Docker Dive — X-Ray Your Images and Kill the Waste
Use dive to inspect every layer of a Docker image, spot wasted megabytes hidden by deleted files, and walk step by step from a 1 GB bloated image down to a tight, efficient build.

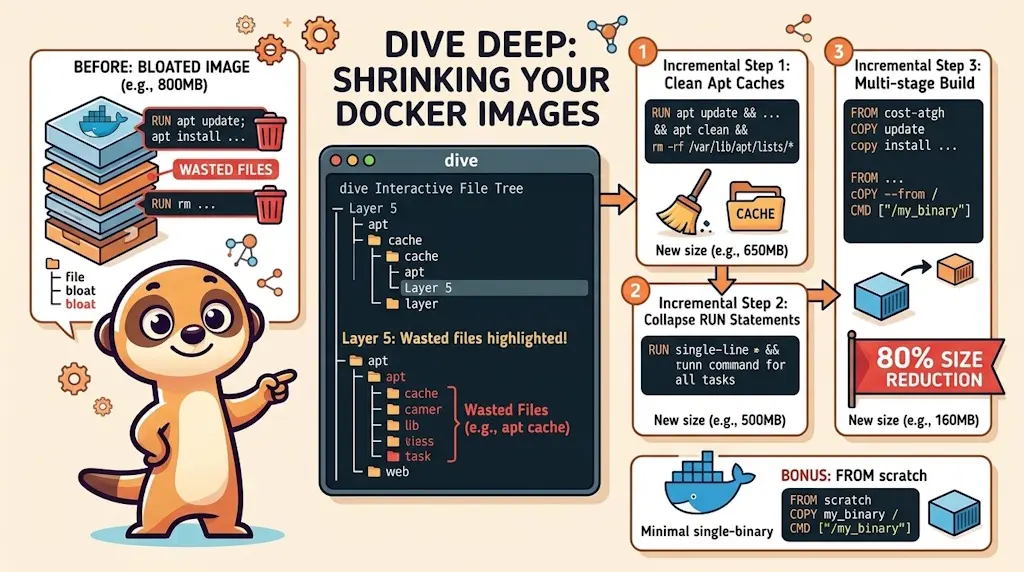
dive is an open-source terminal tool that renders every layer of a Docker image as an interactive file tree, highlighting exactly which files are wasted — present in one layer but deleted in a later one, yet still baked into the final image. This article walks through a deliberately broken Dockerfile, shows how dive exposes the waste, then fixes it in three incremental steps: cleaning apt caches in the same layer, collapsing multiple RUN statements into one, and switching to a multi-stage build that cuts the image by 80%. As a bonus, we push the idea to its logical extreme with FROM scratch — an image containing a single binary and nothing else.
Damn. I just ran docker images and there it was: myapp:latest — 1.19 GB. A Python web app with five dependencies, and somehow it ballooned to over a gigabyte. Something is deeply wrong with that Dockerfile.
The problem with Docker image bloat is that it's invisible until you look for it. Your containers start, your app runs, everything seems fine — and meanwhile you're shipping 400 MB of apt cache and build tools to production on every single deploy.
That's where dive comes in. It's a terminal-based image inspector that lets you navigate the layers of any Docker image, see exactly what each RUN, COPY, and ADD instruction added or removed, and get a cold hard efficiency score at the bottom of the screen. Think of it as an X-ray machine for your images.
What is Dive?
At its core, a Docker image is a stack of read-only layers. Every instruction in your Dockerfile that touches the filesystem creates a new layer. apt-get install — new layer. pip install — new layer. COPY — new layer.
Here's where the trap is: if you install a package in layer 3, then delete its cache in layer 5, the cache data is still inside the image. The deletion only marks the files as "opaque" in the upper layer — the bytes from layer 3 are still there, downloaded by every docker pull.
dive makes this visible. Left panel: the file tree of the selected layer. Right panel: the layer list with sizes. Bottom: your efficiency score and total wasted space.
Keyboard shortcuts inside dive
Press Tab to switch between the layer list and the file tree. Use arrow keys to navigate layers. Space collapses/expands directories in the tree. Files shown in yellow are modified, in red are deleted — those deleted ones are your wasted bytes.
Running Dive — No Installation Needed
You know me very well now; I like to containerize things. And dive has an official Docker image, so there's no reason to install anything on your host:
$ docker run --rm -it -v /var/run/docker.sock:/var/run/docker.sock wagoodman/dive:latest myapp:latest
The -v /var/run/docker.sock:/var/run/docker.sock mount is required: it's how the dive container reaches back into your host Docker daemon to inspect images. If you're not comfortable with that — and it's a legitimate concern — refer to the Docker-out-of-Docker article for the security context around socket mounting.
If you do prefer a local binary, dive is available on Linux, macOS, and Windows:
$ wget -q https://github.com/wagoodman/dive/releases/latest/download/dive_linux_amd64.tar.gz -O - | tar xz dive && sudo mv dive /usr/local/bin/
Either way, the usage is identical: dive <image-name>.
The Patient: A Deliberately Terrible Dockerfile
Let's build something genuinely bad so we have something to analyze. Our app is a tiny Flask API — nothing fancy, just enough to pull in real dependencies:
from flask import Flask, jsonify
app = Flask(__name__)
@app.route("/")def index(): return "Hello from Docker!"
@app.route("/health")def health(): return jsonify({"status": "ok"})
if __name__ == "__main__": app.run(host="0.0.0.0", port=5000)This is a minimal Flask web application that creates two endpoints: a root endpoint that returns a simple text greeting, and a health check endpoint that returns JSON. When run directly, the app starts a web server listening on all network interfaces at port 5000, making it accessible from outside the container.
And the Dockerfile — written with zero regard for image size:
# syntax=docker/dockerfile:1FROM ubuntu:24.04
RUN apt-get updateRUN apt-get install -y \ curl \ wget \ git \ python3 \ python3-pip \ build-essential \ python3-dev \ libssl-dev \ pkg-config
RUN pip3 install flask requests numpy pandas scikit-learn --break-system-packages
RUN mkdir /app
COPY app.py /app/
WORKDIR /app
CMD ["python3", "app.py"]This Dockerfile creates a Docker image based on Ubuntu 24.04 and installs a Python development environment with common tools like curl, git, and several Python packages including Flask and data science libraries. It then copies an app.py file into the container, sets the working directory, and configures the container to run that Python application when started.
Let's build it and see what we're dealing with:
$ docker build -t myapp:bad -f Dockerfile.bad .
[+] Building 142.3s (9/9) FINISHED
$ docker images myapp:bad
REPOSITORY TAG IMAGE ID SIZE myapp bad 3f8c1a9e2b71 1.19GB
1.19 GB. For a five-file Flask app. Let's see exactly why.
The Diagnosis: What Dive Reveals
$ docker run --rm -it -v /var/run/docker.sock:/var/run/docker.sock wagoodman/dive:latest myapp:bad
What you'll see in the interactive TUI is something like this in the right panel (the layer list):
Cmp   Size  Command
     212 MB  FROM ubuntu:24.04
      38 MB  RUN apt-get update
     368 MB  RUN apt-get install -y curl wget git python3...
     184 MB  RUN pip3 install flask requests numpy pandas...
    0.0 B   RUN mkdir /app
    1.2 KB  COPY app.py /app/
The left panel shows the file tree for the selected layer. When you select the apt-get update layer, you'll see /var/lib/apt/lists/ filled with hundreds of megabytes of package index files — and they're still there in every subsequent layer.
For a non-interactive, scriptable result, use the CI mode:
$ CI=true docker run --rm \
    -v /var/run/docker.sock:/var/run/docker.sock \
    wagoodman/dive:latest myapp:bad

  Using default CI config
Image Source: docker://myapp:bad
Fetching image... (this can take a while for large images)
Analyzing image...
  efficiency: 0.6341 (63.41%)
  wastedBytes: 438071296 bytes (438 MB)
  userWastedPercent: 36.59%
Result:FAIL [Total:3] [Passed:0] [Failed:3] [Warn:0] [Skipped:0]
61.89% efficiency. 438 MB wasted. That's brutal, and it's entirely self-inflicted.
What does 'wasted bytes' mean exactly?
Dive counts a file as "wasted" when it exists in a lower layer but is deleted or overwritten in a higher layer. The original bytes from the lower layer are still physically present in the image — they just can't be seen in the running container. Every docker pull downloads them anyway.
Fix #1 — Clean Up the apt Mess in the Same Layer
The first and most common mistake: separating apt-get update from the cleanup. The rule is simple — anything you want to disappear must be deleted in the same RUN instruction.
# syntax=docker/dockerfile:1FROM ubuntu:24.04
RUN apt-get update && \ apt-get install -y \ curl \ wget \ git \ python3 \ python3-pip \ build-essential \ python3-dev \ libssl-dev \ pkg-config && \ apt-get clean && \ rm -rf /var/lib/apt/lists/* /tmp/* /var/tmp/*
RUN pip3 install flask requests numpy pandas scikit-learn --break-system-packages
RUN mkdir /app
COPY app.py /app/
WORKDIR /app
CMD ["python3", "app.py"]This Dockerfile creates a Docker image based on Ubuntu 24.04 and installs a collection of development tools and Python libraries needed to run a Python application. It then copies an app.py file into the container and sets up the environment to run that Python script when the container starts.
The key change is the addition of apt-get clean && rm -rf /var/lib/apt/lists/* /tmp/* /var/tmp/* at the end of the apt install RUN block. This runs inside the same layer, so the cache files are never committed to the image.
$ docker build -t myapp:v2 -f Dockerfile.v2 .
$ docker images myapp:v2
REPOSITORY TAG IMAGE ID SIZE myapp v2 7a4e0f1c9d83 712MB
712 MB instead of 1.19 GB. Nearly 500 MB gone. Let's confirm the improvement with dive:
$ CI=true docker run --rm \
    -v /var/run/docker.sock:/var/run/docker.sock \
    wagoodman/dive:latest myapp:v2

  Using default CI config
Image Source: docker://myapp:v2
Fetching image... (this can take a while for large images)
Analyzing image...
  efficiency: 0.9823 (98.23%)
  wastedBytes: 8192 bytes (8.2 kB)
  userWastedPercent: 1.77%
Result:PASS [Total:3] [Passed:3] [Failed:0] [Warn:0] [Skipped:0]
98.23% efficiency — a massive jump. But we're still at 712 MB for a tiny Flask app. There's more to fix.
Fix #2 — Fewer Layers, Less Overhead
Look at the Dockerfile.bad layer list again. Each separate RUN statement creates its own layer. Even if a layer adds "only" a directory or a couple of kilobytes, every layer has metadata overhead — and more importantly, separating installation from cleanup makes it impossible to keep them in the same layer.
The solution: collapse related operations into a single RUN chain using &&:
# syntax=docker/dockerfile:1FROM ubuntu:24.04
RUN apt-get update && \ apt-get install -y \ curl \ wget \ git \ python3 \ python3-pip \ build-essential \ python3-dev \ libssl-dev \ pkg-config && \ pip3 install flask requests numpy pandas scikit-learn --break-system-packages && \ apt-get clean && \ rm -rf /var/lib/apt/lists/* /tmp/* /var/tmp/* && \ find /usr -name "*.pyc" -delete 2>/dev/null; \ find /usr -name "__pycache__" -type d -exec rm -rf {} + 2>/dev/null; true
RUN mkdir /app
COPY app.py /app/
WORKDIR /app
CMD ["python3", "app.py"]This Dockerfile creates a Docker image based on Ubuntu 24.04 with Python and several development tools installed. It cleans up unnecessary files to keep the image small, then sets up an /app directory, copies in an application file, and configures the container to run that Python application when started.
Beyond the smaller layer count, notice the find commands at the end: they delete all .pyc compiled files and __pycache__ directories that pip creates during installation. Those are pure waste in a production image.
$ docker build -t myapp:v3 -f Dockerfile.v3 .
$ docker images myapp
REPOSITORY TAG IMAGE ID SIZE myapp bad 3f8c1a9e2b71 1.19GB myapp v2 7a4e0f1c9d83 712MB myapp v3 2b9d4e7f1c05 689MB
The gap between v2 and v3 is modest here — about 23 MB. The real value of collapsing RUN statements is clarity and correctness: you can no longer accidentally put cleanup in a different layer.
But 689 MB is still massive for a Flask app
We still have build-essential, python3-dev, libssl-dev, pkg-config, wget, and git inside the production image. Those are build-time tools — they were needed to compile some pip packages, but they have no business being in the image that runs in production. This is where the single-stage approach hits its ceiling.
Fix #3 — The Multi-stage Build
The core idea of a multi-stage build is simple: use one FROM to build, use another FROM to run. The builder stage can be as fat as it wants — tools, caches, compilers — because only the final stage gets shipped.
# syntax=docker/dockerfile:1
FROM python:3.12 AS builder
WORKDIR /build
COPY requirements.txt .
RUN pip install --no-cache-dir -r requirements.txt --target ./packages
FROM python:3.12-slim AS production
WORKDIR /app
COPY --from=builder /build/packages ./packages
ENV PYTHONPATH=/app/packages
COPY app.py .
CMD ["python3", "app.py"]This is a multi-stage Docker build that creates a lean production image by separating the build process from the runtime. The first stage installs Python dependencies into a folder, and the second stage copies only those dependencies into a slim Python image along with the application code, reducing the final image size.
What's happening here:
FROM python:3.12 AS builder— full Python image, used only to install packagespip install --target ./packages— installs everything into a local directory (not system-wide)FROM python:3.12-slim AS production— the slim base image, about 130 MBCOPY --from=builder /build/packages ./packages— only the installed packages cross the boundary; no build tools, no pip cache, no apt lists
$ docker build -t myapp:multistage -f Dockerfile.multistage .
$ docker images myapp
REPOSITORY TAG IMAGE ID SIZE myapp bad 3f8c1a9e2b71 1.19GB myapp v2 7a4e0f1c9d83 712MB myapp v3 2b9d4e7f1c05 689MB myapp multistage 9c3a1f8e4b22 247MB
247 MB — an 80% reduction from our starting point. And the dive score:
$ CI=true docker run --rm \
    -v /var/run/docker.sock:/var/run/docker.sock \
    wagoodman/dive:latest myapp:multistage

  Using default CI config
Image Source: docker://myapp:multistage
Fetching image... (this can take a while for large images)
Analyzing image...
  efficiency: 0.9971 (99.71%)
  wastedBytes: 4096 bytes (4.1 kB)
  userWastedPercent: 0.29%
Result:PASS [Total:3] [Passed:3] [Failed:0] [Warn:0] [Skipped:0]
99.71% efficiency. The remaining 4 KB of "wasted" bytes are background noise — Docker layer metadata that can't be avoided.
Pick the right slim base
python:3.12-slim is the sweet spot for most Python apps. python:3.12-alpine is even smaller (about 20 MB) but uses musl libc instead of glibc, which can cause compatibility issues with binary wheels like numpy or pandas. Test before committing to Alpine for a data-heavy stack.
Multi-stage builds are also the right approach for compiled languages. If you're building a Go, Rust, or C app, the builder stage contains the entire compiler toolchain, and only the final binary ends up in the production stage. Which brings us to the bonus section.
Bonus — FROM scratch: The Absolute Minimum
FROM scratch is a special Docker keyword — it's not an image name, it's a signal to the Docker builder that the new image should start completely empty. No shell, no package manager, no libc, no anything. Just the files you explicitly COPY into it.
This only works if your application is a self-contained binary with zero external dependencies. Statically compiled Go is the poster child:
# syntax=docker/dockerfile:1
FROM golang:1.22-alpine AS builder
WORKDIR /build
COPY main.go .
RUN CGO_ENABLED=0 GOOS=linux go build -a -ldflags '-w -s' -o server .
FROM scratch
COPY --from=builder /build/server /server
EXPOSE 8080
ENTRYPOINT ["/server"]This Dockerfile builds a Go application in two stages to create a tiny, efficient container. First, it compiles the Go code into a standalone binary with no external dependencies, then it copies just that binary into an almost-empty container, resulting in a final image that's just a few megabytes instead of hundreds.
The -ldflags '-w -s' flags strip debug information and the symbol table, shaving a few more MB off the binary.
$ docker build -t myserver:scratch -f Dockerfile.scratch .
$ docker images myserver:scratch
REPOSITORY TAG IMAGE ID SIZE myserver scratch 1a2b3c4d5e6f 6.88MB
6.88 MB. Less than 7 MB for a production HTTP server. And dive?
$ CI=true docker run --rm \
    -v /var/run/docker.sock:/var/run/docker.sock \
    wagoodman/dive:latest myserver:scratch

  Using default CI config
Image Source: docker://myserver:scratch
Fetching image... (this can take a while for large images)
Analyzing image...
  efficiency: 1.0000 (100.00%)
  wastedBytes: 0 bytes (0 B)
  userWastedPercent: 0.00%
Result:PASS [Total:3] [Passed:3] [Failed:0] [Warn:0] [Skipped:0]
100.00% efficiency. 0 bytes wasted. There is literally nowhere left to improve.
FROM scratch isn't always practical
A scratch image has no shell at all — docker exec mycontainer sh will fail. No shell means no shell scripts in your entrypoint, no ping, no curl for health checks from inside the container. For debugging, consider gcr.io/distroless/static instead: it's nearly as small as scratch but includes a handful of POSIX tools and is maintained by Google for security patches.
Dive as a CI Quality Gate
Manually running dive is useful during development, but the real power is in the --ci mode — it reads a configuration file and fails with a non-zero exit code if your image doesn't meet the thresholds. Plug this directly into your pipeline.
Create a .dive-ci.yaml at the root of your project:
rules: lowestEfficiency: 0.95 highestWastedBytes: "20mb" highestUserWastedPercent: 0.05This is a configuration section that defines performance rules or thresholds for some kind of efficiency monitoring system. It sets limits on how inefficient something can be, how much data can be wasted, and what percentage of user resources can be lost before triggering an alert or failure.
Then add a step in your CI pipeline:
$ DIVE_CONFIG=.dive-ci.yaml CI=true docker run --rm

-v /var/run/docker.sock:/var/run/docker.sock

-v $(pwd)/.dive-ci.yaml:/.dive-ci.yaml

-e DIVE_CONFIG=/.dive-ci.yaml

wagoodman/dive:latest myapp:latest
If the image efficiency drops below 95% or wasted bytes exceed 20 MB, the step fails and the deploy never happens. So cool no?
What thresholds make sense?
lowestEfficiency: 0.95 and highestWastedBytes: "20mb" are sensible defaults for a first pass. Adjust highestWastedBytes upward if your image legitimately includes large static assets (fonts, models, datasets) that can't be cleanly separated.
Claude Code — Automate the Entire Loop
Everything we've done manually — run dive, read the JSON, spot the wasted layers, decide what to fix, edit the Dockerfile, rebuild, re-run — is a repeatable loop. If you use Claude Code, you can drive the whole thing with a single slash command:
/docker-dive-optimization
It auto-discovers the project's main Dockerfile (or accepts a path or image tag as argument), builds the image, runs dive in JSON mode, and classifies every finding into three buckets — mapping directly to the patterns we've been applying by hand in this article.
Bucket A — fix now: Mechanical waste that's unambiguously wrong. apt-get clean sitting in a separate RUN from the install, --no-cache missing from an apk add, a cache directory not cleaned in the same layer that created it. Claude applies the Dockerfile edit, rebuilds, and re-runs dive to verify the gain before reporting success.
Bucket B — propose and wait: Findings where the right answer requires a judgment call. Switching from python:3.12 to python:3.12-slim in a production stage. Introducing a multi-stage build where there isn't one. Replacing a 300 MB runtime that's only there for a single CLI call with a standalone binary. Claude presents the layer evidence and the trade-off, then waits for your decision before touching anything.
Bucket C — TODOs: Everything that needs research before it can be touched. Filed as numbered items in .todos/ so they don't get lost between sessions.
Target any image or Dockerfile
The command defaults to the project's own Dockerfile, but it accepts a path or an image tag directly:
/docker-dive-optimization myapp:latest
/docker-dive-optimization ./services/api/Dockerfile
You can copy the command file into any project's .claude/commands/ directory — it auto-discovers whether to use docker compose build or a plain docker build, so no project-specific wiring is needed.
The three-bucket split mirrors the judgment calls in this article. Cleaning apt cache in the same layer is Bucket A — no discussion needed, just merge and verify. Switching to a multi-stage build is Bucket B — real trade-offs to review first. Replacing a niche binary you've never audited is Bucket C — research before touching. Same analysis we did manually, automated.
To prove the point: I ran /docker-dive-optimization on the very blog you're reading right now. The devcontainer image had ballooned to 2.5 GB, scored 89.95% efficiency, and carried 433 MB of wasted bytes — mostly inherited from a heavy mcr.microsoft.com/devcontainers/javascript-node:20-bookworm base that silently baked in oh-my-zsh, subversion, and a full C/C++ build toolchain nobody had asked for. Bucket A caught a redundant chown -R that forced Docker's overlay FS to copy 1 410 files into a useless 21 MB layer. Bucket B flagged the base image and 996 MB of node_modules baked into every build.
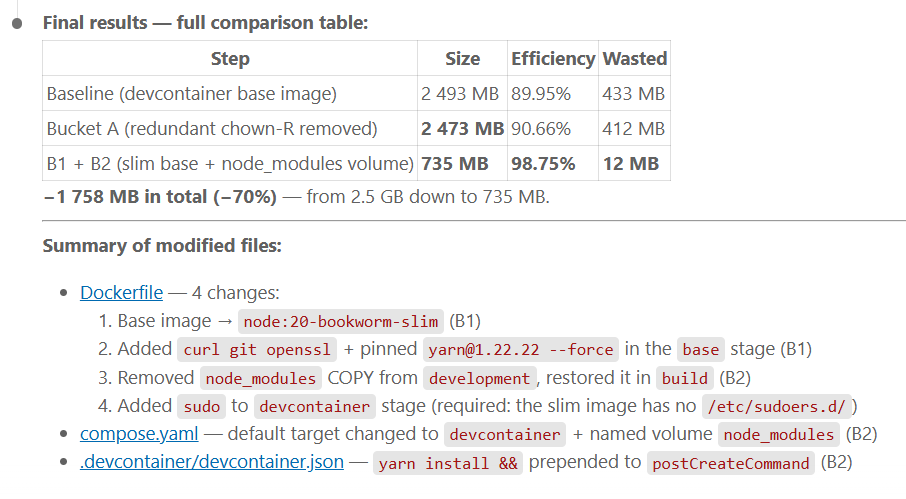
From 2.5 GB down to 735 MB — a 70% reduction, efficiency up from 89.95% to 98.75%. The base image swap from the devcontainer-specific image to node:20-bookworm-slim alone saved over a gigabyte. Moving node_modules to a named Docker volume at runtime recovered another 996 MB. The whole session — including the rebuild and the dive re-run to verify — took under fifteen minutes.
Putting It All Together
Here's the progression we went through:
The four-step journey
- Start (Dockerfile.bad) — 1.19 GB, 61% efficiency: Separate
RUN apt-get update, no cache cleanup, build tools in the final image. - v2 — 712 MB, 98% efficiency: Clean
aptcache and lists in the sameRUNinstruction that installs them. - v3 — 689 MB, 98% efficiency: Collapse all installation steps into one
RUNchain, delete.pycfiles. - Multi-stage — 247 MB, 99.7% efficiency: Use a separate builder stage; only the installed packages cross into the slim production image.
- Bonus (FROM scratch) — 6.88 MB, 100% efficiency: Statically compiled binary, no base image at all.
Conclusion
There's a version of this story where you ship a 1.2 GB image to production because it works — and you never look back. I've been there. The app runs, the team ships, nobody complains. Until you look at your registry storage bill, or your cold-start time on a serverless platform, or the pull time on a CI runner with a fresh cache.
dive makes the invisible visible. Once you see 438 MB of wasted bytes labeled in red, you can't unsee it. The fixes aren't exotic — clean up in the same layer, combine your RUN statements, use multi-stage builds. These are things every Docker practitioner should know by heart, and now you have a tool that will tell you immediately if you've forgotten one.
For more context on writing production-grade Dockerfiles, One Docker Image for Production and Devcontainers covers the single-source-of-truth approach where one Dockerfile handles both environments cleanly. And if you're looking for another terminal-first Docker tool, there's a companion article on lazydocker — a full TUI dashboard for managing your containers and logs without leaving the terminal.
Related posts

Preview Your Local Docusaurus Site on Your Phone
November 16, 2026

ai-explain: ELI5 for Scripts and Errors, Right in Your Terminal
November 12, 2026
DuckDB - Query JSON and CSV Files With SQL, No Database Required
November 9, 2026

Docker Build Cache Ate 180 GB — Here's How to Get Them Back
November 2, 2026

Open WebUI — Beyond the Chat: Models, RAG, Tools and API Keys
October 26, 2026