Transform an Oracle DB as OpenData using Oracle REST Data Services
Set up Oracle REST Data Services (ORDS) in Docker to transform your Oracle DB into OpenData with a powerful REST API. Includes filtering and pagination.

This article is over a year old but was reviewed on July 30, 2026 — the content is still accurate.
This article is part of the Running Oracle Database Server as a Docker container series:
- Running Oracle Database Server as a Docker container
- Transform an Oracle DB as OpenData using Oracle REST Data Services
- Accessing an Oracle database using .Net, NodeJS, PHP and Python

This tutorial demonstrates how to transform your Oracle Database into a powerful RESTful API using Oracle REST Data Services (ORDS) in Docker. Building on a previously established Oracle DB container, this guide walks you through deploying the ORDS container, linking it to your database, and configuring schemas for REST access. You'll learn how to REST-enable specific database tables or views using Oracle SQL Developer and then access your data via auto-generated OpenAPI endpoints. The article also covers how to use URL parameters for advanced querying, including filtering, sorting, and pagination.
In a previous article (Running Oracle Database Server as a Docker container), we've created a Docker container called oracle-db where a Human Resources database is running.
In this article we'll partially expose the database on the web using OpenAPI so, in short, we'll allow authorized people to access, f.i., http://oursite/api/employees to get the list of all employees. That generated OpenAPI schema can be linted, by the way; see Validate your OpenAPI schema against the Belgif REST standards.
Exactly the same way we've done with PostgREST (see my Don't query your PostgreSQL db anymore, prefer PostgREST) but, this time, with an Oracle database.
And the magic will happen thanks Oracle REST Data Services aka ords.
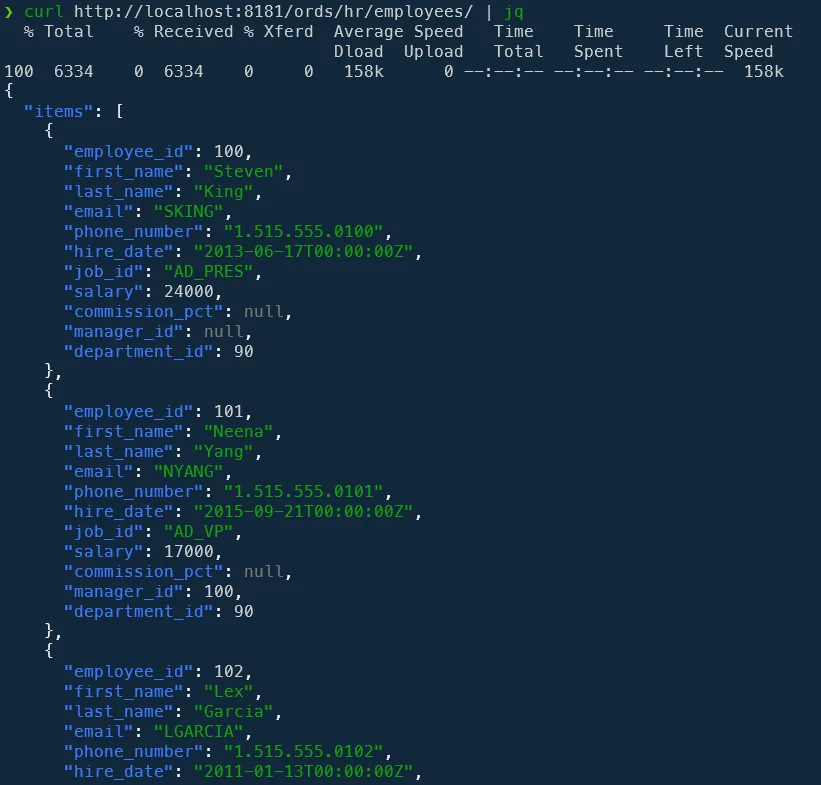
Here's where we're headed: the same Oracle table, now reachable as plain JSON over HTTP.
In the previous article (Running Oracle Database Server as a Docker container), we've created a Docker container called oracle-db where a Human Resources database is running.
Please read that article and follow steps so, before continuing here, you've a running Docker container as described below.
Some prerequisites
Before you begin make sure...
- You've a running Docker container called
oracle-db - The container is thus running on your
localhost - The port number to access your database is
1521 - The credentials to use is
SYS(orSYSTEM) andadminfor the password - The container contains a database called
ORCLPDB1(also called service name) which is the Human Resources sample of Oracle (refer to the mentioned article) and - Our database
oracle-dbis running on a network calledoracle
Download a Docker image for Oracle REST Data Services
Unlike the Docker Oracle Database Server image, we don't need any credentials for downloading the official Oracle ORDS image.
Simply run docker pull container-registry.oracle.com/database/ords-developer:latest to get it. It's a 2.2 GB file size image.
Create an Oracle ORDS container
We'll need to proceed step-by-step.
Create a volume for the ORDS configuration
ORDS requires two folders, one for what it calls its secrets and one for its configuration files. Let's use a Docker self managed volume for the configuration files so please run docker volume create ords_config in your console.
Configure the connection string
In order to be able to start ORDS, the official doc states we need to create a file called conn_string.txt with our connection string. In our use case, here is the file we need to create:
Information
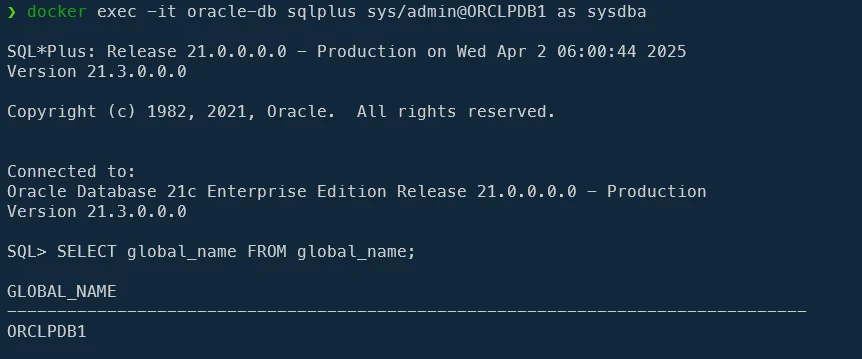
If you've a doubt about which value has to be used as service_name; start a sqlplus console (docker exec -it oracle-db sqlplus sys/admin@ ORCLPDB1 as sysdba) and run SELECT global_name FROM global_name; in SQL*Plus.
The official ORDS Docker image comes with APEX (which is the abbreviation for Oracle Application Express).
Based on the documentation, Oracle Application Express (APEX) is a low-code development platform that enables you to build scalable, secure enterprise apps, with world-class features, that can be deployed anywhere. See https://apex.oracle.com/ for more information.
For our needs, we just want ORDS; we don't need APEX. For this purpose, we'll initialise the IGNORE_APEX OS variable to TRUE.
Create the container
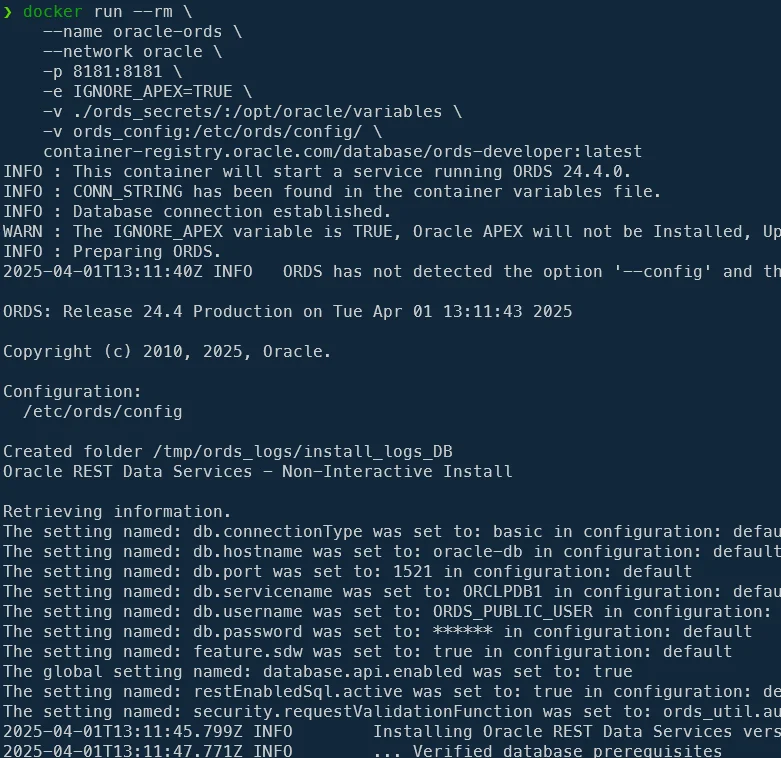
To create our ORDS (without APEX) container; please run:
The `docker run` explained
-d: the ORDS will run as a daemon service,--rm: once the service is terminated, the Docker container will be removed,--network: we should run ORDS on the same network than our database; i.e.oracle-p 8181:8181: we've to map the intern port8181used by ORDS on our host and, for simplicity, we'll expose the port8181also,-e IGNORE_APEX=TRUE: as mentioned, we want ORDS; not APEX so tells Docker to not install APEX,-v ./ords_secrets/:/opt/oracle/variables: as stated in the documentation, we need to provide a file calledconn_string.txtand to map that file in the/opt/oracle/variablesinside the container and, finally,-v ords_config:/etc/ords/config/: we'll use a self-managed Docker volume to keep the configuration files of ORDS.
That command will add the ORDS layer in your database (based on the connection string; which is ORCLPDB1 for us).
On subsequent runs, we shouldn't provide connection string anymore.
Once ORDS has been installed as done here above, if you need to rerun the ORDS container, we should no more provide the secret so we have to remove the -v ./ords_secrets/:/opt/oracle/variables flag.
If you need to run the container once more; here is the command line:
We need to create our user in our database
Before being able to use ORDS and access objects using an HTTP request, we should create a new user in our database and give it some rights.
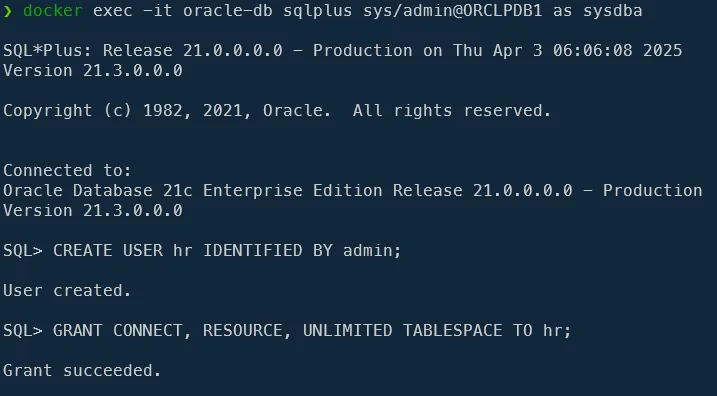
Run docker exec -it oracle-db sqlplus sys/admin@ ORCLPDB1 as sysdba to start a SQL*Plus console and connect to the PDB database.
We need to create a user for ORDS; let's say user hr. Please run this statement: CREATE USER hr IDENTIFIED BY admin;
Then grant permissions: GRANT CONNECT, RESOURCE, UNLIMITED TABLESPACE TO hr;
Once created, we need to exit the console (started using the sys user) and reconnect with our user.
Type thus exit to quit the sqlplus console and run docker exec -it oracle-db sqlplus hr/admin@ ORCLPDB1.
Once back in the sqlplus console (logged in as user hr), please run : EXECUTE ORDS.ENABLE_SCHEMA;.
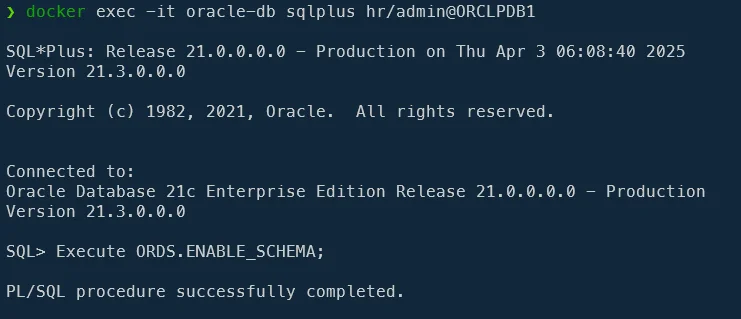
(read ORDS 101: Enabling Oracle Schemas for HTTPS/REST if you want deeper info)
Caution
If you get an error at this level, it means ORDS wasn't installed in your database. Please read again the Create the container chapter.
Start ORDS web interface
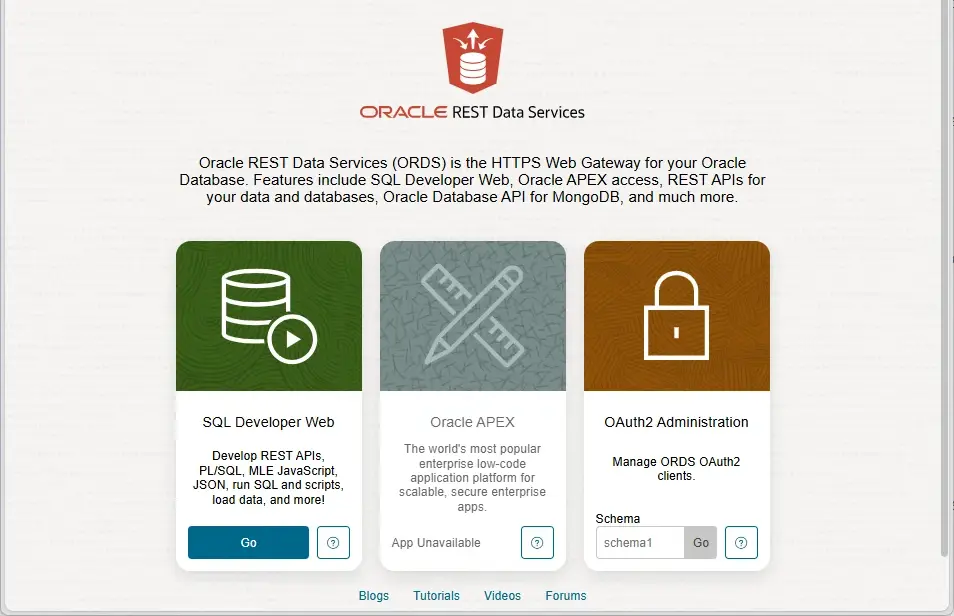
At this stage, we've installed ORDS, configured our database to use it and we've created a user called hr. We can surf to http://localhost: 8181/ords and connect to the ORDS dashboard:
Note
APEX wasn't installed and thus disabled
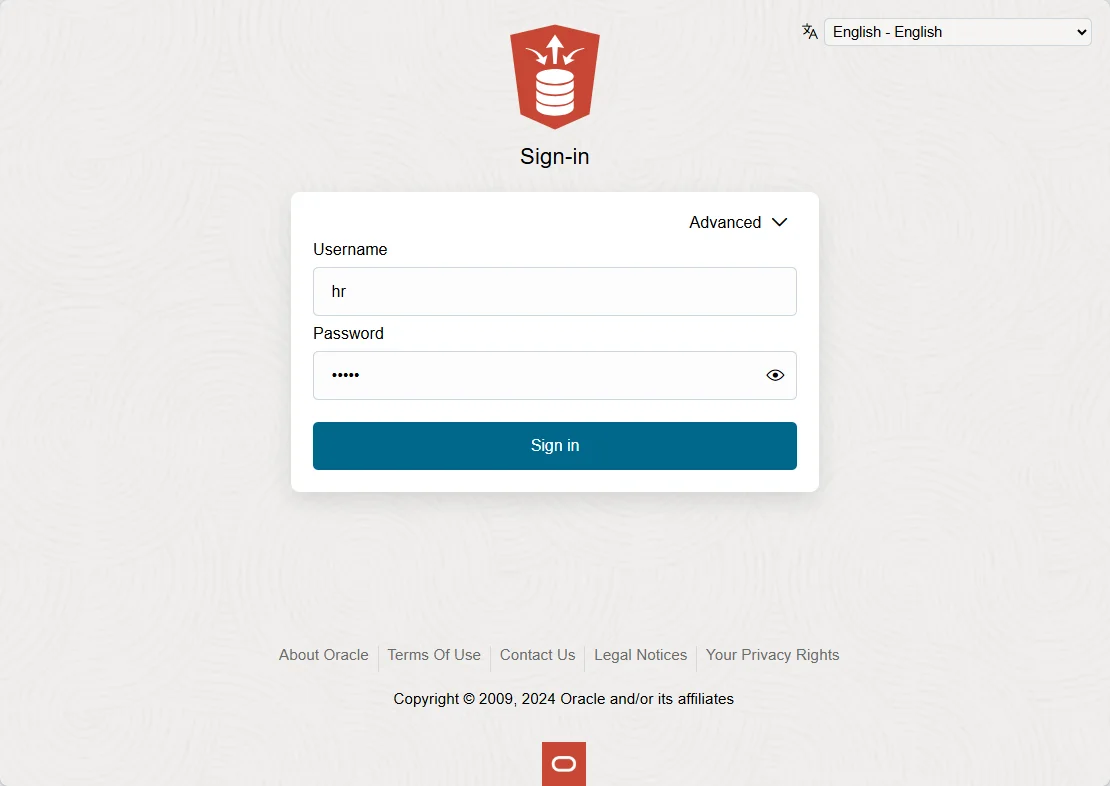
Use hr and admin, our custom user, for the login page:
Right now, we can ask ORDS to see the list of objects already accessible; simply surf to http://localhost: 8181/ords/hr/open-api-catalog/ to get ... an empty list.
This is normal since we should specify which object (a table, a view, a stored procedure) can be accessible or not. But, yes, by accessing http://localhost: 8181/ords/hr/open-api-catalog/ and getting a JSON answer; we can confirm ORDS is running fine.
The http://localhost: 8181/ords/hr/open-api-catalog/ page is called the Schema Metadata (documentation).
REST enable database objects
So, we need to enable each object one by one. The easier way is to use Oracle SQL Developer. If you don't have it, just download it for free.
Create a new connection with these settings:
- Name
Human Resources - ORDS- Username
hr- Role
default- Password
admin- Hostname
127.0.0.1- Port
1521- Service name
orclpdb1
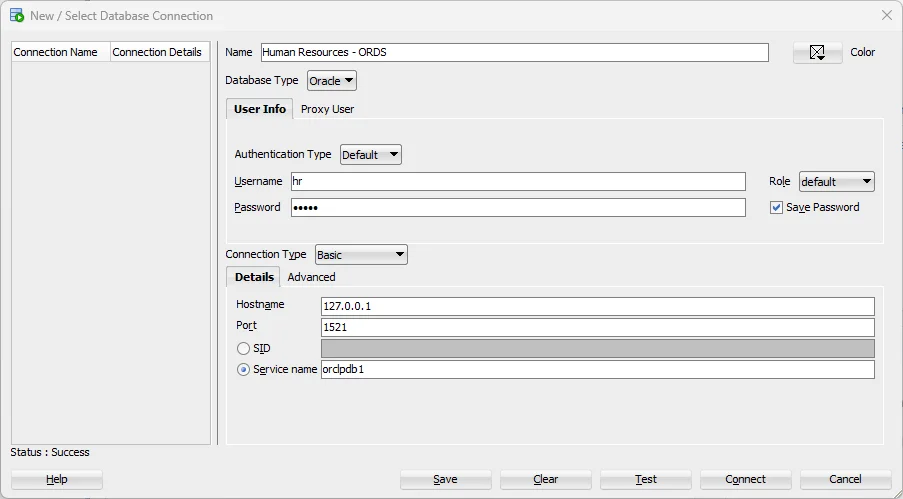
Click on the Save button then on the Connect one.
Just after the login, by clicking on the list of tables or views, there is nothing.
This is normal, we've just created our hr user and the associated hr schema and we don't have objects in that schema.

Adding an employee view in our hr schema
Let's connect to our database and display the list of employees: please run docker exec -it oracle-db sqlplus sys/admin@ ORCLPDB1 as sysdba; then SELECT EMPLOYEE_ID, FIRST_NAME, LAST_NAME, EMAIL FROM SYSTEM.EMPLOYEES;.
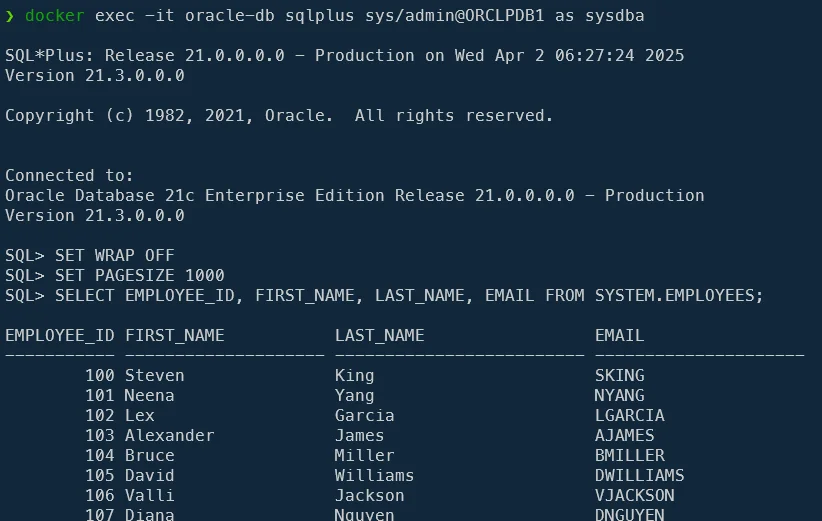
Now, we're sure we've access to the table, let's create a view in our hr schema to display the table content:
- run
GRANT SELECT ON SYSTEM.EMPLOYEES TO hr;and - create the view by running
CREATE VIEW HR.EMPLOYEES AS SELECT EMPLOYEE_ID, FIRST_NAME, LAST_NAME, EMAIL, PHONE_NUMBER, HIRE_DATE, JOB_ID, SALARY, COMMISSION_PCT, MANAGER_ID, DEPARTMENT_ID FROM SYSTEM.EMPLOYEES;.
If we wish to check our view:
- Type
exitin the sqlplus console since you're connected assys, - In the Linux console, run
docker exec -itoracle-dbsqlplus hr/admin@ORCLPDB1to connect ashrthen - run
SELECT * FROM HR.EMPLOYEES;.
As you can see, you'll obtain the list of employees.
So, at this stage, we've added a view called employees in our hr schema and it works.
Don't use SELECT * FROM
It's a very bad practice to use SELECT * FROM ..., always make sure to select the needed fields.
Go back to the Oracle SQL Developer interface, right-click on the Views node and choose Refresh.
You'll see the added view:
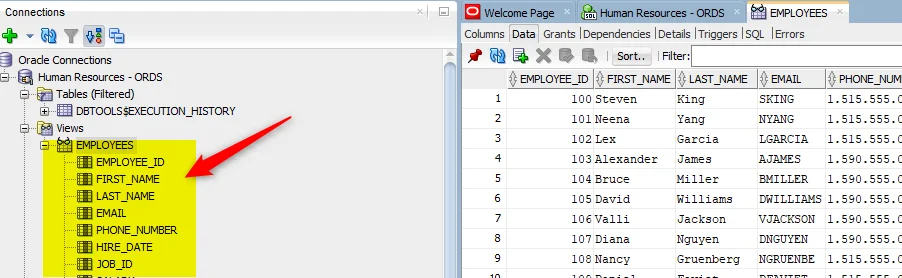
Right-click on the EMPLOYEES view and click on Enable REST Service....
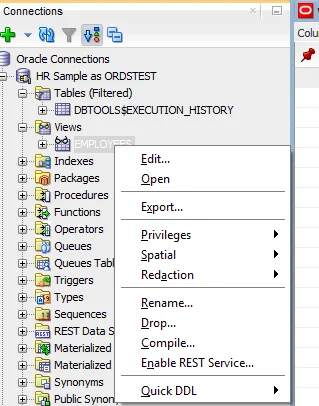
Make sure to check the Enable object checkbox, give a name to your object and, for this small tutorial, uncheck the Authorization required checkbox.
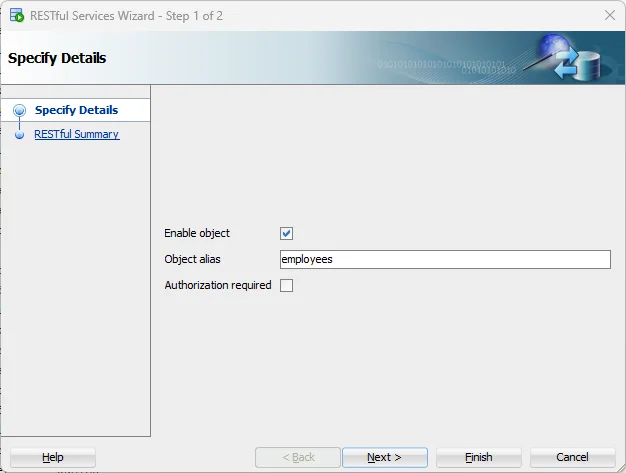
Click on the Next button and just pay attention on the SQL tab:
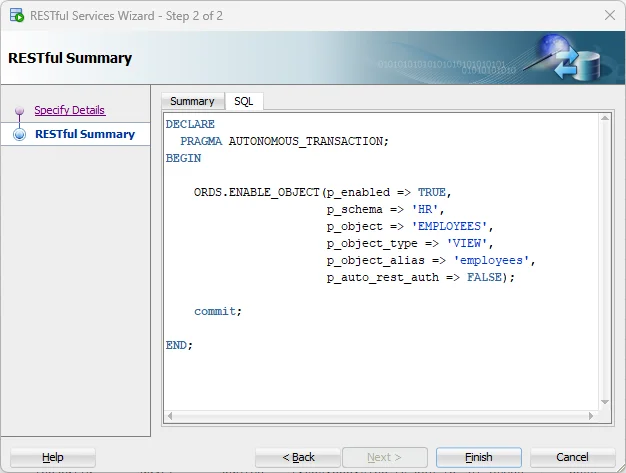
You'll get the DDL to run in a console if you want to REST enable the table by code; not by using the GUI.
The last part is to jump now in the ORDS website (http://localhost: 8181/ords/hr/_sdw/?nav=rest-workshop). Please refresh the page and you'll now see you've one object in the AUTOREST area:
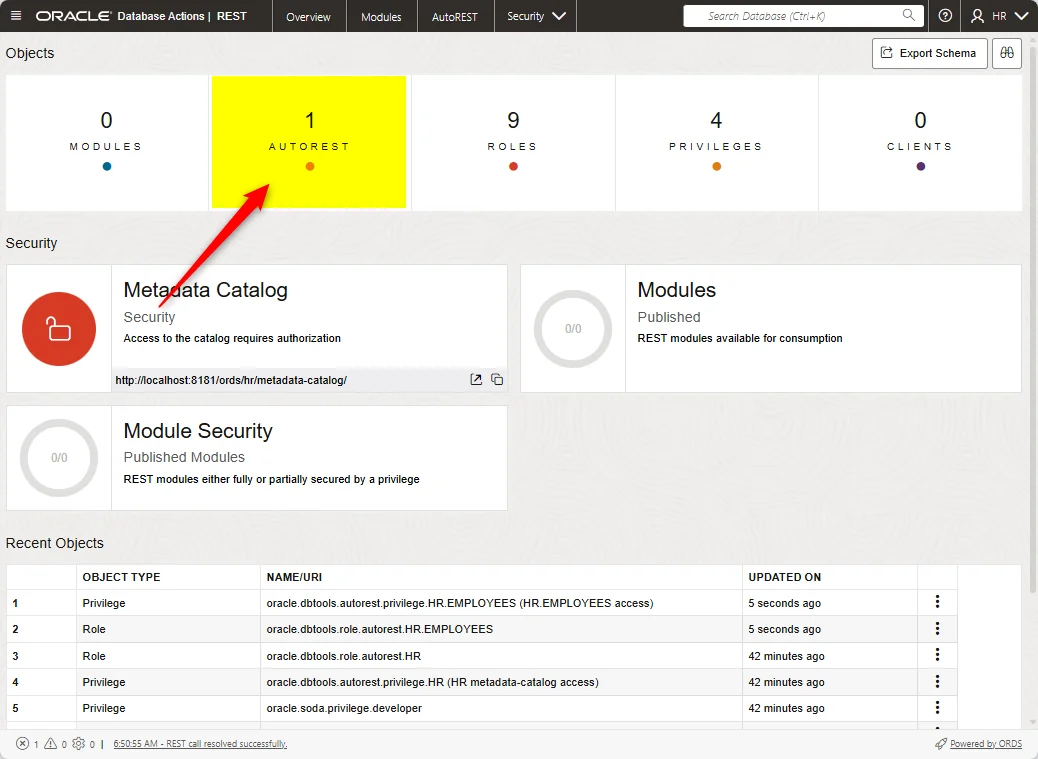
Click on that area and you'll see the object (which is a view) we'll REST enabled previously:
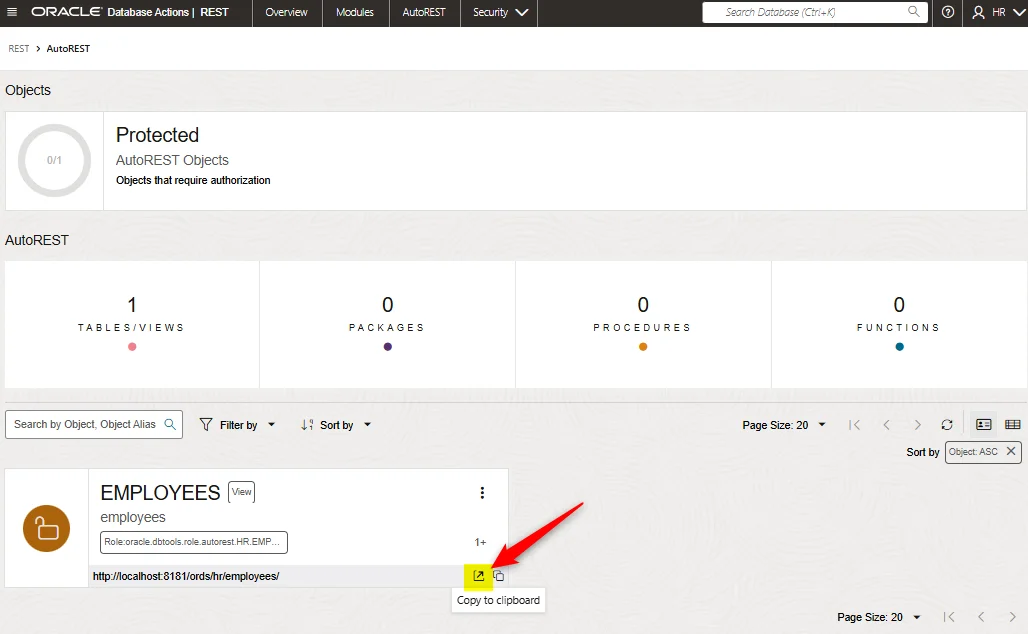
Look at the Open in a new tab icon on the image above. Click on that button and you'll get your records as a JSON response:
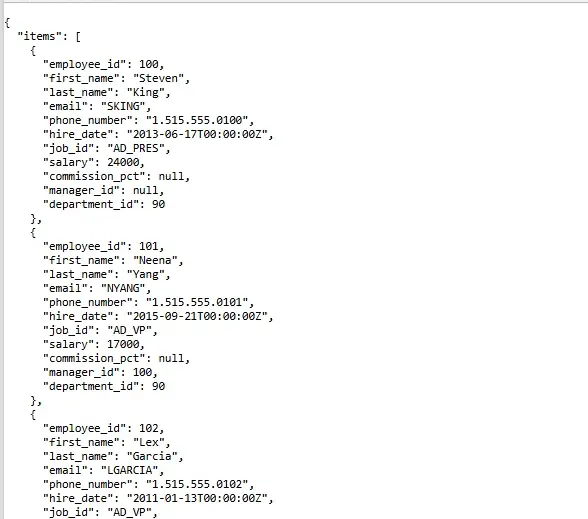
The http://localhost: 8181/ords/hr/employees/ is called the Object Data (documentation)
Since it's nothing more than a URL, you can use it with any tools you want, f.i. using curl. The command to run is curl http://localhost:8181/ords/hr/employees/ | jq — the same output already teased at the top of this article.
And what about the OpenAPI catalog
Please go back to your browser and access http://localhost: 8181/ords/hr/open-api-catalog/ again.
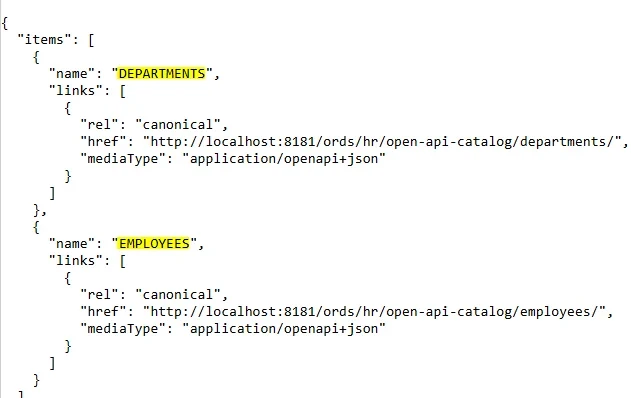
This time, you'll see that you've one item called EMPLOYEES.
If you want to get the description of that resource, the page http://localhost: 8181/ords/hr/open-api-catalog/employees/ can be visited to get f.i. the list of fields exposed.
That page is called the Object Metadata (documentation)
Let's create a new view for the fun:
- Run
docker exec -itoracle-dbsqlplus sys/admin@ORCLPDB1as sysdbathen - In the SQL console, please run
GRANT SELECT ON SYSTEM.DEPARTMENTS TO HR;followed by CREATE VIEW HR.DEPARTMENTS AS SELECT DEPARTMENT_ID, DEPARTMENT_NAME, MANAGER_ID, LOCATION_ID FROM SYSTEM.DEPARTMENTS;and- Jump in the Oracle SQL Developer interface, refresh the list of view, right-click on the new
departmentsview
Now, by refreshing http://localhost: 8181/ords/hr/open-api-catalog/ again, you'll see you've now a second item called DEPARTMENTS.
Working with REST
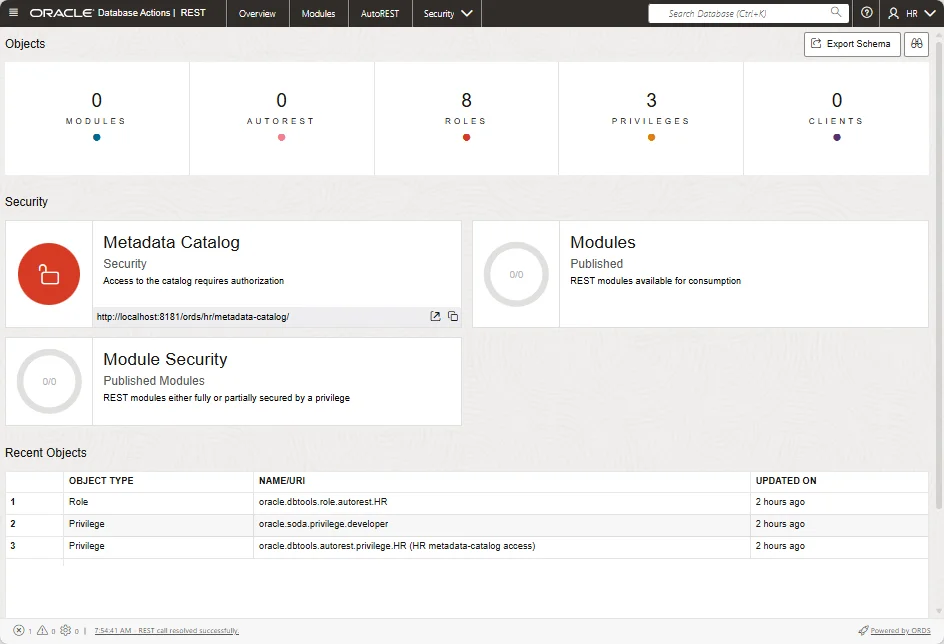
Go to http://localhost: 8181/ords/hr/_sdw/?nav=rest-workshop or, from the hamburger menu, click on the REST item.
Using Paging, Filtering and Ordering Options on the Querystring (optional — skip if the default endpoint is enough)
When accessing to an endpoint (like http://localhost: 8181/ords/hr/employees/), we can manipulate the URL to add parameters like paging, filtering or ordering options.
These are called JSON QBE for JSON query-by-example.
See the official documentation: https://docs.oracle.com/en/database/oracle/simple-oracle-document-access/adsdi/overview-soda-filter-specifications-qbes.html
Pagination
Unless specifically configured, ORDS will use pagination, i.e. it will limit the list of records to 25 rows.
So, if you've more than 25 employees, the endpoint http://localhost: 8181/ords/hr/employees/ will only return the first 25 of them.
By accessing a "full" page like http://localhost: 8181/ords/hr/employees/, we'll in fact just receive a specific number of records (as configured in ORDS). At the end of the JSON answer, there will be navigation links:
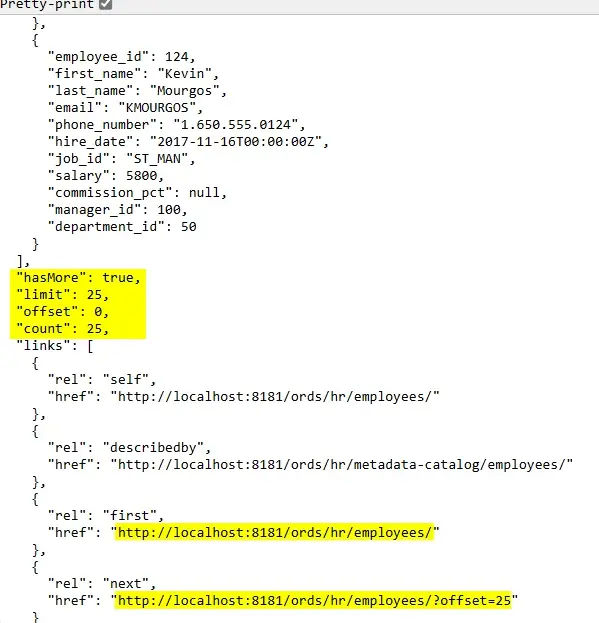
As you can see on the image; the JSON answer will provide a list of records (in an items so-called array) then a few properties like hasMore (true/false), limit i.e. the number of rows in each call, offset is the "page" (when 0 the first 25 rows are displayed, when 1 then rows 26 till 50, ...), count is the number of rows in the answer.
So, while hasMore is true, there are still records to obtain with a subsequent request.
There are two parameters to control paging of result data: offset and limit.
So we can run multiple requests like http://localhost: 8181/ords/hr/employees/?offset=25, http://localhost: 8181/ords/hr/employees/?offset=50 and so on.
We can define the number of records by page using the limit querystring parameter: http://localhost: 8181/ords/hr/employees/?limit=100.
Note
The official documentation strongly discourages removing the limit (and thus asking for all records at once). For this reason there is no way to remove the limit. If you really wish to get the full list, try with a very high number like limit=1000000 (one million).
Filtering
The general syntax is using /?q={"column":{"$eq":"value"}}.
Greater than
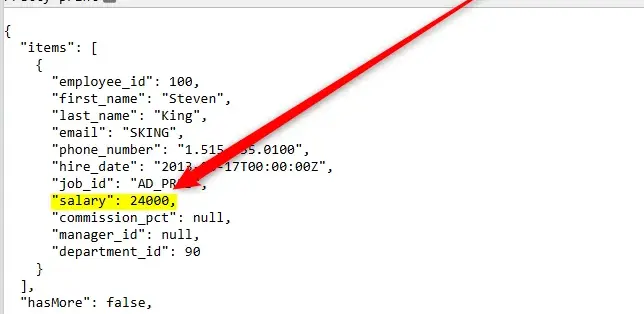
For instance, who earn more than 20,000€ as salary? http://localhost: 8181/ords/hr/employees/?q={"salary":{"$gt":20000}} will apply a filter on salary > 20000.
Equal
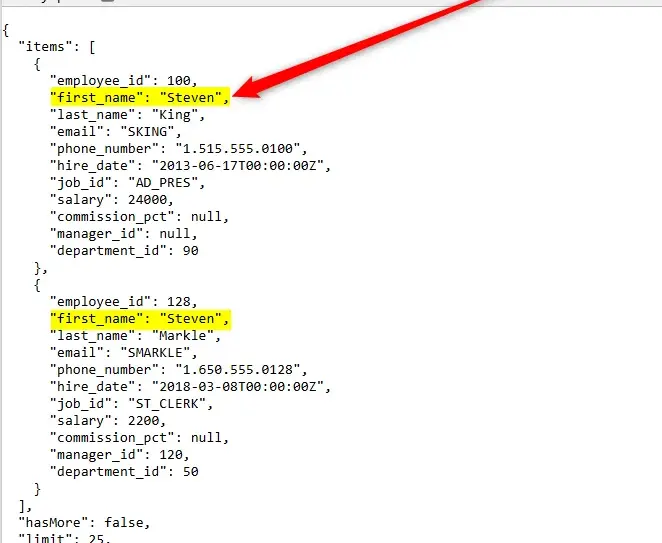
To find all employees called Steven: http://localhost: 8181/ords/hr/employees/?q={"first_name":{"$eq":"Steven"}}
Instring / contains / like
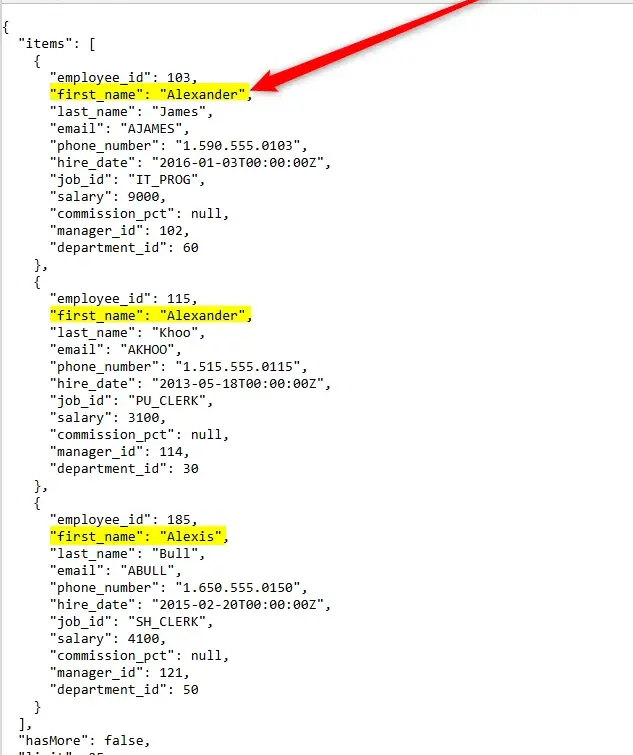
Employees with the pattern alex in their first name: http://localhost: 8181/ords/hr/employees/?q={"first_name":{"$instr":"alex"}} (will match f.i. Alexander or Alexis).
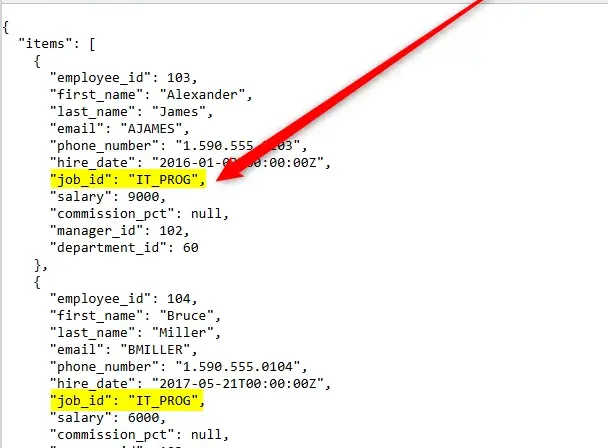
Who is working as ICT? Here the like operator will be the one to use: http://localhost: 8181/ords/hr/employees/?q={"job_id":{"$like":"IT_%"}} (IT_% means starts with)
Complex filtering
We can also use AND like in this example: http://localhost: 8181/ords/hr/employees/?q={"first_name":{"$instr":"alex"},"salary":{"$gt":5000}} i.e. retrieve all people having alex in their first name and earning more than 5,000€
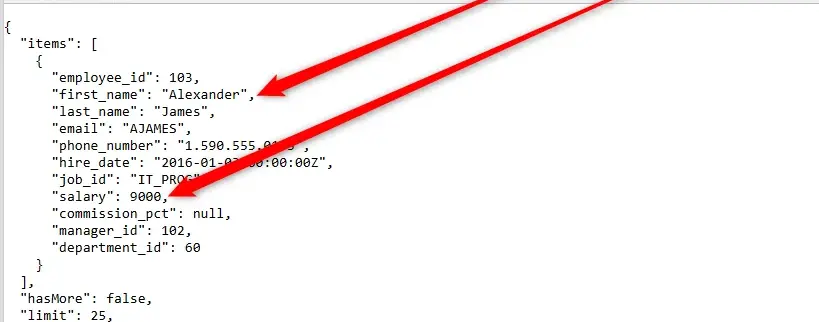
Using complex filtering
The following URL http://localhost: 8181/ords/hr/employees/?q={"job_id":{"$like":"%CLERK"},"salary":{"$gt":2899},"hire_date":{"$gt":{"$date":"2016-12-31T12:59:59Z"}}} will return every employee who:
- working as clerk (
job_idending by theCLERKword), - having a salary greater than 2,899€ and
- hired as from 1st January 2017.
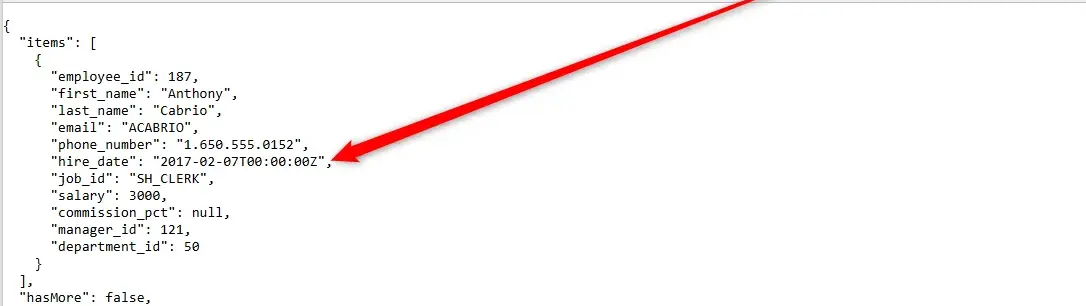
Sorting
The general syntax is using /?q={"$orderby":{"fieldname1":"asc","fieldname2":"desc"}}.
To sort on the first name desc and, then based on the salary (the higher first): http://localhost: 8181/ords/hr/employees/?q={"$orderby":{"first_name":"desc","salary":"desc"}}.
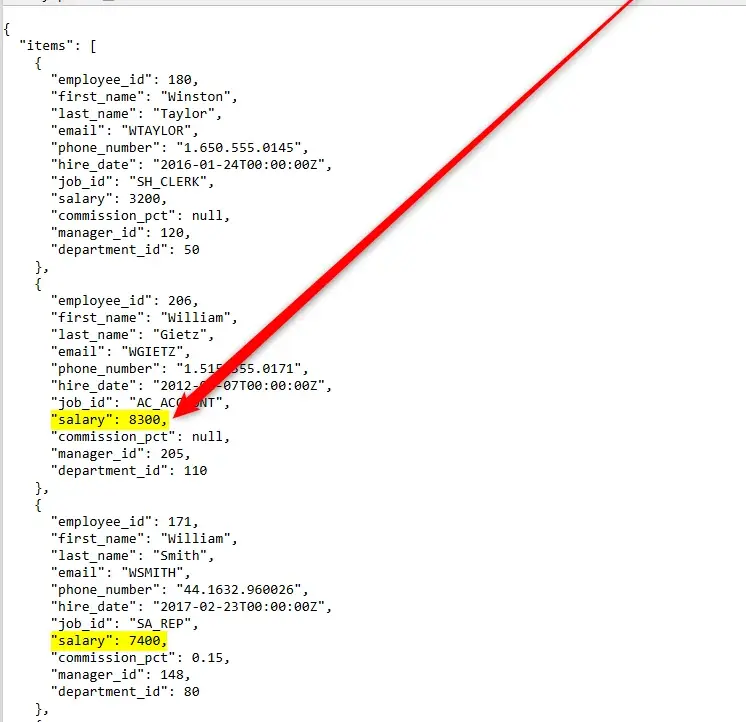
Swagger
ORDS can generate an openapi.json file to use with Swagger. Read more Manage & Monitor Oracle Database with REST APIs
Further reading
This article is part of the Running Oracle Database Server as a Docker container series:
- Running Oracle Database Server as a Docker container
- Transform an Oracle DB as OpenData using Oracle REST Data Services
- Accessing an Oracle database using .Net, NodeJS, PHP and Python
Loading comments…
