One Docker Image for Production and Devcontainers - The Clean Way
Learn how to design a Docker setup that delivers a secure, minimal production image while enabling effortless local development through VS Code Devcontainers with clean overrides and environment isolation

This article is over a year old. The information may be outdated.
This article is part of the Coding using a devcontainer series:
- PHP development in a devcontainer with preinstalled code quality tools
- Install a PHP Docker environment in a matter of seconds
- Docker - Python devcontainer
- Docker - Easy setup of Python under Windows
- Docker - Even easier setup of Python
- One Docker Image for Production and Devcontainers - The Clean Way
- Level Up Your Presentations with Quarto, reveal.js, Decktape, Docker and DevContainers
This article presents a clean method for using a single Docker image for both production deployments and VS Code Devcontainers. The approach involves building a minimal, secure production image first, then extending it with development tools, specific user configurations, and overrides for a separate devcontainer image. This ensures a lightweight production environment with a reduced attack surface, while providing a rich and isolated development experience.
This article is the result of intense reflection: how to define a Docker image for deployment in production as cleanly as possible and, while avoiding copy/paste and other repetitions as much as possible, create an image for development in devcontainer.
In other words: I want to create the lightest and most secure image possible for deployment in production, but of course, I need to be able to develop this image in my VSCode environment, and for that, I need my development tools, a specific Linux user to synchronize files with my host and avoid permissions problems, etc.
After multiple attempts, here is what I came up with, which seems to meet this need.
A few core concepts to keep in mind while reading this article
- We must completely separate future production from our development (devcontainer).
- We will need to create the production Docker image before we can use the devcontainer.
What does a perfect separation of environments mean?
Our first instinct should always be: do we need this (utility, configuration, user, etc.) in the Docker image that we are going to deploy on the server?
Some examples:
- Development tools such as a linter, formatter, code quality tool, debugger, etc. have no place in the image that will be deployed.
- Creating a user that will allow file synchronization with the host has no place in the image that will be deployed.
- ...
Our image must be clean, as efficient and lightweight as possible... We must minimize what is known as "attack surface" i.e. to reduce the number of tools we'll install in order to reduce security risks.
Everything we need for our development will then have to be part of a second Docker image, which we will use when we activate the devcontainer feature in VSCode. This is where we will create our user, add development tools, and activate certain configurations such as debugging, etc. If you have never set one up before, PHP development in a devcontainer with preinstalled code quality tools walks through a complete devcontainer from scratch.
So, in short, we'll have two Docker images
One for the deploy and a second one to extend the first with additional tools and configuration items. That one will never leave our host and we'll never build it ourselves but let VSCode do it for us.

The Result
One Dockerfile, no copy-paste, and both images build from the exact same instructions: a minimal, rootless production container, and a devcontainer that extends it with the tools you need to develop.
Here's the production container answering on http://localhost:8000:
{"message":"Hello, FastAPI - PRODUCTION!"}
The steps below build exactly this, from an empty folder, then extend it into a devcontainer.
Step 1 - We have to create the production docker image
Please create a new folder in your temporary folder for our example.
Let's create our production files
Let's create a few files (remember, for the production Docker image).
The production .env file
For this article, we'll create a Python script so we'll have to specify the version of Python we want.
This is just for the example but, in your case, this .env will be used to put there all the settings you want for your own production image.
So, even if you don't see yet why you have to use this file in your own use case, just keep it even if you have no variables to put inside.
APP_HOME="/app"
PYTHON_VERSION=3.13
TIMEZONE="Europe/Brussels"
This snippet sets up three environment variables that configure basic application settings: where the app lives on the system, which Python version to use, and what timezone to apply. These are typical configuration values you'd set at the start of a bash script or deployment setup.
The production Dockerfile file
The provided file is an example you can reuse. During this article, as an example, we'll create a small Python script to illustrate some things.
# cspell:disable
# Production Dockerfile
ARG DOCKER_APP_HOME="/app"ARG PYTHON_VERSION=3.13ARG TIMEZONE="Europe/Brussels"
FROM python:${PYTHON_VERSION}-slim
ARG TIMEZONE
ENV TZ=${TIMEZONE}
RUN --mount=type=cache,target=/var/cache/apt,rw \ set -eux \ && printf "\e[0;105m%s\e[0;0m\n" "Install required Linux binaries..." \ && apt-get update -yqq \ && DEBIAN_FRONTEND=noninteractive apt-get install -y --no-install-recommends \ locales \ tini \ && echo "en_US.UTF-8 UTF-8" > /etc/locale.gen \ && locale-gen en_US.UTF-8 \ && apt-get clean \ && rm -rf /var/lib/apt/lists/*
ENV LANG=en_US.UTF-8 \ LANGUAGE=en_US:en \ LC_ALL=en_US.UTF-8
ARG DOCKER_APP_HOME
WORKDIR "${DOCKER_APP_HOME}"
COPY requirements.txt .
RUN --mount=type=cache,target=/root/.cache/pip \ set -eux \ && printf "\e[0;105m%s\e[0;0m\n" "Install Python prod dependencies..." \ && pip install -r requirements.txt
# Make sure installed dependencies are in the PATHENV PATH="/root/.local/bin:$PATH"
COPY . .
ENTRYPOINT ["/usr/bin/tini", "--"]
ENV PYTHONPATH="${DOCKER_APP_HOME}/src"
CMD ["gunicorn", "--bind", "0.0.0.0:8000", "--workers", "4", "--worker-class", "uvicorn.workers.UvicornWorker", "main:app"]This Dockerfile builds a production Python application container using Python 3.13 slim as the base image. It installs system dependencies (locale support and tini process manager), sets up the timezone and language environment, installs Python dependencies from requirements.txt, copies the application code, and configures it to run a Gunicorn web server with Uvicorn workers on port 8000.
Look at the provided script:
- We'll define the version to use for Python
- We'll configure some environment variables like the time zone, ...
- We'll install Linux dependencies we need for the production (but make sure to not add here dependencies we just need for the local development)
- Because it's a Python example, we'll copy the
requirements.txtfile in the Docker image and install packages - We'll copy all our files inside the Docker image (make sure to correctly configure your
.dockerignorefile) - And, finally, for the production image, we'll initialize the entry point and the command to keep
Caution
As you can see, we've not created here, in the Docker image, an unprivileged user. Our production image is thus violating a rule we all have read: Your Docker image should be rootless.
This is a key concept here:
- The user will be configured while deploying the image using tools like Kubernetes f.i.,
- When we'll use the Docker image for local development, the user UID/GID has to match the one of the developers (and we don't know right now if it's
1000:1000or something else), - The user can be easily specified in the
compose.yamlfile.
The production compose.yaml file
The compose.yaml file is used by Docker compose (which is a part of Docker) to know how to build your image and how to create your container.
This is a very important file since we'll define here all the required configurations, we'll specify our .env file so Docker can translate variables to their values, ...
We'll also tell Docker which port of the running container has to be shared with our host, ...
name: my_sample
services: app: build: context: . dockerfile: Dockerfile args: - DOCKER_APP_HOME=${APP_HOME:-/app} - PYTHON_VERSION=${PYTHON_VERSION:-3.13} - TIMEZONE=${TIMEZONE:-Europe/Brussels} image: my_sample_prod:latest container_name: app env_file: .env ports: - "8000:8000" user: "1001:1001" security_opt: - no-new-privileges:trueThis is a Docker Compose configuration that defines a single service called 'app'. It builds a Docker image from the Dockerfile in the current directory, passing in customizable build arguments for the app directory, Python version, and timezone with sensible defaults. The service then runs as a container with specific security settings, port mapping, and environment configuration.
Caution
Pay attention to the user: and security_opt: parts.
It tells Docker to use a user having UID/GID 1001 when creating a container based on our image. This user ... didn't exist in the image so why?
This is a trick to make sure the container is running rootless i.e. the user in the container is an unprivileged one.
As extra security measure, we have the security_opt: - no-new-privileges:true line to prevent the container from gaining any additional privileges.
In short: when a container will be created based on our image, the user will be able to just run what we've decided for him, nothing more.
The production Python requirements file
We've seen a mention to this file in our Dockerfile: because we're using Python as an example for this blog post, we need a requirements.txt file to declare which dependencies our script needs. In our example, we need FastAPI dependencies:
fastapigunicornuvicorn[standard]This is a requirements file listing the Python packages needed to run a FastAPI web application with a production-grade server setup. FastAPI is the web framework, while Gunicorn and Uvicorn are different application servers that run the code—Gunicorn is a traditional option and Uvicorn is the modern async-compatible choice.
Information
Look at this file once more: we only have, strictly speaking, the dependencies we need for production.
If your own use case isn't a Python script, for sure, you should not create this requirements.txt file (but, then, also update the Dockerfile and remove that part).
The production Python script
And finally, we'll create, for the demo, a FastAPI Python script that will return a simple JSON answer; pretty straightforward:
from fastapi import FastAPI
app = FastAPI()
@app.get("/")def read_root(): return {"message": "Hello, FastAPI - PRODUCTION!"}This code creates a basic web server using FastAPI, a modern Python web framework. It sets up a single endpoint that responds to GET requests at the root URL ("/") by returning a JSON message. When someone visits this endpoint, they'll get back a simple greeting.
Summary for the production files
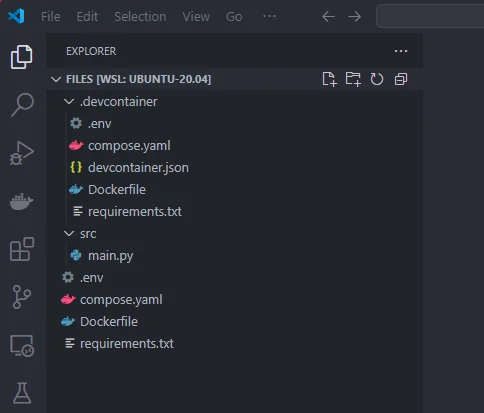
So at this point, our project looks like this i.e. we have five files.
docker-prod-devcontainer
Creating the Docker production image
Jump in a Linux console and run the command below to see if everything is fine i.e. if there are no error and f.i. our .env file where we've specified the version to use for Python is well retrieved and used.
You'll get something like this:
name: my_sampleservices: app: build: context: /tmp/docker-prod-devcontainer dockerfile: Dockerfile args: APP_HOME: /ap PYTHON_VERSION: "3.13" TIMEZONE: Europe/Brussels container_name: app environment: APP_HOME: /ap PYTHON_VERSION: "3.13" TIMEZONE: Europe/Brussels image: my_sample_prod:latest networks: default: null ports: - mode: ingress target: 8000 published: "8000" protocol: tcp security_opt: - no-new-privileges:true user: 1001:1001networks: default: name: my_sample_defaultThis is a Docker Compose configuration file that defines a single service called 'app'. It specifies how to build a Docker image from a Dockerfile, sets up environment variables for the application, exposes port 8000, and configures security and networking settings for the container.
Remember our user 1001
Look here above on the user: 1001:1001 line. We've seen this in a previous chapter: when the container will be created, the active user will be 1001:1001 and that one didn't exist (we haven't created it in our Dockerfile): our container will be rootless; just what we want.
Now, we'll build and create the container by running the command below.
EXTREMELY IMPORTANT - WE HAVE TO BUILD THE IMAGE FIRST
Because our future devcontainer will be derived from the production image, we MUST build it first:
This ensures that VSCode will retrieve a local version of your image. If you don't do this, if you've not yet built the image, Docker will try to pull it from Docker hub (from internet) and you'll probably get an error.
So, once again, before going further in this tutorial, please run docker compose build first in a console.
Running a production container
Now, we can create a container if we want by running the command below:
Since our demo project is a FastAPI Python application, simply start a browser and go to the http://localhost:8000 location to see the message from FastAPI. The output is a JSON one:
{"message":"Hello, FastAPI - PRODUCTION!"}
And, just to be sure, checking who is the current user for PROD
Optional, let's run a parametrized command into the container to see who is the current user:
This, just to confirm: when running our container, it'll run using a not-privileged user thanks to our compose.yaml orchestration file.
Step 2 - Override (or extend) the production image and get a devcontainer ready one
Let's create our devcontainer files
Please now create a subfolder called .devcontainer with the files below.
The .devcontainer/.env file
In case we need some more configuration items, let's create the .devcontainer/.env file (even if empty).
The .devcontainer/Dockerfile file
One of the most important file is the .devcontainer/Dockerfile where we'll add extra things (Linux dependencies, Python libraries, ...) to allow us to have a better development experience.
# syntax=docker/dockerfile:1.6
# .devcontainer/Dockerfile
ARG OS_USERID=1000ARG OS_GROUPID=1000ARG OS_USERNAME="vscode"ARG DOCKER_APP_HOME="/app"
FROM my_sample_prod:latest
ENV PYTHONDONTWRITEBYTECODE=1 \ PYTHONUNBUFFERED=1
USER root
#! If you get an error during the execution of this block, make sure the "my_sample_prod"#! image isn't running with a non-root user. It should be "root". Rebuild the image to be sure.RUN --mount=type=cache,target=/var/cache/apt,rw \ set -eux \ && printf "\e[0;105m%s\e[0;0m\n" "Install required Linux binaries for devcontainer..." \ && apt-get update -yqq \ && DEBIAN_FRONTEND=noninteractive apt-get install -y --no-install-recommends \ bash \ bash-completion \ git \ curl \ ca-certificates \ && apt-get clean \ && rm -rf /var/lib/apt/lists/*
# --- Create non-root user ---
ARG OS_USERIDARG OS_GROUPIDARG OS_USERNAME
RUN set -eux \ && if ! id -u "${OS_USERNAME}" >/dev/null 2>&1; then \ printf "\e[0;105m%s\e[0;0m\n" "Create devcontainer user ${OS_USERNAME} (${OS_USERID}:${OS_GROUPID})..." \ && groupadd -g ${OS_GROUPID} "${OS_USERNAME}" \ && useradd -u ${OS_USERID} -g ${OS_GROUPID} -m --shell /bin/bash --create-home "${OS_USERNAME}" \ && chown -R "${OS_USERNAME}":"${OS_USERNAME}" "/home/${OS_USERNAME}"; \ fi
# Ensure vscode home folders exist and are writable. The .vscode-server folder is used by# VSCode while installing extensions in the container. That folder has to be owner by our user; not root.RUN set -eux \ && mkdir -p "/home/${OS_USERNAME}/.vscode-server/bin" \ && mkdir -p "/home/${OS_USERNAME}/.vscode-server/extensions" \ && mkdir -p "/home/${OS_USERNAME}/.vscode-server/data" \ && chown -R "${OS_USERNAME}":"${OS_USERNAME}" "/home/${OS_USERNAME}/.vscode-server"
# ---------- Shell and history setup -----------------------------------------# Configure bash to use this fileRUN echo "export HISTFILE=/home/${OS_USERNAME}/.bash_history" >> "/home/${OS_USERNAME}/.bashrc" && \ echo 'export HISTSIZE=10000' >> "/home/${OS_USERNAME}/.bashrc" && \ echo 'export HISTFILESIZE=10000' >> "/home/${OS_USERNAME}/.bashrc" && \ echo 'shopt -s histappend' >> "/home/${OS_USERNAME}/.bashrc"
# Set up the shell promptRUN set -eux && \ echo "PS1='\n\e[0;33m🐳 \e[0;36m\$(whoami)\e[0m \w # '" >> "/home/${OS_USERNAME}/.bashrc"
# Welcome message and tips (make sure the message isn't yet in the file)RUN set -eux; \ BASHRC="/home/${OS_USERNAME}/.bashrc"; \ MARKER="# DEV CONTAINER WELCOME MESSAGE"; \ grep -qxF "$MARKER" "$BASHRC" || cat <<EOF >> "$BASHRC"$MARKERecho -e "\n📘 Welcome to the Dev Container!"echo -e "Below are some useful commands:"echo -e ""echo -e " ✨ \e[32mpython -m debugpy --listen 0.0.0.0:5679 -m uvicorn main:app --host 0.0.0.0 --port 8000 --reload\e[0m Start a hot-reloading preview in your browser."EOF
ARG DOCKER_APP_HOME
# Important: in the production image, the folder "DOCKER_APP_HOME" (/app most probably) is# owned by the root user. Here, for the devcontainer, the folder has to be owned by our# current user.RUN set -eux \ && chown -R "${OS_USERNAME}":"${OS_USERNAME}" "${DOCKER_APP_HOME}"
USER "${OS_USERNAME}"
COPY requirements.txt .
RUN --mount=type=cache,target=/home/${OS_USERNAME}/.cache/pip \ set -eux \ && cat requirements.txt \ && printf "\e[0;105m%s\e[0;0m\n" "Install Python dev dependencies..." \ && python -m pip install -r requirements.txt
WORKDIR "${DOCKER_APP_HOME}"This Dockerfile builds a development container based on a production image. It installs essential Linux tools, creates a non-root user for development, configures the bash shell with history and a custom prompt, sets up VS Code server folders, changes ownership of the app directory to the new user, and installs Python dependencies.
Look at the provided script once again:
- We are reusing our previously created Docker image (see the
FROM my_sample_prod:latestline) - We'll install some dev Linux tools like
bash,curl,git, ... we don't need in prod - Now, we'll create a non-root user by using a few parameters like
OS_USERID,OS_GROUPIDandOS_USERNAME. We'll create some custom folders too for that user - We'll configure our Shell for things like the history file, to have a customized prompt, ...
- We'll make sure the different folder we need to manipulate are owned by our user
- We'll install some specific Python Dev dependencies (this is needed for our sample here)
This last step is thus only needed for illustration of this blog post. Please use your own.
Paying attention to the FROM statement
Let me insist one more time on this point. Right now, our Dockerfile is extending an existing image called my_sample_prod:latest.
Do you have that image right now on your host? If you don't have it, VSCode, when you'll use the Open in Devcontainer feature, will first try to download the image from Docker Hub.
Ok, perhaps the image is hosted there and in that case, Docker will download it from the Hub. Perhaps that image doesn't exist elsewhere than on your host. Perhaps the image exists on both the Hub and your computer.
So many questions, right? Just be very aware of this!
Make sure to run docker compose build in your root folder if you need to:
- Create the local image
- Refresh the local image because you've modified your production Docker files (as seen in the previous chapter).
So, if not yet done, please run docker compose build! Make sure running docker image ls | grep -i my_sample in your console will well list your image.
The .devcontainer/requirements.txt file
This small file is there just for illustration purposes. In this blog post, we're creating a small FastAPI python application and, in the .devcontainer/requirements.txt we'll add some extra dev dependencies for Python, like installing the Debugpy tool i.e. the Microsoft Python Debugger.
debugpy
This is just the name 'debugpy', which is a Python debugging package. On its own, it's not actually executable code — it would typically appear in a requirements file, import statement, or configuration.
Of course, if your project isn't a Python one, this file can be removed and, in that case, also remove the associated lines from the .devcontainer/Dockerfile.
The .devcontainer/compose.yaml file
As for the production image, here, we need to tell Docker how the image has to be built and how the container (the dev one) has to be created.
services: app: build: context: ./.devcontainer dockerfile: Dockerfile args: - DOCKER_APP_HOME=${APP_HOME:-/app} - OS_USERID=${LOCAL_UID:-1000} - OS_GROUPID=${LOCAL_GID:-1000} - OS_USERNAME=${LOCAL_USER:-vscode} container_name: my_sample_devcontainer_app ports: - 5679:5679 # Debugpy port env_file: - .env - .devcontainer/.env volumes: - .:${APP_HOME:-/app} - vscode-extensions:/home/${LOCAL_USER:-vscode}/.vscode-server/extensions - ./.devcontainer/history/.bash_history:/home/${LOCAL_USER:-vscode}/.bash_history:rw
command: sleep infinity
volumes: vscode-extensions:This Docker Compose configuration defines a development container service called 'app' that builds from a Dockerfile in the .devcontainer directory, passing in customizable build arguments for home directory, user ID, group ID, and username. It exposes a debug port, loads environment variables from files, mounts the project directory and VS Code extensions for persistence, and runs indefinitely to stay available for development work.
If you look at this .devcontainer/compose.yaml file, we're configuring a few things:
- The list of build arguments (
args) should mention the user id, group id and name of our user. This is important: when we'll work inside the devcontainer, any files created in the container will be owned by this specific user. If we are usingjohndoewith1001for both user id and group id; then files will be synchronized on your host like that; owned byjohndoenot you. If you are the user1000:1000locally, you understand that files won't be yours and you'll get permissions problems. It's something we have to avoid. For this, we have to correctly configure the.devcontainer/compose.yamlfile.
See the syntax: ${LOCAL_UID:-1000}. By default, the file will assign 1000 (which is often the correct ID). But first, Docker will check if a variable called LOCAL_UID exists on the host. If this is the case, that value will be used. So, if running id -u (or id -g for the group id) doesn't give 1000 on your host; make sure to create the LOCAL_UID or LOCAL_GID variable in your .bashrc file and assign them to the correct value.
-
Because our current sample is about Python, we'll also expose the DebugPy standard port thanks to the line
5679:5679so, when starting a debug session, the container will work. -
We're also referring to two
.envfiles, the one from the root folder (used for the Docker PROD image) and the one from the.devcontainerfolder -
We'll add some volumes:
.:${APP_HOME:-/app}will mount (=share) files from our project (inside VSCode) with the${APP_HOME:-/app}folder i.e. where the files are stored inside the Docker PROD image. Like this, files that we already copied in the PROD Docker image will just be overridden by the ones of our dev session (=> this is where the magic happens)- We'll also ask Docker to create a self-managed volume for the
vscode-extensions. Thanks to this line, the first time we'll create the devcontainer, VSCode will install extensions but next time, thanks to this line, VSCode won't install extensions again, they're already present. Thisvscode-extensionsis used for data persistence. - And the line for
./.devcontainer/history/.bash_historywill persist the history of your command lines (in the console) in your project. So, next time you'll work inside the devcontainer, the CLI history will be already populated with what you did in the past.
The .devcontainer/devcontainer.json file
And, finally, the configuration file for VSCode.
In VSCode, to be able to run a Devcontainer: command (from the Command Palette (CTRL+SHIFT+P)), the .devcontainer/devcontainer.json file should be present and tells VSCode what to do.
{ "name": "MySample Devcontainer", "dockerComposeFile": [ "../compose.yaml", "compose.yaml" ], "service": "app", "workspaceFolder": "/app", "remoteUser": "vscode", "containerUser": "vscode", "containerEnv": { "GIT_SSH_COMMAND": "ssh -i /home/vscode/.ssh/id_ed25519 -o 'UserKnownHostsFile=/dev/null'" }, "initializeCommand": "mkdir -p .devcontainer/history && touch .devcontainer/history/.bash_history && echo '.bash_history' > .devcontainer/history/.gitignore", "customizations": { "vscode": { "settings": { "files.autoSave": "onFocusChange", "window.title": "${dirty}${rootName} ${separator} [DevContainer]", "workbench.colorTheme": "Visual Studio Light" }, "extensions": [ "ms-python.debugpy" ] } }}This is a development container configuration file that sets up a Docker-based development environment. It specifies which Docker services to run, how to configure VS Code inside the container, and what initialization steps to perform when the container starts. It also configures SSH access and various editor preferences for developers working in this containerized setup.
- We have to use the
dockerComposeFileitem to load our twocompose.yamlfiles i.e. the one of the root (the prod one) and the one from the.devcontainerfolder. This is needed because we just need to extend the productioncompose.yamlfile. We'll reuse all services and keys defined in../compose.yamland just add (extend) or update (override) some - We need to tell VSCode which folder should be open in our VSCode Devcontainer session, it has to be
/app(has to match theAPP_HOMEvariable from.devcontainer/compose.yaml) - We'll define our remoteUser name, it'll be
vscode(has to match theOS_USERNAMEvariable from.devcontainer/compose.yaml) - We'll also add a
GIT_SSH_COMMANDenvironment variable. This is optional but it'll allow us to run agitcommand (likegit pull) from inside our devcontainer - The
initializeCommandkey will create the.devcontainer/historyfolder on our host (with us as owner) just before creating the container. Like this, we'll be able to store our bash history file there (see thevolumesentry in.devcontainer/compose.yaml) - And, finally, in the
customizationspart, we can add vscode settings and extensions we want to configure and install inside our Devcontainer. You can add a lot of settings / extensions here if you want, depending of your project's type
Our project's structure right now
So at this point, our project looks like this i.e. we have ten files.
docker-prod-devcontainer/
Creating the Devcontainer image
This part is pure optional, it's just to check if everything is correctly filled in.
Jump in the .devcontainer folder (cd .devcontainer) and run this command:
You'll get something like this:
name: my_sampleservices: app: build: context: /tmp/docker-prod-devcontainer/.devcontainer dockerfile: Dockerfile args: APP_HOME: /ap OS_GROUPID: "1000" OS_USERID: "1000" OS_USERNAME: vscode PYTHON_VERSION: "3.13" TIMEZONE: Europe/Brussels command: - sleep - infinity container_name: my_sample_devcontainer_app environment: APP_HOME: /ap PYTHON_VERSION: "3.13" TIMEZONE: Europe/Brussels image: my_sample_prod:latest networks: default: null ports: - mode: ingress target: 8000 published: "8000" protocol: tcp - mode: ingress target: 5679 published: "5679" protocol: tcp security_opt: - no-new-privileges:true user: 1001:1001 volumes: - type: bind source: /tmp/docker-prod-devcontainer target: /ap bind: create_host_path: true - type: volume source: vscode-extensions target: /home/vscode/.vscode-server/extensions volume: {} - type: bind source: /tmp/docker-prod-devcontainer/.devcontainer/history/.bash_history target: /home/vscode/.bash_history bind: create_host_path: truenetworks: default: name: my_sample_defaultvolumes: vscode-extensions: name: my_sample_vscode-extensionsThis is a Docker Compose configuration file that defines a development container service. It sets up a single application service with specific build arguments, environment variables, port mappings, security settings, and volume mounts to create an isolated development environment with VS Code extensions persistence.
Did you get an error? If so, you can more easily read/manage the error right now.
You can look at the configuration to see if everything looks correct i.e. if your variables have well be replaced by the values coming from the .env files.

Opening the container using VSCode
Time to open the project using the Devcontainer feature of VSCode.
If you look at the bottom right of your screen, you'll probably see this popup:

Simply click on the Reopen in Container button or, second way, press CTRL+SHIFT+P to open the Command palette and select the "Dev Containers: Rebuild Without Cache and Reopen in Container" option.
VSCode will close the project and reopen it. It'll take more time (the first time) because it needs to create the Docker container first.
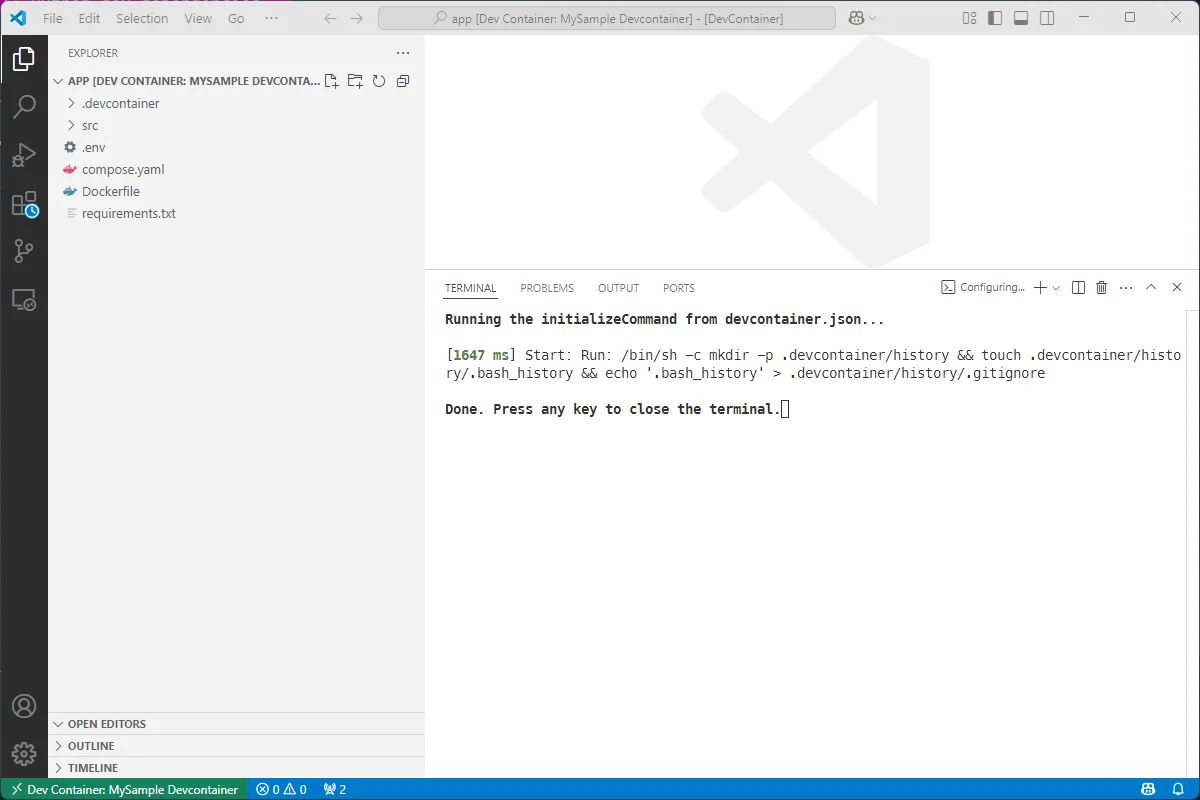
If you see the image here above, you're in the container. I've configured a light theme just to make the clear distinction between host (black theme) and devcontainer (light theme).
Bottom right, you can create a new Terminal:

In this demo project, you can see this message; once:

The idea is thus to provide contextual help to the developer and to tell him, here, how he can start the FastAPI server using hot reload and with Debugpy enabled.
Let's test
If we return to the http://localhost:8000 URL we can still get the JSON answer (so the container is well running).
{"message":"Hello, FastAPI - PRODUCTION!"}
But now, in VSCode, if you edit the src/main.py script and update the Hello message like below:
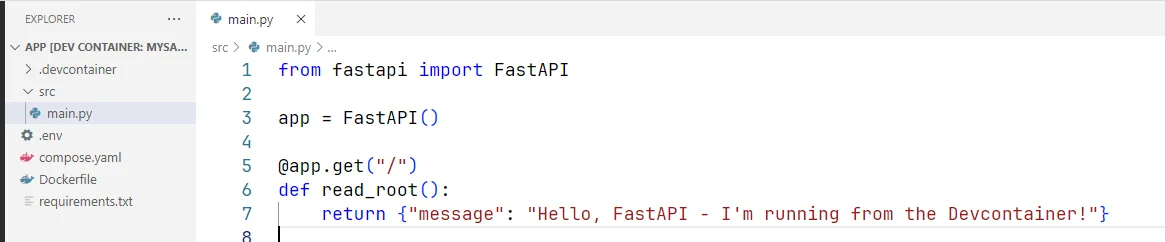
You just need to save the change, go back to the browser window and refresh the page:
{"message":"Hello, FastAPI - I'm running from the Devcontainer!"}
Let's debug
In this demo project, we've added the Debugpy dependency.
We just need to add an extra file for VSCode.
{ "version": "0.2.0", "configurations": [ { "name": "Python: FastAPI", "type": "debugpy", "request": "attach", "connect": { "host": "localhost", "port": 5679, }, "justMyCode": true, "pathMappings": [ { "localRoot": "${workspaceFolder}/src", "remoteRoot": "." } ] } ]}This is a VS Code debug configuration file that sets up remote debugging for a Python FastAPI application. It tells the debugger to connect to a Python process already running on localhost at port 5679, and maps your local source files to the remote paths so breakpoints work correctly.
To be sure the extension is correctly working, just close VSCode and open it again. Open the DevContainer again too (now, you can simply choose "Reopen in Devcontainer").
Once in your devcontainer, please open the src/main.py file. Click anywhere on the return line (line 7) and press F9 to add a breakpoint.

Press F5 to start the debugger session.
Go back to the browser, refresh the page and VSCode will break on that specific line.

Going further
The example above uses Python; the exact same two-image approach is used, language by language, in Docker - Python devcontainer and PHP development in a devcontainer with preinstalled code quality tools. And if a devcontainer is still an abstract notion for you, start with Docker - Explain me like I'm five - What's Docker for?.
This article is part of the Coding using a devcontainer series:
- PHP development in a devcontainer with preinstalled code quality tools
- Install a PHP Docker environment in a matter of seconds
- Docker - Python devcontainer
- Docker - Easy setup of Python under Windows
- Docker - Even easier setup of Python
- One Docker Image for Production and Devcontainers - The Clean Way
- Level Up Your Presentations with Quarto, reveal.js, Decktape, Docker and DevContainers
Loading comments…
Related posts

ai-explain: ELI5 for Scripts and Errors, Right in Your Terminal
November 12, 2026
DuckDB - Query JSON and CSV Files With SQL, No Database Required
November 9, 2026

Docker Build Cache Ate 180 GB — Here's How to Get Them Back
November 2, 2026
Open WebUI — Beyond the Chat: Models, RAG, Tools and API Keys
October 26, 2026
yq — The YAML Processor You Already Know How to Use
October 19, 2026