Using volumes with Docker, use cases
Master Docker volumes to stop losing data! Explore Docker-managed volumes, mounted volumes, and real-world use cases for container data persistence.

This article is over a year old but was reviewed on July 30, 2026 — the content is still accurate.

This article demonstrates Docker data persistence using a simple execution-counter container: no volume means data resets on every restart; a Docker-managed volume (declared in compose.yaml) persists data across restarts but stores files outside your project (accessible via Docker Desktop or the VSCode Docker extension); and a mounted/bind volume (./data:/data) syncs data straight into your project folder on disk — with a note on using user: 1000:1000 to avoid root-owned files.
When working with a Docker container, data can be persistent or not. Imagine you're creating a localhost website with Joomla, WordPress or any other tool (Laravel, Symfony, etc.).
You've perfectly created the various Docker files needed to run the local site, you've run the command docker compose up --detach to start the containers and now you're busy installing the site. After a few moments, your local site is up and you can start developing its functionalities.
By default, if you haven't taken any precautions, the moment you stop the container (docker compose down), you'll kill your site, i.e., having not taken care to save your data (your site, your database), everything will be lost and reset the next time you run docker compose up --detach. Well... Maybe that was your wish (something totally ephemeral); maybe not.
This article focuses on the different kinds of volumes and when to reach for each; if you just want to get files in and out of a running container, Share data between your running Docker container and your computer covers that narrower case.
What a volume changes
To illustrate the notion of persistence, we're going to work with a Docker image that does one single thing: count how many times it has been executed. Let's call it five times:
Now stop and start the container by running docker compose down ; docker compose up --detach, then call the counter again:
We've lost our data
As you can see, we've lost our counter. By stopping and starting the container, our data has been lost. And that's perfectly normal, because that's the intrinsic concept of a Docker container: it's ephemeral. A container should be disposable; by restarting it, the container is reset.
Now exactly the same scenario, after adding three lines to compose.yaml to declare a volume:
Same down, same up, and the counter picks up at 7 where it stopped at 6. That's the whole subject of this article.
Why it works
There are three strategies, and choosing between them is the real decision:
- No volume at all (the default): everything the container writes lives and dies with it. Perfect for a container you're just playing with.
- A volume managed by Docker: the data survives
down/up, but Docker stores it somewhere outside your project, and it's Docker's job to know where. - A mounted volume (bind mount): you decide, the data lands in a folder of your project, on your disk, visible in your editor.
The demo below walks through the three of them with the same counter.
Setting up the demo
For the illustration, please start a Linux shell and run mkdir -p /tmp/counter && cd $_.
Now that you're in a temporary folder on your disk, please create a new file called Dockerfile with this content:
Please, too, create a file called counter.sh with this content:
Now, just create the Docker image by running docker build -t demo/counter ..
Can't be smaller
As you can see, our image is really small. This is the advantage using the alpine Docker image.
Then create the compose.yaml file. This is the first strategy: no volume at all, hence the counter reset you saw above.
We'll run our container by running docker compose up --detach:
We can verify our container is running using docker container list (simplified output):
docker compose exec counter /counter.sh is the command used above to execute our script.
Volumes managed by Docker
Update the compose.yaml file like this:
name: demo
services:
counter: build: . container_name: counter image: demo/counter # highlight-next-line volumes: # highlight-next-line - counter_data:/data
# highlight-next-linevolumes: # highlight-next-line counter_data:This is a Docker Compose configuration file that defines a service called 'counter' built from the current directory. It sets up a named volume called 'counter_data' that persists data in a '/data' directory inside the container, so the data survives when the container restarts.
As you can see, we're using a volumes (always plural form) and we're saying that the /data folder inside the container should be mapped to a volume called counter_data. At the bottom of the compose.yaml file, we are just declaring our volume. These are the three lines that produced the persistent counter shown at the top of this article.
We'll start our container again: docker compose down ; docker compose up --detach.
But now, we should have a Docker volume called counter_data; let's check:
Yes, there it is.
So, our counter was well persistent this time
As you can see, by running down followed by up, we have kept the value of our counter. This value is saved in a file which is now stored in a Docker volume. As long as we don't delete the volume, our value will be preserved.
This is exactly the pattern you want for any tool's own settings — a config directory that should outlive a --rm container. Containerizing lazydocker uses a Docker-managed volume that way to keep its pane layout across every project.
You can remove the volume by running docker volume rm demo_counter_data but:
Indeed, you can't remove a volume if there is still at least one container using it, so you should run docker compose down && docker volume rm demo_counter_data or, simpler, docker compose down --volumes. The --volumes flag says to remove any volume declared in the compose.yaml file.
Mounted volumes
A mounted volume is synchronized with your hard disk. Instead of letting Docker manage everything for you, you'll decide where files should be stored.
Let's do some cleanup right now; please run docker compose down --volumes to kill the volume used in the previous chapter and kill the docker container.
Update the compose.yaml file like this:
name: demo
services:
counter: build: . container_name: counter image: demo/counter # highlight-next-line volumes: # highlight-next-line - ./data:/dataThis is a Docker Compose configuration file that defines a single service called 'counter'. It specifies how to build and run a Docker container for this service, including which image to use and where to mount local files into the container.
The syntax now is just slightly different: we don't have a volumes entry at the bottom of the file but we've used a relative notation like ./data:/data. So, the ./data local folder (on your hard disk) has to be synchronized with the /data folder of the container.
By running docker compose up --detach && docker compose exec counter /counter.sh we'll run our counter and expect to see You have executed this script 1 times. but you'll probably get an error:
We need to create our local data folder:
Now that we've our data folder, try again:
This time, the counter.txt file is present in our directory:
Ouch, the file is owned by `root` not me
Uh oh! The file is owned by the root user and not me (i.e. user christophe in my case). That's annoying since I can't edit it or remove it without using sudo.
That last one is a one-line fix, described in the next section.
Under the Hood (skip this if you just want to use it)
Getting your own files back from a mounted volume
The file is owned by root because the current user; used inside the container, is the root user. We need to inform Docker that he has to use ours.
To do this, we'll update once more our compose.yaml file:
name: demo
services:
counter: build: . container_name: counter image: demo/counter # highlight-next-line user: 1000:1000 volumes: - ./data:/dataThis is a Docker Compose configuration file that defines a service called 'counter'. It builds a Docker image from the current directory, sets up file storage by mounting a local folder into the container, and configures the container to run as a non-root user for security.
Why 1000:1000?
We need to pass to Docker our current user id and group id so Docker will be able to create files/folders using our user. To get your current user id and group id, just run echo "$(id -u):$(id -g)" in the console and, you'll see, the first created user (after the installation of Linux) is, always, user id 1000, group id 1000. Most probably you.
Let's try again but, first remove the incorrect file: sudo rm -f data/counter.txt
Then run docker compose down && docker compose up --detach && docker compose exec counter /counter.sh
Now, the file will be yours:
Location of the volumes managed by Docker
Volumes are stored somewhere on the disk by Docker (on Windows, inside a VHDX virtual disk that only grows), you don't need to take care about this. And, above all, they are not saved in your project folder; let's check this:
Files are not stored in our project
As you can see, we've only our files, not the counter. Files stored in a volume managed by Docker aren't stored in our project's directory.
Location
In fact, volumes are stored in \\wsl$\docker-desktop-data\data\docker\volumes if you're running WSL but it's really a bad idea to access files directly from there. Let Docker do the job for you.
Accessing files in the volume using Docker Desktop
One of the easiest ways to access the files contained in a volume is to use the Docker Desktop graphical interface.

By clicking on the volume name (demo_counter_data here), you'll see the list of files it contains.

By double-clicking on the filename, you'll start a basic text editor where you can, if you want, update the counter and save the change.
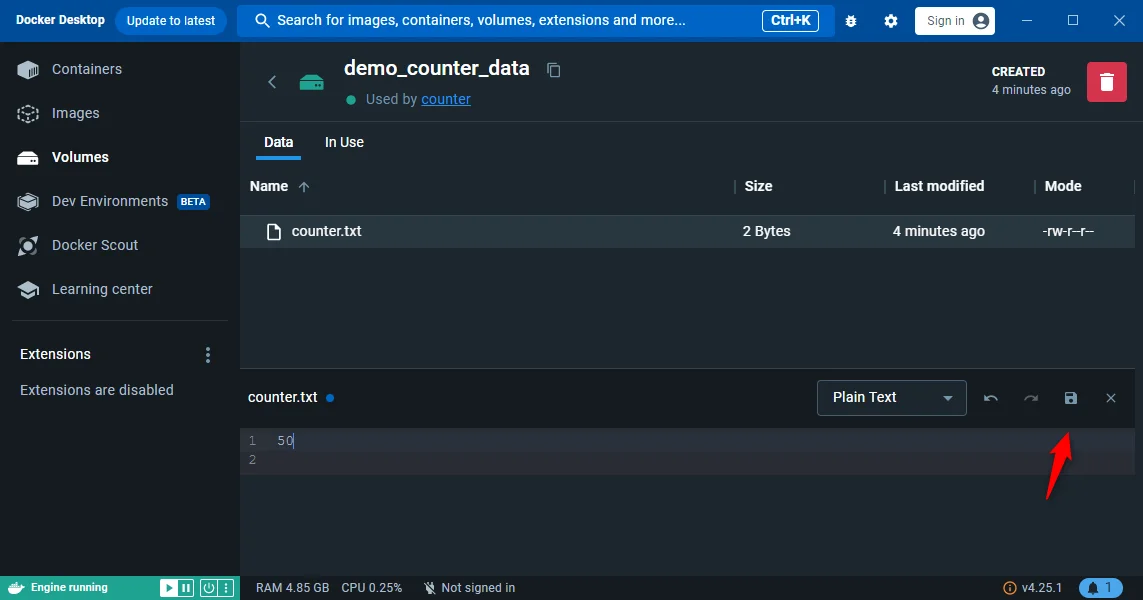
A new call to our counter shows that we have hacked the number:
Accessing files in the volume using VSCode
But you can, too, use Visual Studio Code to access files.
First, if needed, install the Docker extension:
- Press CTRL+SHIFT+X to display the
Extensionswindow of VSCode, - Search for the
Dockerextension of Microsoft (make sure to search forms-azuretools.vscode-docker), - and Install the extension
Now, in the left pane, you'll see a new button for Docker. Click on it.
In the new window, you'll get the list of containers, the list of images and other things.
Expand the list of containers, click on demo/counter (our container) and display the list of files.
Open the data root folder and right-click on counter.txt, our counter file, and select Open.
Now, you can edit that file from VSCode, make changes and save them.

Yes, accessing files using VSCode works too.
Conclusion
Depending on your needs, you can opt for one of three solutions.
You want to play with a Docker container, test it, learn from it... You don't want to keep any traces on your hard disk. The first solution is perfect here i.e. don't matter about volumes.
You want to test but also keep the data somewhere without polluting your hard disk. You're working on something temporary, so you may want to keep the data, but you can't be sure. The second solution will suit you best i.e. self managed volumes.
On the contrary, your work is important and you don't want to lose anything. Your data must be saved on your hard disk. The third solution will be the one you use i.e. mounted volumes.
The question to ask yourself is never "do I need a volume?" but "who owns this data: the container, Docker, or me?". And when the answer is me, don't forget the user: 1000:1000 line, or you'll be typing sudo on your own files. To go further with bind mounts and the -v flag on a plain docker run, see Share data between your running Docker container and your computer.
Related posts

Preview Your Local Docusaurus Site on Your Phone
November 16, 2026

ai-explain: ELI5 for Scripts and Errors, Right in Your Terminal
November 12, 2026
DuckDB - Query JSON and CSV Files With SQL, No Database Required
November 9, 2026

Docker Build Cache Ate 180 GB — Here's How to Get Them Back
November 2, 2026

Open WebUI — Beyond the Chat: Models, RAG, Tools and API Keys
October 26, 2026