Adding Reader Reactions to Your Docusaurus Blog
Build a fully working "Was this article helpful?" widget for your Docusaurus blog. Step-by-step guide covering the PHP backend, React component, CSS module, Docusaurus swizzle, and an admin dashboard — everything you need to reproduce it from scratch.


This article is part of the Creating Docusaurus components series:
- Change how Docusaurus will create img tags
- Overrides the generation of img tags with Docusaurus
- Organize Your Docusaurus Content with a Custom Series Component
- Providing a go to the top button in Docusaurus posts
- Creating a search&replace plugin for Docusaurus
- A component for showing code snippets in a Docusaurus blog
- A Docusaurus component that alerts readers the article is over a year old
- Showing the changelog of your post
- Inject ASCII Art in any HTML pages rendered by Docusaurus
- Best Practice - Customizing the Docusaurus RSS Feed for Full Content & Images
- Running some checks on your Docusaurus images
- Tags management in Docusaurus
- Automating TL;DR Summaries with Gemini AI
- Introducing the ProjectSetup Component - A Standardized Way to Share Project Structures
- How to indicate AI-assisted content in a Docusaurus blog
- Bring Your CLI Tutorials to Life with a Typewriter Terminal
- Meerkat Mischief: Sprinkling Easter Eggs Across my Blog
- AI-Powered Code Tooltips in Docusaurus — Explain Like I'm Five
- Adding Reader Reactions to Your Docusaurus Blog
- Your Blog Is Unreadable to an AI. Here Is the Fix.
- Shake Your Phone, Startle the Meerkat
- Add a "Copy as Markdown" Button to Your Docusaurus Blog
- Ask My Blog: Turning 259 Articles Into 2,160 Searchable Questions
- The Third Door: A Floating Chat Bubble, and the Feature Nobody Could Find
- Drawing a Map of My Own Blog
- Let Readers Flag Issues — A Multi-Type Feedback Widget for Docusaurus
This guide walks through building a "Was this article helpful?" widget for a Docusaurus blog — from scratch, end to end. You will create a lightweight PHP script that stores votes in a JSON file and sends throttled email notifications, a React component that reads and writes those votes, a CSS module that blends seamlessly with any Docusaurus theme, and a swizzle of BlogPostItem to inject the widget at the bottom of every post. A bonus admin dashboard page lets you monitor approval rates across all articles at a glance.
Reader feedback is one of those things that looks simple from the outside but hides a surprising amount of moving parts once you start building it. I wanted something unobtrusive — no third-party services, no cookies, no sign-up required. Just a small "Was this article helpful?" widget at the bottom of every post, a JSON file on the server, and an email in my inbox when a reader votes.
What followed was a self-contained system: a 160-line PHP backend, a React component, a CSS module, and a single swizzle. Everything lives in your own repository and under your own hosting. No external dependencies, no privacy implications, no recurring costs.
In this article I'll walk you through every file, every decision, and every line that matters — so you can reproduce it on your own Docusaurus blog and adapt it to your needs.

The Big Picture
Before diving in, here is what we are going to build and how the pieces fit together:
Browser                          Your Server
  │                                   │
  ├─ GET /api/reactions.php?slug=...  ─▶  reactions-data.json (read)
  │◀─ { helpful: 12, not_helpful: 3 } ─┤
  │                                   │
  ├─ POST /api/reactions.php          ─▶  reactions-data.json (write)
  │  { slug, vote }                   │   + email notification
  │◀─ { helpful: 13, not_helpful: 3 } ─┤
  │                                   │
  └─ GET /api/reactions.php?admin=... ─▶  reactions-data.json (full dump)
Five files are involved:
| File | Role |
|---|---|
api/reactions.php | PHP backend: stores votes, sends emails |
src/components/Reaction/index.tsx | React component rendered at the bottom of every post |
src/components/Reaction/styles.module.css | CSS module for the widget |
src/theme/BlogPostItem/index.js | Swizzled Docusaurus component that injects the widget |
src/pages/reactions-dashboard.js | Admin page to visualize all votes |
Two JSON files are created at runtime by the backend:
api/reactions-data.json— the vote store, one entry per article slugapi/notifications.json— throttle timestamps, one entry per article slug
Let's build them one by one.
Step 1 — The PHP backend
Create the file api/reactions.php at the root of your web server (next to, or inside, your Docusaurus output folder). The PHP script does not need to be inside the Docusaurus source tree at all; it just needs to be reachable by the browser.
1.1 — Configuration
<?phpdeclare(strict_types=1);
// ── Configuration ─────────────────────────────────────────────────────────────// Copy api/.env.example to api/.env and set your values before deploying.$_envVars = file_exists(__DIR__ . '/.env') ? (parse_ini_file(__DIR__ . '/.env') ?: []) : [];
define('ADMIN_EMAIL', $_envVars['ADMIN_EMAIL'] ?? '');define('ADMIN_TOKEN', $_envVars['ADMIN_TOKEN'] ?? '');define('NO_REPLY', $_envVars['NO_REPLY'] ?? '');define('NOTIFY_COOLDOWN_SECONDS', 3600); // minimum gap between emails per articledefine('SITE_URL', 'https://www.avonture.be');
// ── CORS ──────────────────────────────────────────────────────────────────────$allowedOrigins = [ SITE_URL, 'https://localhost:3000',];
// Same-origin requests carry no Origin header — allow them unconditionally.// Only cross-origin requests need to be validated.$origin = $_SERVER['HTTP_ORIGIN'] ?? '';if ($origin !== '' && !in_array($origin, $allowedOrigins, true)) { http_response_code(403); exit;}
header('Content-Type: application/json; charset=utf-8');if ($origin !== '') { header("Access-Control-Allow-Origin: $origin"); header('Access-Control-Allow-Methods: GET, POST, OPTIONS'); header('Access-Control-Allow-Headers: Content-Type'); header('Vary: Origin');}
if ($_SERVER['REQUEST_METHOD'] === 'OPTIONS') { http_response_code(204); exit;}
// ── Helpers ───────────────────────────────────────────────────────────────────
function loadData(string $file): array{ if (!file_exists($file)) { return []; } return json_decode(file_get_contents($file), true) ?: [];}
function saveData(string $file, array $data): void{ $fp = fopen($file, 'c+'); if (!$fp) { return; } if (flock($fp, LOCK_EX)) { ftruncate($fp, 0); rewind($fp); fwrite($fp, json_encode($data, JSON_PRETTY_PRINT | JSON_UNESCAPED_SLASHES)); flock($fp, LOCK_UN); } fclose($fp);}
function sanitizeSlug(string $raw): string{ $slug = preg_replace('/[^a-z0-9\-\/]/', '', strtolower(trim($raw))); return substr($slug, 0, 200);}
function jsonError(int $code, string $message): never{ http_response_code($code); echo json_encode(['error' => $message]); exit;}
// Sends an email notification for a new vote, with a per-article cooldown.function maybeNotify(string $slug, string $vote, array $counts): void{ $throttleFile = __DIR__ . '/notifications.json'; $throttle = loadData($throttleFile);
if (time() - ($throttle[$slug] ?? 0) < NOTIFY_COOLDOWN_SECONDS) { return; }
$articleUrl = SITE_URL . '/' . $slug; $dashboardUrl = SITE_URL . '/reactions-dashboard'; $total = $counts['helpful'] + $counts['not_helpful']; $ratio = $total > 0 ? round($counts['helpful'] / $total * 100) : 0;
$subject = "[Blog] New reaction on: $slug"; $body = implode("\n", [ "A reader just reacted to one of your blog posts.", "", "Article : $articleUrl", "Vote : $vote", "Helpful : {$counts['helpful']}", "Not helpful : {$counts['not_helpful']}", "Approval : {$ratio}%", "", "View full dashboard: $dashboardUrl", ]); $headers = implode("\r\n", [ "From: " . NO_REPLY, "Reply-To: " . NO_REPLY, "Content-Type: text/plain; charset=utf-8", ]);
if (@mail(ADMIN_EMAIL, $subject, $body, $headers)) { $throttle[$slug] = time(); saveData($throttleFile, $throttle); }}
// ── Parse input ───────────────────────────────────────────────────────────────
$method = $_SERVER['REQUEST_METHOD'];$slug = '';$vote = '';
if ($method === 'GET') { // Admin request: return all reaction data if (array_key_exists('admin', $_GET)) { if (ADMIN_TOKEN === '' || ($_GET['admin'] ?? '') !== ADMIN_TOKEN) { jsonError(403, 'Forbidden'); } echo json_encode(loadData(__DIR__ . '/reactions-data.json')); exit; } $slug = sanitizeSlug($_GET['slug'] ?? '');} elseif ($method === 'POST') { $body = json_decode(file_get_contents('php://input'), true) ?? []; $slug = sanitizeSlug($body['slug'] ?? ''); $vote = $body['vote'] ?? '';} else { jsonError(405, 'Method not allowed');}
if ($slug === '') { jsonError(400, 'Missing slug');}
// ── Load data ─────────────────────────────────────────────────────────────────
$dataFile = __DIR__ . '/reactions-data.json';$data = loadData($dataFile);
if (!isset($data[$slug])) { $data[$slug] = ['helpful' => 0, 'not_helpful' => 0];}
// ── Record vote ───────────────────────────────────────────────────────────────
if ($method === 'POST') { if ($vote === 'helpful') { $data[$slug]['helpful']++; } elseif ($vote === 'not_helpful') { $data[$slug]['not_helpful']++; } else { jsonError(400, 'Invalid vote value'); } saveData($dataFile, $data); maybeNotify($slug, $vote, $data[$slug]);}
echo json_encode($data[$slug]);This is a PHP API endpoint for managing blog article reactions (helpful/not helpful votes). It handles CORS validation, loads and saves vote counts from a JSON file, processes GET requests to retrieve vote data and POST requests to record new votes, and sends admin notifications with rate-limiting to prevent email spam.
Four constants, four decisions to make:
ADMIN_EMAIL— where email notifications go. Use your own address.ADMIN_TOKEN— a long random string (32+ characters). This protects the admin endpoint that returns all votes. Generate one withopenssl rand -base64 24in your terminal and never commit it to a public repository.NOREPLY— your noreply email address.NOTIFY_COOLDOWN_SECONDS— the minimum number of seconds between two notification emails for the same article. The default is 3 600 (one hour). This prevents your inbox from being flooded when an article goes viral.SITE_URL— your public domain, used to build clickable links in the notification email and to validate CORS origins. Think to change this value to yours.
Using a .env file
Don't hardcode your email, token, ... in the PHP file. Add the api/.env file next to the reactions.php file and replace placeholders by your own values.
ADMIN_EMAIL=your_email@your_domainADMIN_TOKEN=change-me-to-a-long-random-stringNO_REPLY=noreply@your_domainIP_HASH_SALT=change-me-to-another-long-random-stringNONCE_SECRET=change-me-to-yet-another-long-random-stringThis is a configuration file that sets up essential secrets and credentials for an application. It defines an admin email address, authentication token, a no-reply email address, and two cryptographic salts used for hashing and security purposes. Each sensitive value needs to be customized with real, secure values before the application runs.
1.2 — CORS
A word about CORS: in this api/reactions.php file, you'll find this snippet:
$allowedOrigins = [
    SITE_URL,
    'https://localhost:3000',
];

$origin = $_SERVER['HTTP_ORIGIN'] ?? '';
if (!in_array($origin, $allowedOrigins, true)) {
    http_response_code(403);
    exit;
}

header('Content-Type: application/json; charset=utf-8');
header("Access-Control-Allow-Origin: $origin");
header('Access-Control-Allow-Methods: GET, POST, OPTIONS');
header('Access-Control-Allow-Headers: Content-Type');
header('Vary: Origin');

if ($_SERVER['REQUEST_METHOD'] === 'OPTIONS') {
    http_response_code(204);
    exit;
}
The CORS block does two things.
First, it rejects any request that does not originate from your site or from localhost:3000 (your local Docusaurus dev server). Without this check, anyone could POST fake votes from any origin. The check is strict (in_array with the third argument true): no substring matching, no wildcards.
Second, it echoes the validated origin back in the Access-Control-Allow-Origin header. This is more correct than the wildcard * approach because it works with credentials and explicitly tells browsers which origin is allowed — and the Vary: Origin header ensures that caches respect per-origin responses.
The OPTIONS branch handles the browser preflight that precedes any cross-origin POST with a Content-Type: application/json header.
Why localhost:3000?
During development, yarn start serves Docusaurus on https://localhost:3000. Without adding it to the allowed origins list, every vote from your dev environment would be silently rejected by the browser before even reaching the server.
1.3 — Email notification with per-article throttling
A word about email notification: in this api/reactions.php file, you'll find this snippet:
function maybeNotify(string $slug, string $vote, array $counts): void
{
    $throttleFile = __DIR__ . '/notifications.json';
    $throttle     = loadData($throttleFile);

    if (time() - ($throttle[$slug] ?? 0) < NOTIFY_COOLDOWN_SECONDS) {
        return;
    }

    $articleUrl   = SITE_URL . '/' . $slug;
    $dashboardUrl = SITE_URL . '/reactions-dashboard';
    $total        = $counts['helpful'] + $counts['not_helpful'];
    $ratio        = $total > 0 ? round($counts['helpful'] / $total * 100) : 0;

    $subject = "[Blog] New reaction on: $slug";
    $body    = implode("\n", [
        "A reader just reacted to one of your blog posts.",
        "",
        "Article     : $articleUrl",
        "Vote        : $vote",
        "Helpful     : {$counts['helpful']}",
        "Not helpful : {$counts['not_helpful']}",
        "Approval    : {$ratio}%",
        "",
        "View full dashboard: $dashboardUrl",
    ]);

    $headers = implode("\r\n", [
        "From: " . NO_REPLY,
        "Reply-To: " . NO_REPLY,
        "Content-Type: text/plain; charset=utf-8",
    ]);

    if (@mail(ADMIN_EMAIL, $subject, $body, $headers)) {
        $throttle[$slug] = time();
        saveData($throttleFile, $throttle);
    }
}
The throttle check is the key line: time() - ($throttle[$slug] ?? 0) < NOTIFY_COOLDOWN_SECONDS. If the last email for this article was sent less than NOTIFY_COOLDOWN_SECONDS ago, the function returns immediately without sending anything. The throttle timestamp is only saved when mail() actually succeeds, so a failed send does not block the next attempt.
The notification email includes the vote type, the running totals, and the approval ratio — enough context to decide whether an article needs attention without having to open the dashboard.
Adjust the cooldown to your traffic
On a low-traffic blog, a one-hour cooldown is reasonable. If you ever end up on a high-traffic aggregator, consider bumping NOTIFY_COOLDOWN_SECONDS to 86400 (24 hours) temporarily. The votes are never lost, you just receive fewer emails about them.
1.4 — Routing: GET and POST
$method = $_SERVER['REQUEST_METHOD'];
$slug   = '';
$vote   = '';

if ($method === 'GET') {
    // Admin request: return all reaction data
    if (array_key_exists('admin', $_GET)) {
        if (($_GET['admin'] ?? '') !== ADMIN_TOKEN) {
            jsonError(403, 'Forbidden');
        }
        echo json_encode(loadData(__DIR__ . '/reactions-data.json'));
        exit;
    }
    $slug = sanitizeSlug($_GET['slug'] ?? '');
} elseif ($method === 'POST') {
    $body = json_decode(file_get_contents('php://input'), true) ?? [];
    $slug = sanitizeSlug($body['slug'] ?? '');
    $vote = $body['vote'] ?? '';
} else {
    jsonError(405, 'Method not allowed');
}

if ($slug === '') {
    jsonError(400, 'Missing slug');
}
The GET branch handles two cases.
When the admin query parameter is present, the script checks it against ADMIN_TOKEN. A matching token returns the full contents of reactions-data.json — the data consumed by the dashboard. A non-matching token returns a 403 Forbidden.
When admin is absent, the script reads the slug query parameter. This is the public endpoint the React component calls on page load to get the current vote counts for a specific article.
The POST branch reads the request body as JSON (the React component sends Content-Type: application/json). It extracts slug and vote. Both go through validation in the next section.
$dataFile = __DIR__ . '/reactions-data.json';
$data     = loadData($dataFile);

if (!isset($data[$slug])) {
    $data[$slug] = ['helpful' => 0, 'not_helpful' => 0];
}

if ($method === 'POST') {
    if ($vote === 'helpful') {
        $data[$slug]['helpful']++;
    } elseif ($vote === 'not_helpful') {
        $data[$slug]['not_helpful']++;
    } else {
        jsonError(400, 'Invalid vote value');
    }
    saveData($dataFile, $data);
    maybeNotify($slug, $vote, $data[$slug]);
}

echo json_encode($data[$slug]);
On first access, the slug entry is created with zeroed counters. The POST branch increments the right counter, saves the file, and triggers the throttled notification. Any vote value other than helpful or not_helpful is rejected immediately. The final line echoes the (updated or unchanged) counts for this slug, whatever the method.
Step 2 — The React component
Create the folder src/components/Reaction/ and the file index.tsx inside it.
2.1 — Imports and setup
import { useState, useEffect, useCallback, type JSX } from "react";
import useDocusaurusContext from "@docusaurus/useDocusaurusContext";
import styles from "./styles.module.css";

interface Props {
  metadata?: {
    permalink?: string;
  };
}

interface Counts {
  helpful: number;
  not_helpful: number;
}

export default function Reaction({ metadata }: Props): JSX.Element | null {
  const { siteConfig } = useDocusaurusContext();
  const slug = metadata?.permalink?.replace(/^\/|\/$/g, "") ?? "";
  const apiUrl = `${siteConfig.url}/api/reactions.php`;
  const storageKey = `reaction_${slug}`;
metadata is the object that Docusaurus passes to every blog post component. We use metadata.permalink — the URL path of the article — as the slug. The two replace calls strip the leading and trailing slashes so, the slug matches what sanitizeSlug on the PHP side produces: blog/my-article, not /blog/my-article/.
The Props interface only needs metadata.permalink; everything else Docusaurus passes is ignored. Counts is the { helpful, not_helpful } shape the PHP endpoint returns — reused below for the counts state.
siteConfig.url is your production URL from docusaurus.config.js. The component builds the API URL from it dynamically, which means it also works correctly in development (where url will point to https://localhost:3000 if you configure it that way, but in practice the component is only mounted after Docusaurus resolves the site config).
storageKey gives every article its own entry in localStorage (reaction_blog-my-article), preventing a vote on one article from affecting another.
2.2 — State
  const [counts, setCounts] = useState<Counts | null>(null);
  const [voted, setVoted] = useState<string | null>(null);
  const [submitError, setSubmitError] = useState(false);

  useEffect(() => {
    try {
      const stored = localStorage.getItem(storageKey);
      if (stored) setVoted(stored);
    } catch {}
  }, [storageKey]);
counts holds the { helpful, not_helpful } object returned by the API. It starts as null (not yet loaded). submitError is a flag flipped on when a vote POST fails, so the render can show a retry message.
voted holds the previous vote for this article. It starts as null and is only populated after mount, inside a useEffect that reads localStorage. The try/catch is there because localStorage can throw in private browsing modes or when storage is full.
Why not read localStorage in useState?
Docusaurus server-renders every page. If voted were seeded from localStorage in a useState initializer, the server would produce null (no localStorage there) while the browser would produce the stored "helpful" — the two HTML trees disagree, and React throws a hydration mismatch. Deferring the read to useEffect keeps the first client render identical to the server's, then updates. Anything outside useState, useEffect, or an event handler still needs a typeof window !== "undefined" guard.
2.3 — Loading counts on mount
  useEffect(() => {
    if (!slug) return;
    fetch(`${apiUrl}?slug=${encodeURIComponent(slug)}`)
      .then((r) => (r.ok ? r.json() : null))
      .then((data) => {
        if (data) setCounts(data);
      })
      .catch(() => {});
  }, [slug, apiUrl]);
On mount, the component fetches the current counts for this article. The encodeURIComponent call ensures the slug is safe in a URL query string. If the fetch fails for any reason (network error, server down, non-OK status), the error is swallowed silently — the widget simply stays in its initial state, which is fine.
2.4 — Sending a vote
  const handleVote = useCallback(
    async (vote: string) => {
      setSubmitError(false);
      try {
        const res = await fetch(apiUrl, {
          method: "POST",
          headers: { "Content-Type": "application/json" },
          body: JSON.stringify({ slug, vote }),
        });
        if (!res.ok) {
          setSubmitError(true);
          return;
        }
        const data = await res.json();
        setCounts(data);
        setVoted(vote);
        try {
          localStorage.setItem(storageKey, vote);
        } catch {}
      } catch {
        setSubmitError(true);
      }
    },
    [slug, apiUrl, storageKey],
  );
handleVote POSTs { slug, vote } as JSON. On success, it updates the displayed counts with the fresh values returned by the server, sets voted to the chosen value (switching the UI from "vote buttons" to "thank you" state), and saves the vote to localStorage. Any failure — a non-OK response or a thrown fetch — sets submitError, which surfaces the retry message in the render below; localStorage write failures are swallowed since the vote itself already went through.
useCallback memoizes the function so it does not get recreated on every render, which is important since it is passed as an onClick prop.
2.5 — Rendering
  if (!slug) return null;

  return (
    <div className={styles.container}>
      {!voted ? (
        <>
          <span className={styles.question}>Was this article helpful?</span>
          <div className={styles.buttons}>
            <button
              className={styles.btn}
              onClick={() => handleVote("helpful")}
              aria-label="Yes, this was helpful"
            >
              👍 Helpful
            </button>
            <button
              className={`${styles.btn} ${styles.btnNeutral}`}
              onClick={() => handleVote("not_helpful")}
              aria-label="No, this was not helpful"
            >
              👎 Not really
            </button>
          </div>
          {submitError && (
            <span className={styles.submitError}>
              Could not save your vote — please try again.
            </span>
          )}
        </>
      ) : (
        <div className={styles.thanks}>
          <span className={styles.thanksMsg}>
            {voted === "helpful" ? "Glad it helped! 🙌" : "Thanks for the feedback!"}
          </span>
          {counts && (
            <span className={styles.counts}>
              <span title={`${counts.helpful} found this helpful`}>
                👍 {counts.helpful}
              </span>
              <span title={`${counts.not_helpful} did not find this helpful`}>
                👎 {counts.not_helpful}
              </span>
            </span>
          )}
        </div>
      )}
    </div>
  );
}
The rendering has two states. Before voting (!voted): the question, two buttons, and — only when submitError is set — a retry message under them. After voting (voted is set): a thank-you message personalized to the vote choice, plus the vote counts — which are now visible since the reader has expressed their opinion.
The aria-label attributes make the buttons accessible to screen readers: emoji-only labels like "👍 Helpful" are not always read correctly by screen readers, so an explicit label helps.
The Props and Counts interfaces at the top are the whole contract: the compiler flags a wrong metadata shape or a misused count field at build time, so there is no runtime PropTypes check to add.
Step 3 — The CSS module
Create file styles.module.css in src/components/Reaction/.
The outer container is a flex row with wrapping, so it collapses gracefully on narrow screens. The colors use Docusaurus CSS custom properties (--ifm-*), which means the widget automatically adapts to light mode, dark mode, and any custom Docusaurus theme without writing a single media query or duplicate rule.
The "Helpful" button turns the primary theme color on hover; the "Not really" button turns a neutral grey. The 0.15 s transition makes the hover feel responsive without being flashy.
Step 4 — Injecting the widget via swizzling
Swizzling is Docusaurus's mechanism for replacing a built-in theme component with your own version. We want to inject <Reaction /> at the bottom of every blog post page — and the right place to do that is BlogPostItem, the component that wraps the content and footer of every post.
4.1 — Run the swizzle command
yarn run swizzle @docusaurus/theme-classic BlogPostItem --wrap
Wrap vs. Eject
The --wrap flag creates a thin wrapper around the original component rather than copying the entire source. However, for BlogPostItem we want fine-grained control over the layout (to place <Reaction /> exactly where we want it, between the content and the footer). In practice, you will likely eject, not wrap. Run the command without --wrap and Docusaurus will ask you to confirm; choose Eject.
This creates src/theme/BlogPostItem/index.js with the original source. Open it.
4.2 — Modify the swizzled file
You need to make three changes: import the component, detect whether we are on a single-post page, and render <Reaction /> conditionally.
Here is the relevant portion:
import Reaction from "@site/src/components/Reaction";
import { useBlogPost } from "@docusaurus/plugin-content-blog/client";
import BlogPostItemContainer from "@theme/BlogPostItem/Container";
import BlogPostItemContent from "@theme/BlogPostItem/Content";
import BlogPostItemFooter from "@theme/BlogPostItem/Footer";
import BlogPostItemHeader from "@theme/BlogPostItem/Header";

function useContainerClassName() {
  const { isBlogPostPage } = useBlogPost();
  return !isBlogPostPage ? "margin-bottom--xl" : undefined;
}

export default function BlogPostItem({ children, className }) {
  const { metadata, isBlogPostPage } = useBlogPost();
  const containerClassName = useContainerClassName();

  return (
    <BlogPostItemContainer className={clsx(containerClassName, className)}>
      <BlogPostItemHeader />
      <BlogPostItemContent>{children}</BlogPostItemContent>
      <BlogPostItemFooter />

      {isBlogPostPage && (
        <Reaction metadata={metadata} />
      )}
    </BlogPostItemContainer>
  );
}
The key guard is isBlogPostPage. Docusaurus renders BlogPostItem in two contexts:
- Blog list pages — where article cards are shown in a grid or feed.
- Single post pages — where the full article is displayed.
Without the guard, a reaction widget would appear under every article card on the blog homepage, which is not what we want. isBlogPostPage is true only when you are reading a single post, so the widget shows up in exactly the right place.
Placement matters
If you have other custom components (a Bluesky share button, related posts, etc.), the order here defines the visual order at the bottom of every post. Adjust to your preference.
4.3 — The complete swizzled file ON MY SITE
Important
Below is the contents of the index.js file on my blog. I'm sharing it as an example and for comparison, since I use many more React components than just the one we just covered in this post.
Step 5 — The admin dashboard
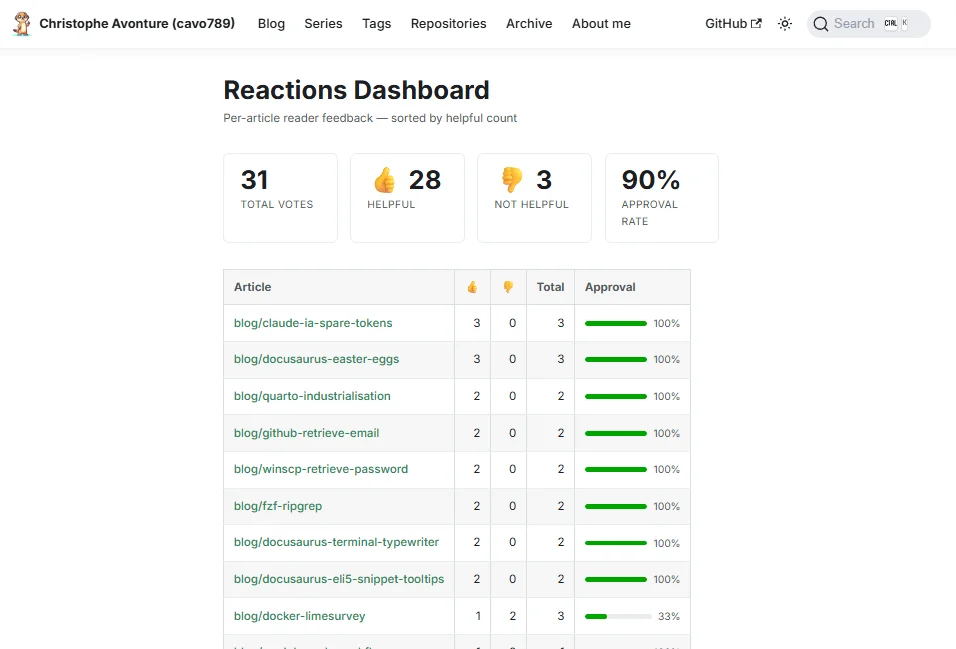
The dashboard is a standard Docusaurus page (not a blog post) that calls the admin endpoint of reactions.php and presents the data in a table with per-article approval bars.
Create src/pages/reactions-dashboard.js with this content:
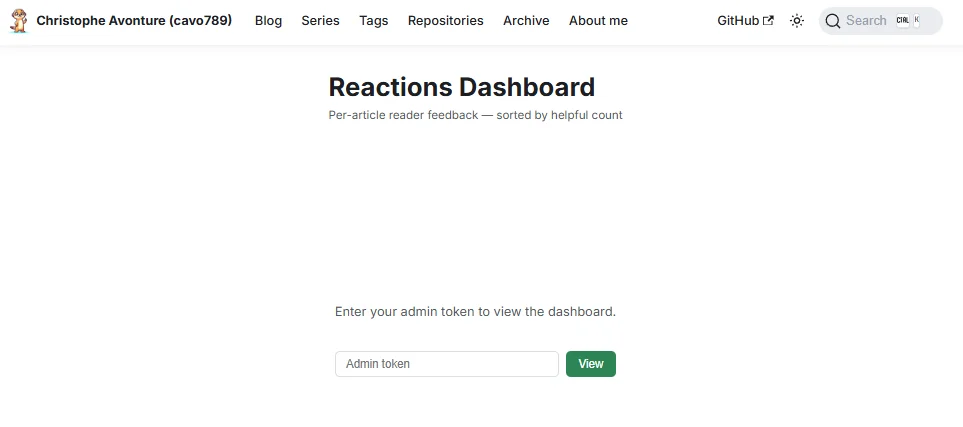
5.1 — Authentication
The page reads the admin token from the URL hash (/reactions-dashboard#your-token). If no hash is present, it renders an input form to enter the token manually. The token is never sent in the URL path or stored in localStorage.
const [token, setToken] = useState(() => {
  if (typeof window === "undefined") return "";
  return window.location.hash.slice(1);
});
Passing the token in the hash is a practical choice: the hash is never sent to the server in the HTTP request, so it does not appear in server logs, and you can bookmark the URL.
Fill your ADMIN_TOKEN to connect:
5.2 — Data loading
const fetchData = useCallback(async (t) => {
  if (!t) return;
  setLoading(true);
  setError(null);
  try {
    const res = await fetch(`${apiUrl}?admin=${encodeURIComponent(t)}`);
    if (res.status === 403) { setError("Invalid token."); setData(null); return; }
    if (!res.ok) throw new Error(`HTTP ${res.status}`);
    setData(await res.json());
  } catch (e) {
    setError(`Failed to load data: ${e.message}`);
    setData(null);
  } finally {
    setLoading(false);
  }
}, [apiUrl]);
A 403 means the token is wrong and gets a clear "Invalid token." message. Any other non-OK status is treated as a generic error. The finally block always clears the loading state.
5.3 — Aggregation
function computeTotals(data) {
  let totalHelpful = 0;
  let totalNot = 0;

  const rows = Object.entries(data)
    .map(([slug, counts]) => {
      const helpful    = counts.helpful    ?? 0;
      const notHelpful = counts.not_helpful ?? 0;
      const total      = helpful + notHelpful;
      const ratio      = total > 0 ? Math.round((helpful / total) * 100) : 0;
      totalHelpful += helpful;
      totalNot     += notHelpful;
      return { slug, helpful, notHelpful, total, ratio };
    })
    .sort((a, b) => b.helpful - a.helpful || b.total - a.total);

  const grandTotal = totalHelpful + totalNot;
  const approval   = grandTotal > 0 ? Math.round((totalHelpful / grandTotal) * 100) : 0;

  return { rows, totalHelpful, totalNot, grandTotal, approval };
}
computeTotals iterates over every article in reactions-data.json, computes a per-article approval ratio, and sorts by helpful count descending (ties broken by total votes). The grand totals at the end power the summary cards at the top of the page.
And here is what you can get:
All Files at a Glance
Here is the full set of files involved, grouped for easy installation (rendered with my code snippets component).
... excluding src/theme/BlogPostItem/index.js
In the list below, I've not included src/theme/BlogPostItem/index.js because, as said, that file will vary between my blog and yours. Please refer to Step 4 and create the file manually.
Need help here? Click the "Help" button above for setup instructions.
Security Considerations
A few things to keep in mind before deploying:
Change the ADMIN_TOKEN. The example in the repository uses a placeholder. Generate your own with openssl rand -base64 32 and update the constant before deploying. Anyone with this token can read every vote ever recorded.
reactions-data.json and notifications.json should not be publicly accessible. If your web server serves the api/ folder directly, make sure these JSON files are not downloadable by just navigating to them. Add an .htaccess rule to block direct access to *.json files inside that directory:
<FilesMatch "\.json$">
    Require all denied
</FilesMatch>
The PHP script does not authenticate voters. Anyone can POST multiple votes for the same article from different clients. localStorage only prevents double voting from the same browser, not from scripts or different devices. For a personal blog, this is an acceptable trade-off — you get signal, not precision polling data.
File permissions. Make sure api/reactions-data.json and api/notifications.json are writable by the web server user. The script creates them on first use, so the api/ directory itself must be writable. On Linux: chmod 775 api/ and ensure the web server user owns or is in the group of that folder.
Testing It
Once the files are in place:
- Start the Docusaurus dev server:
yarn start - Open any blog post. You should see the "Was this article helpful?" widget at the bottom.
- Click one of the buttons. The widget should switch to the thank-you state.
- Refresh the page. The widget should still show the thank-you state (loaded from
localStorage). - Open a different browser (or an incognito window) and reload the same article. The vote counts from step 3 should be visible after voting.
- Visit
/reactions-dashboardand enter your admin token. The article you just voted on should appear in the table.
The dashboard URL
You can bookmark /reactions-dashboard#your-token to open the dashboard directly. The token in the hash fragment is never sent to the server in the HTTP request, so it does not appear in server access logs.
Conclusion
The entire system is about 250 lines of code across five files, has no external dependencies beyond what Docusaurus already ships, and requires nothing on the infrastructure side except a server capable of running PHP.
What I like most about this approach is that every byte of data lives in your own files, under your own control. Votes are stored in a plain JSON file you can open with any text editor, back up with any tool, and migrate to any other system whenever you want. No SaaS subscription to cancel, no API key to renew, no privacy policy to update because someone else's SDK added a tracker.
If you build on this and add features — per-section reactions, reader questions, outdated flags — the same pattern scales naturally: one PHP file per feature, one React component, one JSON store.
This article is part of the Creating Docusaurus components series:
- Change how Docusaurus will create img tags
- Overrides the generation of img tags with Docusaurus
- Organize Your Docusaurus Content with a Custom Series Component
- Providing a go to the top button in Docusaurus posts
- Creating a search&replace plugin for Docusaurus
- A component for showing code snippets in a Docusaurus blog
- A Docusaurus component that alerts readers the article is over a year old
- Showing the changelog of your post
- Inject ASCII Art in any HTML pages rendered by Docusaurus
- Best Practice - Customizing the Docusaurus RSS Feed for Full Content & Images
- Running some checks on your Docusaurus images
- Tags management in Docusaurus
- Automating TL;DR Summaries with Gemini AI
- Introducing the ProjectSetup Component - A Standardized Way to Share Project Structures
- How to indicate AI-assisted content in a Docusaurus blog
- Bring Your CLI Tutorials to Life with a Typewriter Terminal
- Meerkat Mischief: Sprinkling Easter Eggs Across my Blog
- AI-Powered Code Tooltips in Docusaurus — Explain Like I'm Five
- Adding Reader Reactions to Your Docusaurus Blog
- Your Blog Is Unreadable to an AI. Here Is the Fix.
- Shake Your Phone, Startle the Meerkat
- Add a "Copy as Markdown" Button to Your Docusaurus Blog
- Ask My Blog: Turning 259 Articles Into 2,160 Searchable Questions
- The Third Door: A Floating Chat Bubble, and the Feature Nobody Could Find
- Drawing a Map of My Own Blog
- Let Readers Flag Issues — A Multi-Type Feedback Widget for Docusaurus
Loading comments…
Related posts

Drawing a Map of My Own Blog
October 8, 2026
Ask My Blog: Turning 259 Articles Into 2,160 Searchable Questions
September 28, 2026
Add a "Copy as Markdown" Button to Your Docusaurus Blog
September 10, 2026
Shake Your Phone, Startle the Meerkat
August 27, 2026