Discovering Pentaho, an ETL program
Discover Pentaho Data Integration (ETL). Follow this step-by-step guide to install Pentaho (PDI/Kettle) on Linux and load data from an Excel file into a PostgreSQL database using Docker.

This article is over a year old but was reviewed on July 30, 2026 — the content is still accurate.

This guide provides a step-by-step introduction to Pentaho Data Integration (PDI/Kettle) on Linux. It walks through the entire process of setting up your environment, from installing Pentaho and its Java dependencies to creating a sample ETL job. You will learn how to use Docker to quickly spin up a PostgreSQL database and then use Pentaho's Spoon graphical interface to build a transformation that extracts data from an Excel file, and loads it into a PostgreSQL table.
Pentaho Data Integration is an ETL tool (Extract, Transform and Load) used for data integration. Let's imagine you've an Excel file and you want to extract records (only those matching a specific rule), then apply a transformation (like adding some new columns based on current data) and load them in a PostgreSQL database.
Pentaho (also called PDI or Kettle) will allow you to draw a data flow (load files, do some merge, apply transformation, run some piece of code (Shell or JavaScript), ... and store the result somewhere (a database or a file) or, even, send information by email in case of failure).
Let's quickly discover Pentaho and, as a first example, load an Excel file into a PostgreSQL database.
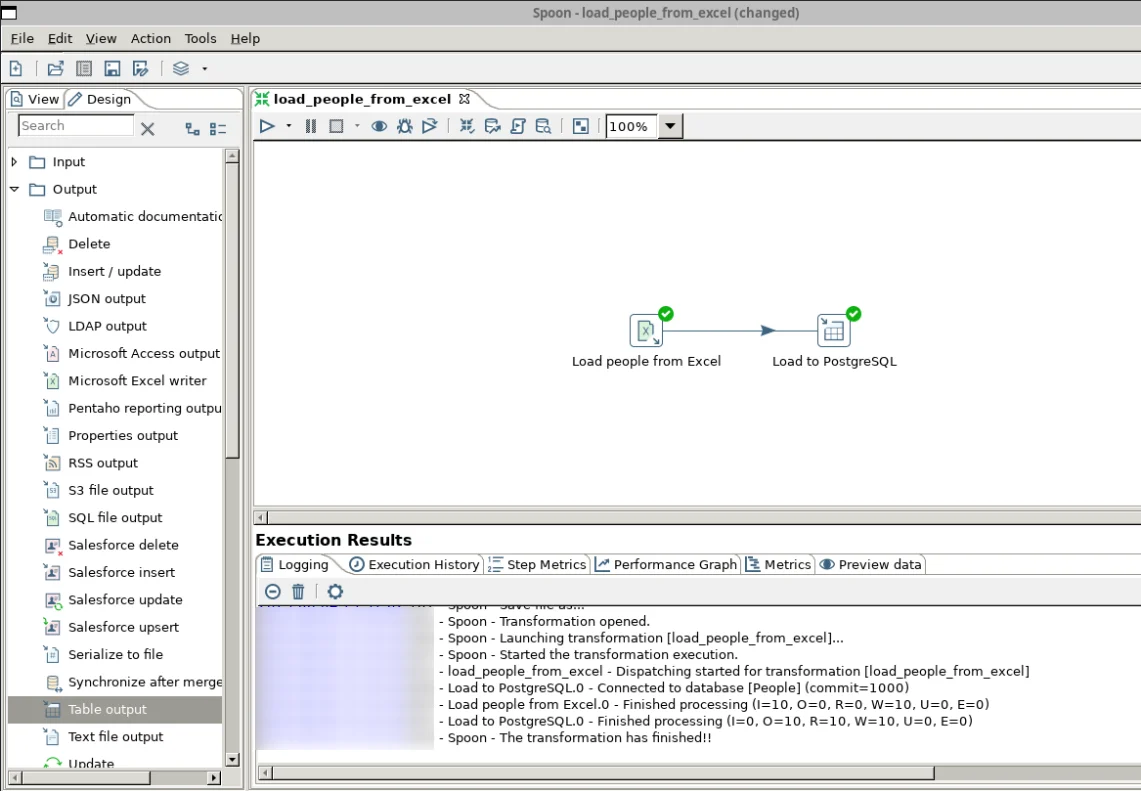
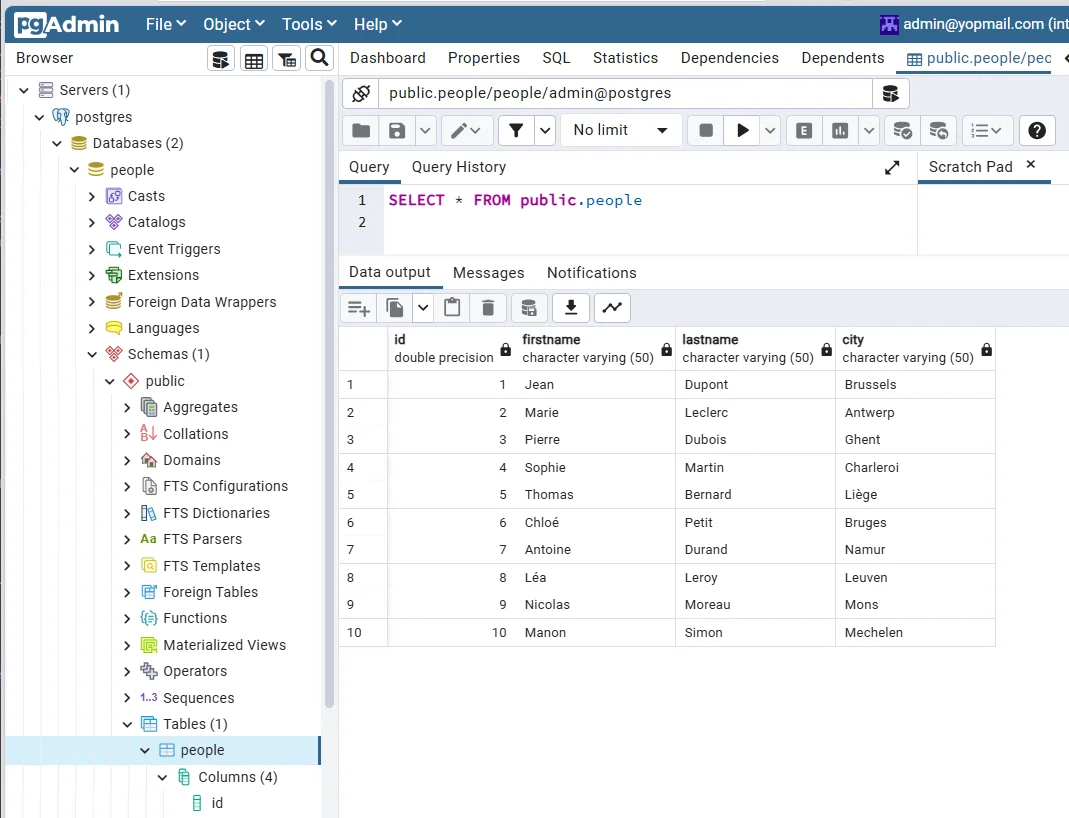
Here is exactly what we're building: a flow that reads an Excel file, then loads its rows into a PostgreSQL table.

Why It Works
- Spoon, Pentaho's graphical interface, is a drag-and-drop canvas: no code to write, just steps (Excel input, database output, ...) connected by arrows.
- Each step can be tested in isolation — preview the Excel rows, test the database connection — before you ever run the whole flow.
- Pentaho generates the
CREATE TABLESQL for you from the flow itself, so the database schema and the flow never drift apart.
Installation on Linux
Pentaho can be installed on both Windows and Linux since it's a Java application.
My personal experience: even with a powerful computer with plenty of RAM, Java interfaces on Windows are just impossible because interfaces are so unresponsive. On top, before you can even launch the application, you have to go through the trouble of installing Java and ... yuck.
Let's move on and install it under Linux; it's really easy to do.
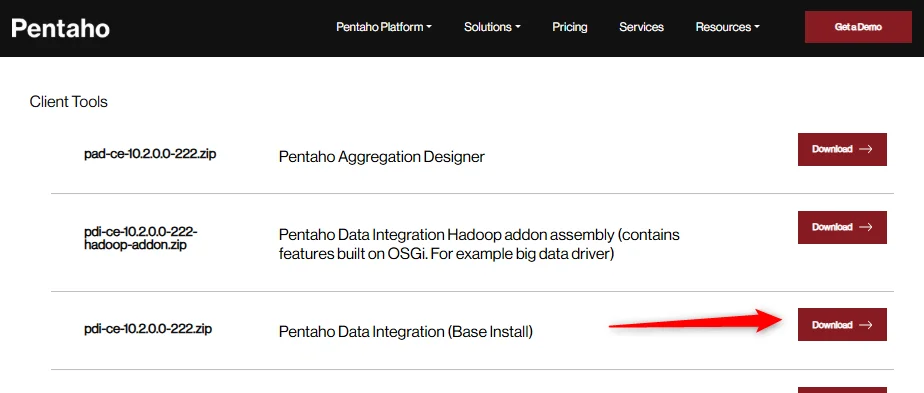
- Go to https://pentaho.com/pentaho-developer-edition/; fill in the form (it's mandatory) before getting the list of files you can download
- Download the
pdi-ce-10.2.0.0-222.zipfile. If like me you're under Windows, the archive will be put on your Windows partition; let's copy it to your Linux one- Start your Linux console and create a new folder like f.i.
~/tools/pentaho(you can decide to use another path but, in this documentation, we'll refer to~/tools/pentaho) - Still in your console, run
explorer.exe .in the command line to run Windows Explorer and open your Linux folder in it (see Open your Linux folder in Windows Explorer) - In a new tab (in Windows Explorer thus), go to your download directories to retrieve the downloaded file
- Copy the file from the Windows folder to your Linux one; using a drag&drop f.i.
- Start your Linux console and create a new folder like f.i.
- Back to your Linux console, go to the folder where you've just copied the file (
~/tools/pentaho) - Run
rm *Zone.Identifierto remove unneeded file (create by Windows during the copy action) - Run
unzip pdi-ce-10.2.0.0-222.zip. That command will create adata-integrationsubfolder - Run
rm pdi-ce-10.2.0.0-222.zipsince we don't need it anymore and runcd data-integrationto jump in the new folder - The next things to do is to prepare your system
- Please run
sudo apt-get update - Then, please run
sudo apt-get install openjdk-11-jdksince Pentaho requires Java to run - Please run
sudo apt-get install libgtk-3-0to install GTK 3 (GTK 2 is obsolete)
- Please run
Adding Pentaho to the PATH
To finalize the installation, you also need to update the PATH Linux variable.
Please run code ~/.bashrc (or code ~/.zshrc if you're using Oh-my-ZSH); search in the file if you already have a line with PATH=. If yes, please update and add $HOME/tools/pentaho/data-integration to it. If not, please go to the end of the file and add this line:
PATH="$HOME/tools/pentaho/data-integration:$PATH"This line prepends a Pentaho Data Integration directory to the system's PATH environment variable, so that executable programs in that tools folder can be run from anywhere in the terminal without typing the full path.
Save and quit.
To make the change also for your current console, run export PATH="$HOME/tools/pentaho/data-integration:$PATH" (or create a new console).
From now, you'll be able to run Pentaho whatever the current directory.
Let's prepare our environment
We'll create a new project; please create a temporary folder and jump in it:
$ mkdir -p /tmp/pentaho && cd $_
We will create a dummy Excel file then load it in a PostgreSQL database. The target table will be called people and we'll create it manually (not automatically).
First, we need an Excel file to load
For this tutorial, we'll load an Excel file in PostgreSQL so we need an Excel file.
Copy the table here below into Excel and save the new files as people.xlsx (otherwise, click here to download it). Save the file to your Linux /tmp/pentaho folder.
| ID | Firstname | Lastname | City |
|---|---|---|---|
| 1 | Jean | Dupont | Brussels |
| 2 | Marie | Leclerc | Antwerp |
| 3 | Pierre | Dubois | Ghent |
| 4 | Sophie | Martin | Charleroi |
| 5 | Thomas | Bernard | Liège |
| 6 | Chloé | Petit | Bruges |
| 7 | Antoine | Durand | Namur |
| 8 | Léa | Leroy | Leuven |
| 9 | Nicolas | Moreau | Mons |
| 10 | Manon | Simon | Mechelen |
Then we need a PostgreSQL database
For this, we'll use Docker. Please create a file called compose.yaml in your /tmp/pentaho folder with this content:
name: pentaho
services: postgres: image: postgres:9-alpine hostname: postgresql environment: - DATABASE_HOST=postgresql - POSTGRES_DB=people - POSTGRES_HOST_AUTH_METHOD=trust - POSTGRES_PASSWORD=admin - POSTGRES_USER=admin ports: - "5432:5432" expose: - "5432" networks: - pentaho
pgadmin: image: dpage/pgadmin4:6.12 hostname: pgadmin ports: - "8080:80" depends_on: - postgres environment: - PGADMIN_DEFAULT_EMAIL=admin@yopmail.com - PGADMIN_DEFAULT_PASSWORD=admin networks: - pentaho
networks: pentaho: external: falseThis is a Docker Compose configuration that sets up a PostgreSQL database and pgAdmin (a web-based management tool) for a Pentaho system. The two services run in the same isolated network, with PostgreSQL storing data and pgAdmin providing a web interface to manage that database.
And for our easiness, let's create a makefile
.PHONY: startstart: SWT_GTK3=1 SKIP_WEBKITGTK_CHECK=1 KETTLE_HOME=${PWD} spoon.sh
.PHONY: upup: docker compose upThis Makefile provides two convenient shortcuts for starting services. The 'start' target launches the Spoon application (a data integration tool) with specific environment variables configured, while the 'up' target starts Docker containers defined in a compose file.
Let's run our Docker container
Please run docker compose up --detach to start the PostgreSQL container and the pgAdmin one.
As you've seen, we've already set up a pgAdmin interface; we can open it by going to http://localhost:8080. pgAdmin is not your only option here; see Using Adminer, pgadmin or phpmyadmin to access your Docker database container.
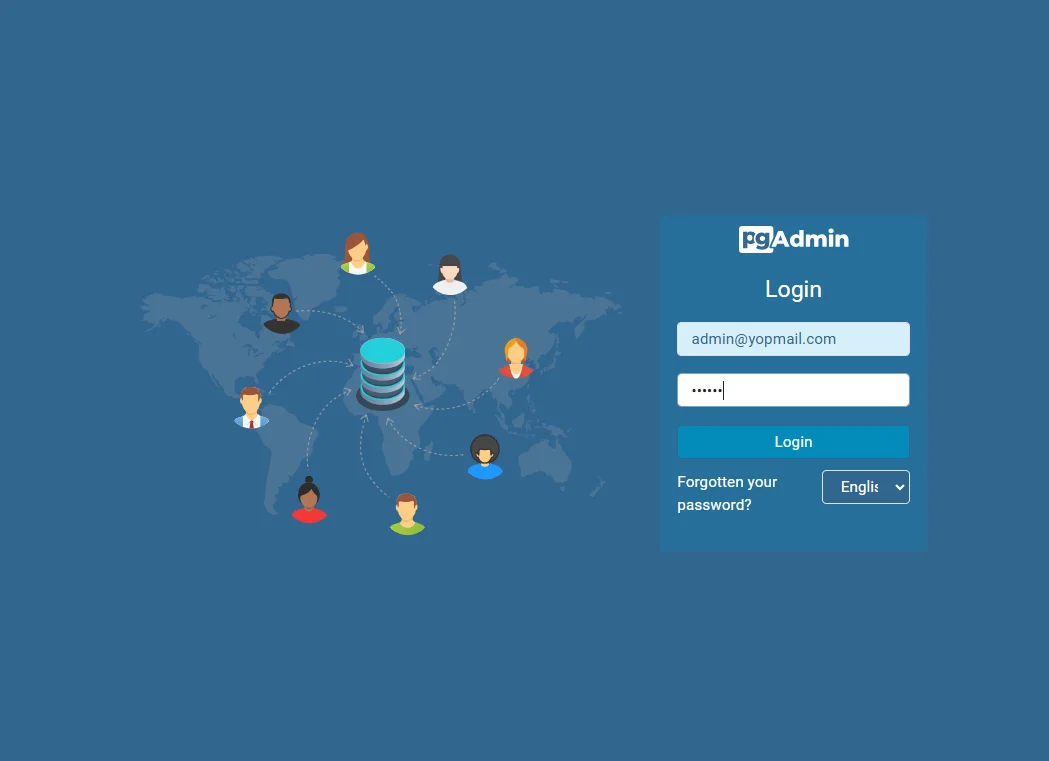
Use admin@yopmail.com and admin as credentials.
Once in the interface of pgAdmin, we have to create a new server by clicking on the Add new server button.
Give a name to the server then, in the Connection tab, fill in as below:
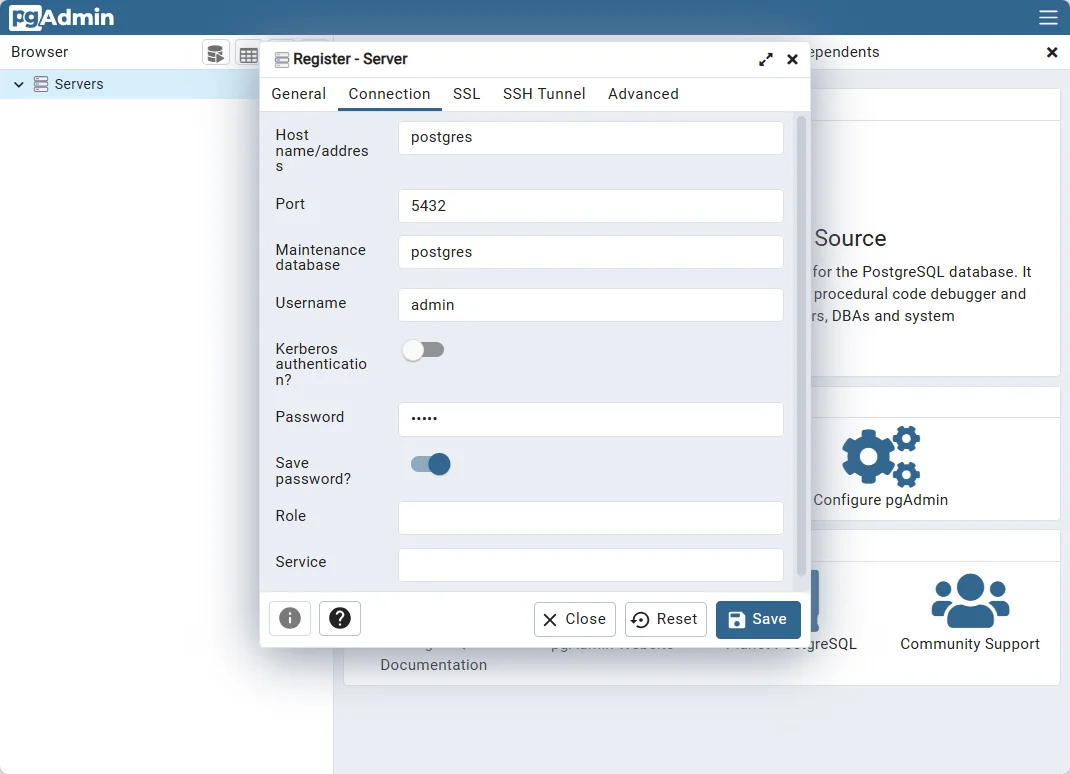
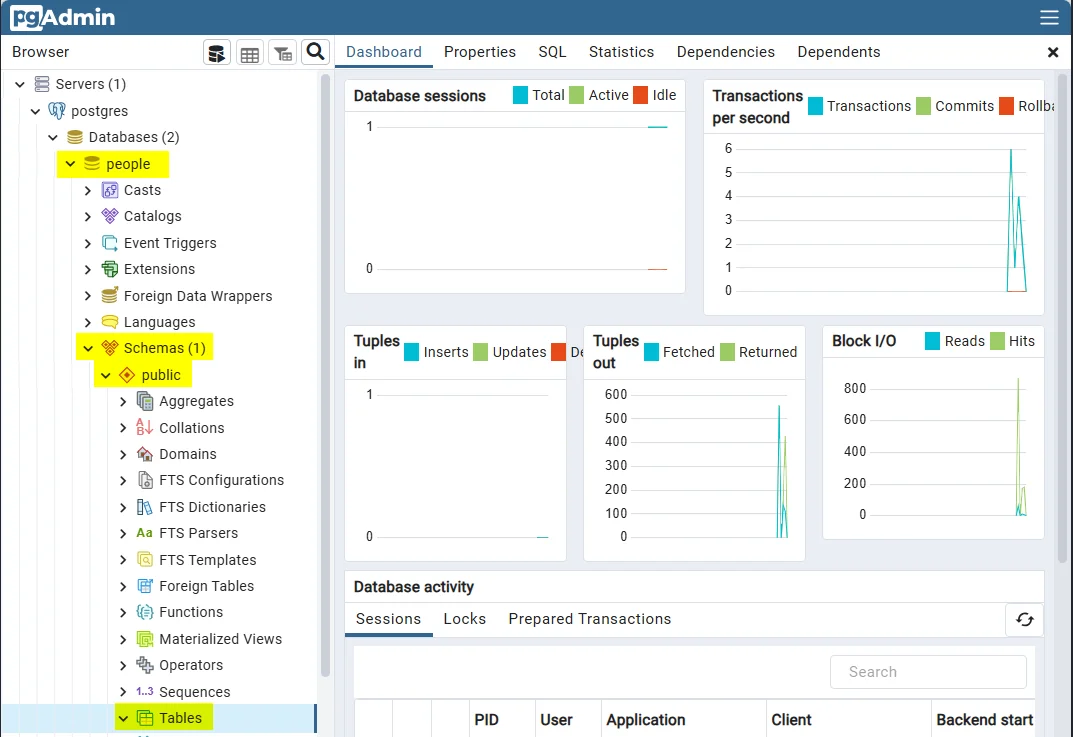
As you can see on the image below, during the creation of our PostgreSQL container, a new database called people has been created. That database has a public schema and, right now, no tables.
Information
This is done thanks to our compose.yaml file. If you're curious, open the compose.yaml file again and pay attention to the environment section for the postgres service. We've instructed PostgreSQL to create a database called people; owned by user called admin.
The pieces of the jigsaw are in place, create our flow
Now, run spoon.sh to start the graphical user interface of Pentaho. That interface is called Spoon.
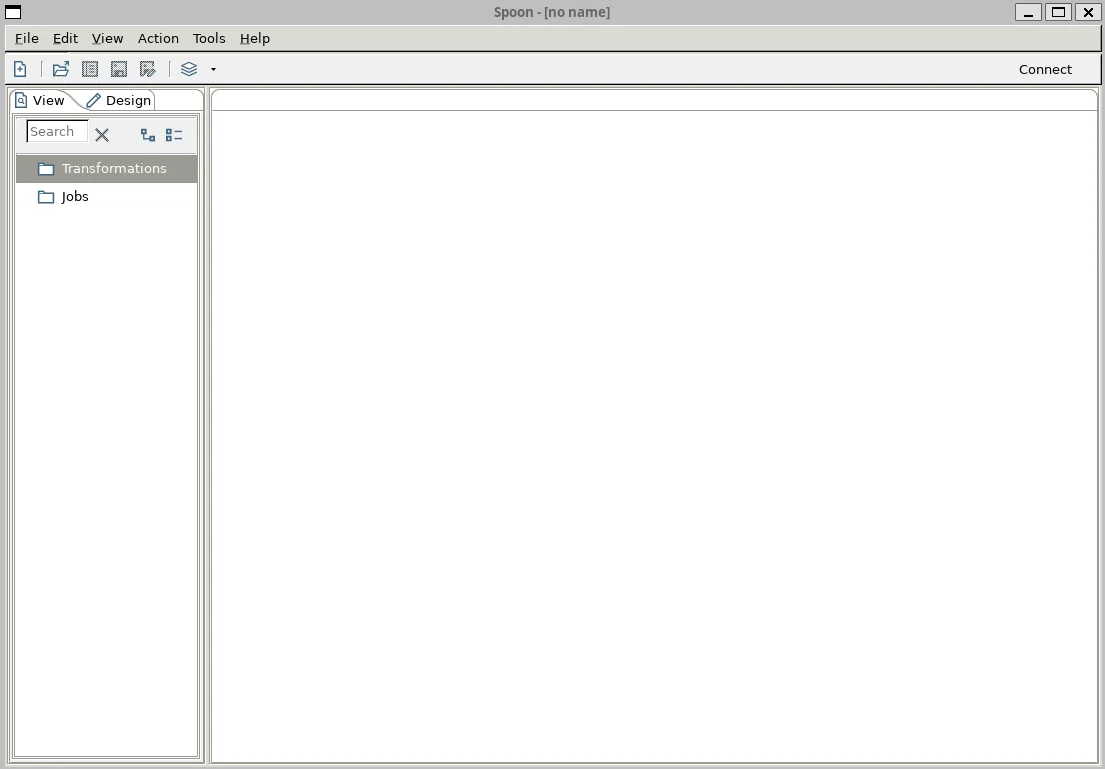
We need to create a new transformation file
Click on the File menu, then New and select Transformation.
Load from Excel
In our scenario, we want to load an Excel file so click on the Input category and scroll down until you see Microsoft Excel input and drop it to the main canvas.
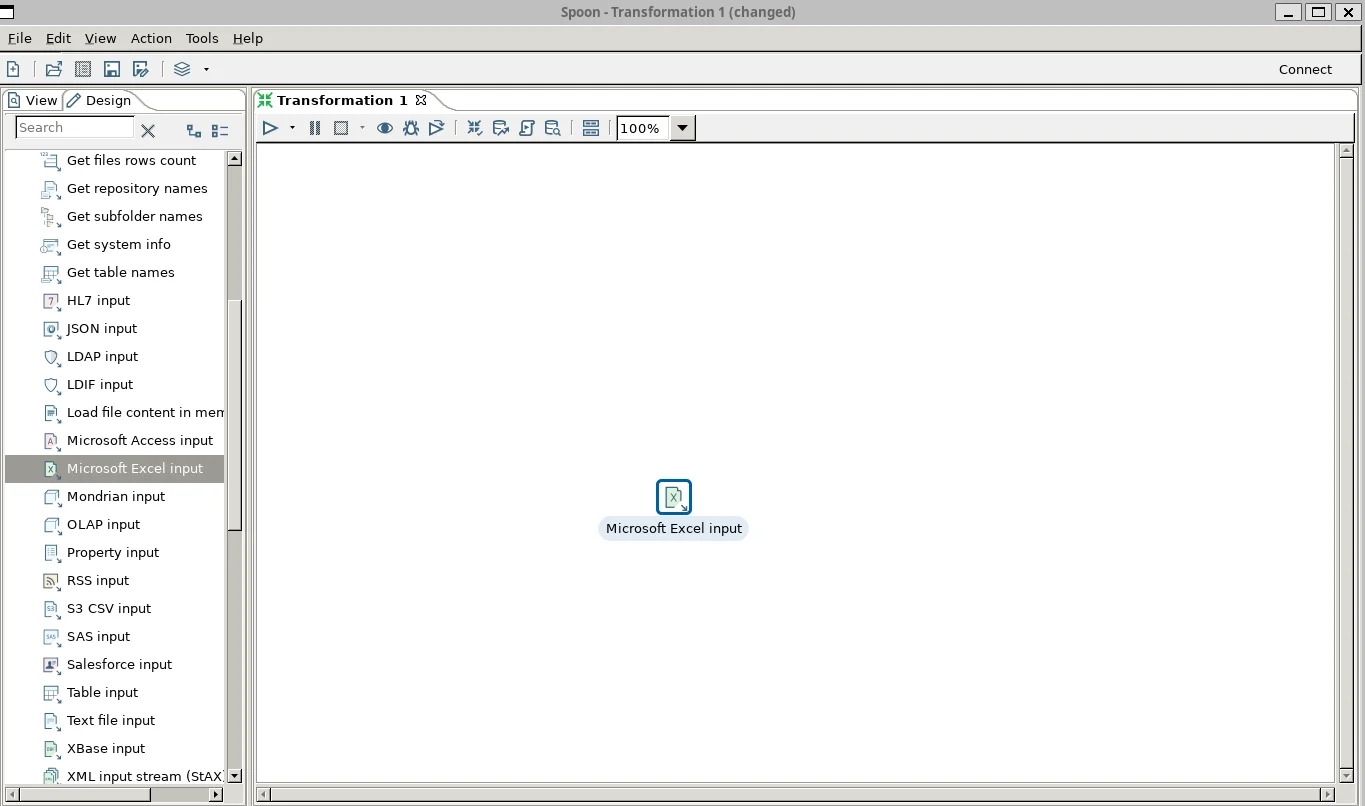
Double-click on the just added step so you can configure it:
- Give it a clear name (like Load people from Excel),
- Click on the Browse... button to retrieve your file (f.i.
/tmp/pentaho/people.xlsx) then click on theAddbutton to add that file to the list of Selected files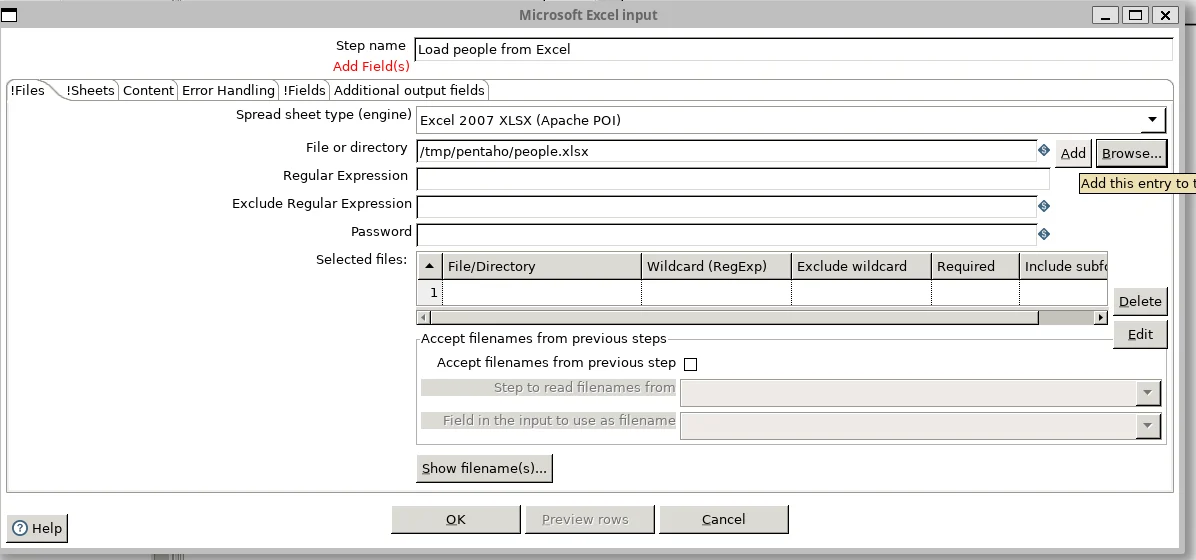
- In the
Sheetstab, click on theGet sheetname(s)...button, retrieve the name of the sheet and add it.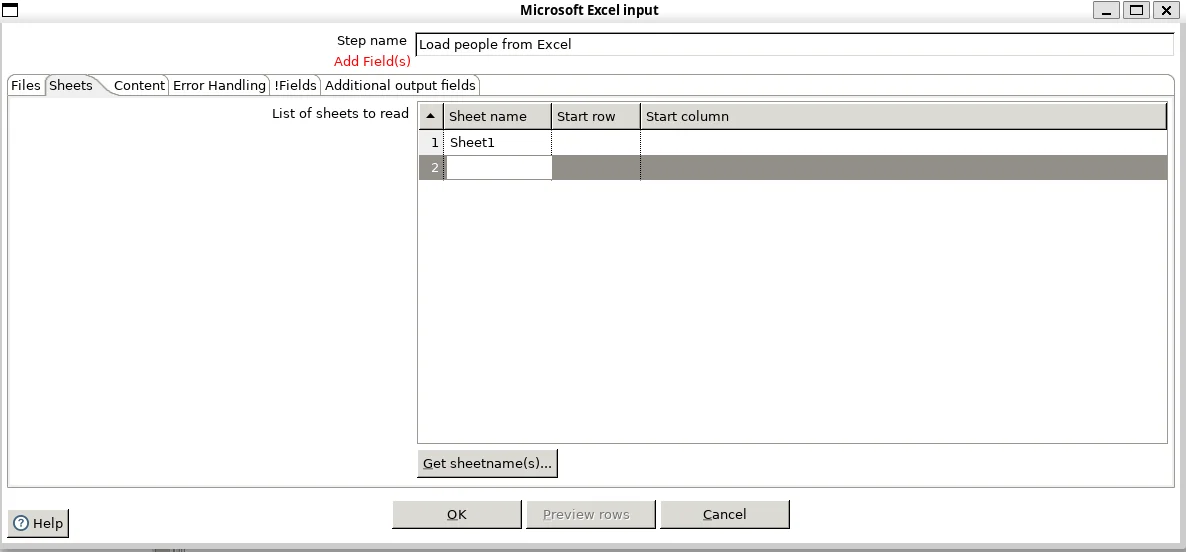
- In the
Contenttab, there is nothing to change (since our Excel file has a header row then the data without empty rows between) - In the
Fieldstab, click onGet fields from header row...to load names then adjust some properties like below illustrated: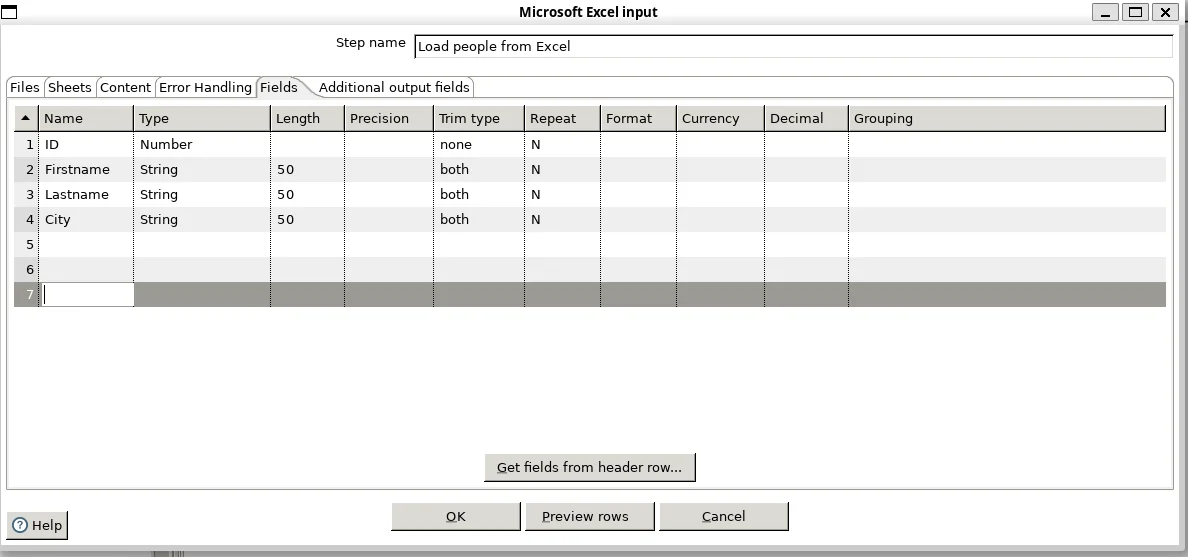
- Click on the
Preview rowsbutton if you want to check if everything is OK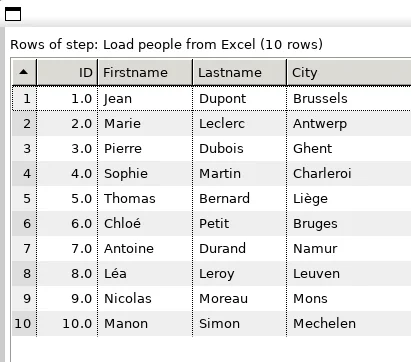
We're done; click on the OK button.
Define our database connection
Now, click on View tab as illustrated below and double-click on the Database connections item.
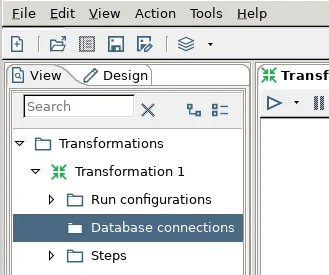
Remember our compose.yaml file and fill in the screen like this:
- Host Name
localhost- Database Name
people- Port Number
5432- Username
admin- Password
admin
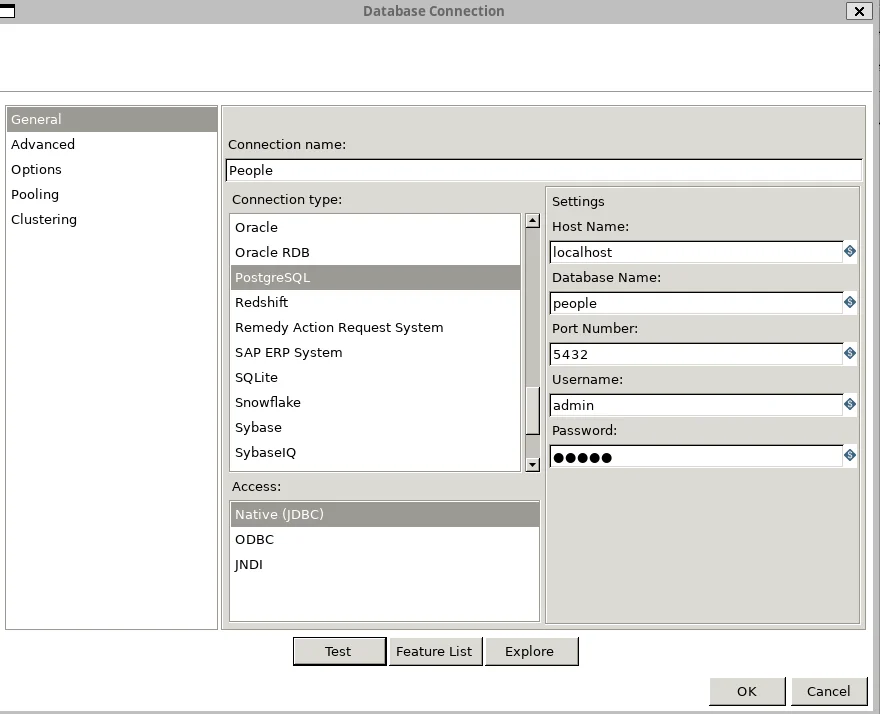
Click on the Test button to make sure the connection is correctly configured.

Click on the Ok button to save your connection.
Prepare our table output
Click on the Design table then on the Output category and find Table output. Do a drag&drop to the canvas.
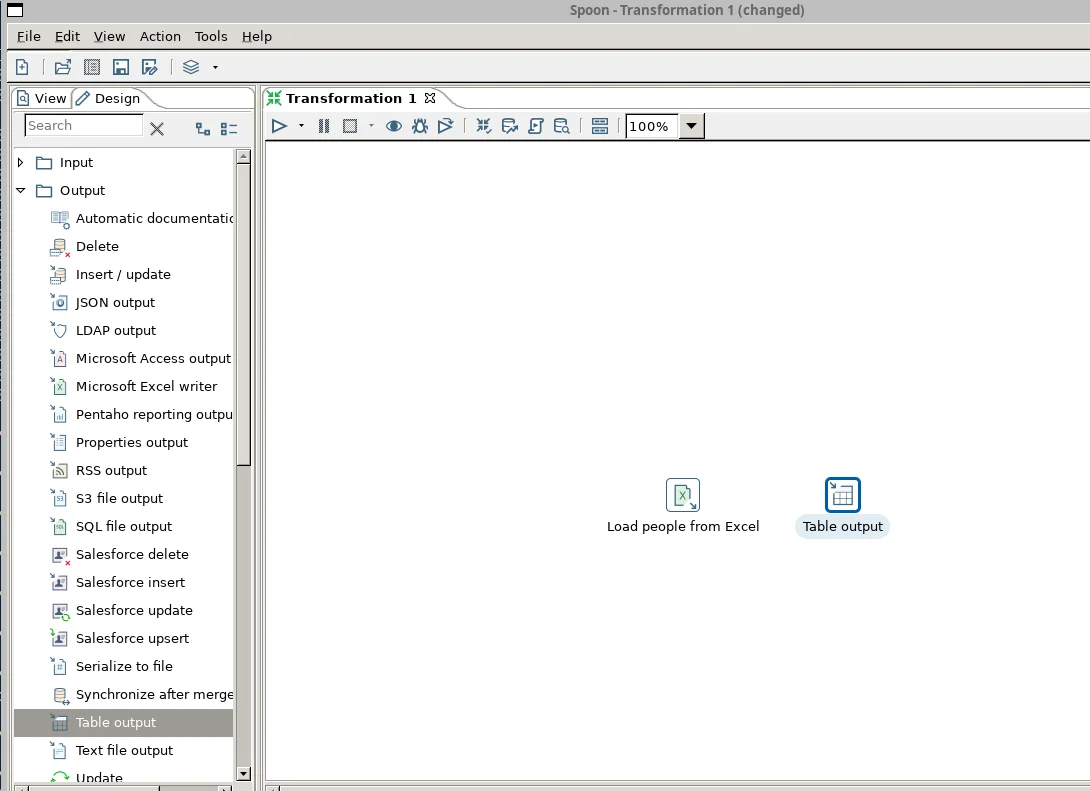
Click on the Load people from Excel box and wait until the small icons below are displayed:

Click on the button with the output connector (the one with the right arrow) and drop the line onto the Table output box:

It tells Pentaho that, once the Load people from Excel step is successfully done, to continue with Table output.
Now double-click on Table output and let's do some configuration:
- Give it a clear step name (like Load to PostgreSQL),
- The name of the Connection to use should be
People(the one we've just created), - The Target schema has to be
public(the one from our People database), - The Target table is
people.
Now, click on the SQL button to see that Pentaho will provide a popup (think to resize the window) with a CREATE TABLE instruction:
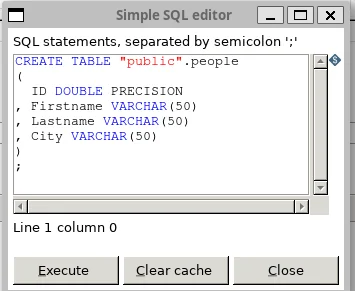
Since our table didn't exist yet, click on the Execute button:
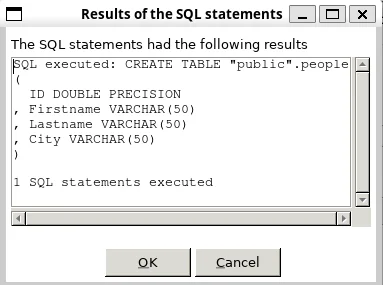
Let's verify thanks to pgAdmin:
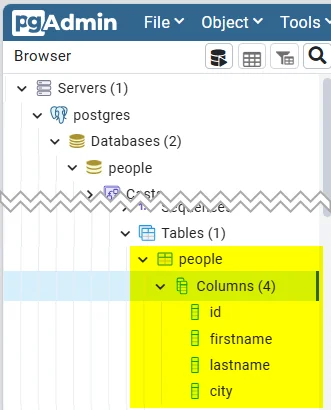
Nice. We can now close the two popup window, go back to the configuration of our table. Click on the OK button since we've finished this step.
Time to save our transformation
Please click on the File menu then Save.
Save the file to /tmp/pentaho with the load_people_from_excel.ktr name.
Run it
See the Run icon (the same one already shown at the top of this article). Click on it. You'll get a new window with bottom right a Run button; click on it.
If everything was correctly configured and fired, you'll get the same "Successfully executed" screen already teased earlier.
Back to pgAdmin, get the list of records from the people table to verify if the Excel file was well loaded — the same result already shown at the top of this article.
Download the transformation file
If you've some troubles by creating your transformation file, here is the one I've used for this article: load_people_from_excel.ktr.
If you want the Excel file used in this article, here is the link again.
Conclusion
Aside Docker, PostgreSQL and pgAdmin, we've seen how to load an Excel file on a Linux environment and store records in a PostgreSQL table.
The possibilities offered by Pentaho are just monstrous.
Loading comments…
Related posts
DuckDB - Query JSON and CSV Files With SQL, No Database Required
November 9, 2026

Export MS Access objects
June 27, 2025


Start Joomla with Docker in just a few clicks
October 3, 2024

SQL - Formatting tool
July 17, 2024