Writing functional tests with Pest
Discover how to write clean and expressive functional tests using the Pest PHP testing framework.

This article is part of the Functional testing series:
- Introduction to Behat
- Introduction to Cypress
- Writing functional tests with Pest
Changelog

This article provides a comprehensive guide to writing functional tests for your website using Pest v4. It walks you through setting up a complete Docker-based testing environment from scratch, including creating a Dockerfile and a Makefile for easy command execution. You'll learn how to write a browser test case, run it against a live website, and interpret the results. The post also covers how Pest automatically captures screenshots on failure, making debugging easier, and provides insights into the underlying technology like Playwright.
Last year, I wrote Write PHP unit tests using Pest. Since then Nuno Maduro has released Pest in a version 4 with built-in browser testing.
What does that mean? Now, aside unit testing (see my previous article), we can also ask Pest to visit a website and make actions like clicking on a button, filling in some fields (think to a login page, a search field, ...), submitting forms, navigating, ... and thus, yes, running some functional tests.
An example can be to visit the homepage of your website, click in the search text area, fill some keywords, select the first visible item, click on it and assert the new page will display some text.
I've already written an article about Behat, another one about Cypress; it was logical to do the same with Pest v4.
My idea, like always, is to use (or create) a Docker image so we can immediately start without the pain of installing and configuring everything.
Here is the payoff: 10 functional tests running in a real browser, in less than 26 seconds.
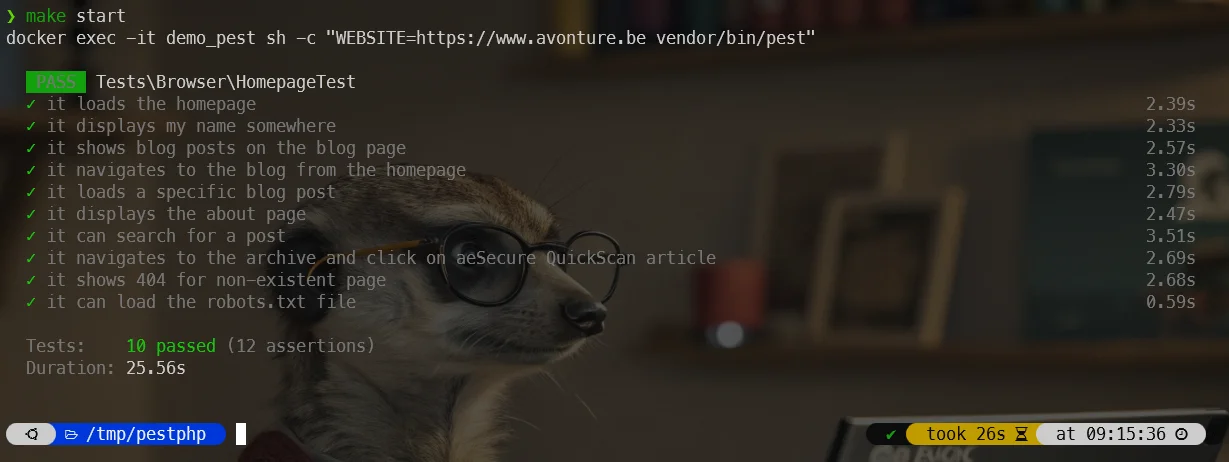
And when a test fails — here, intentionally — Pest automatically takes a screenshot of what the browser actually saw:
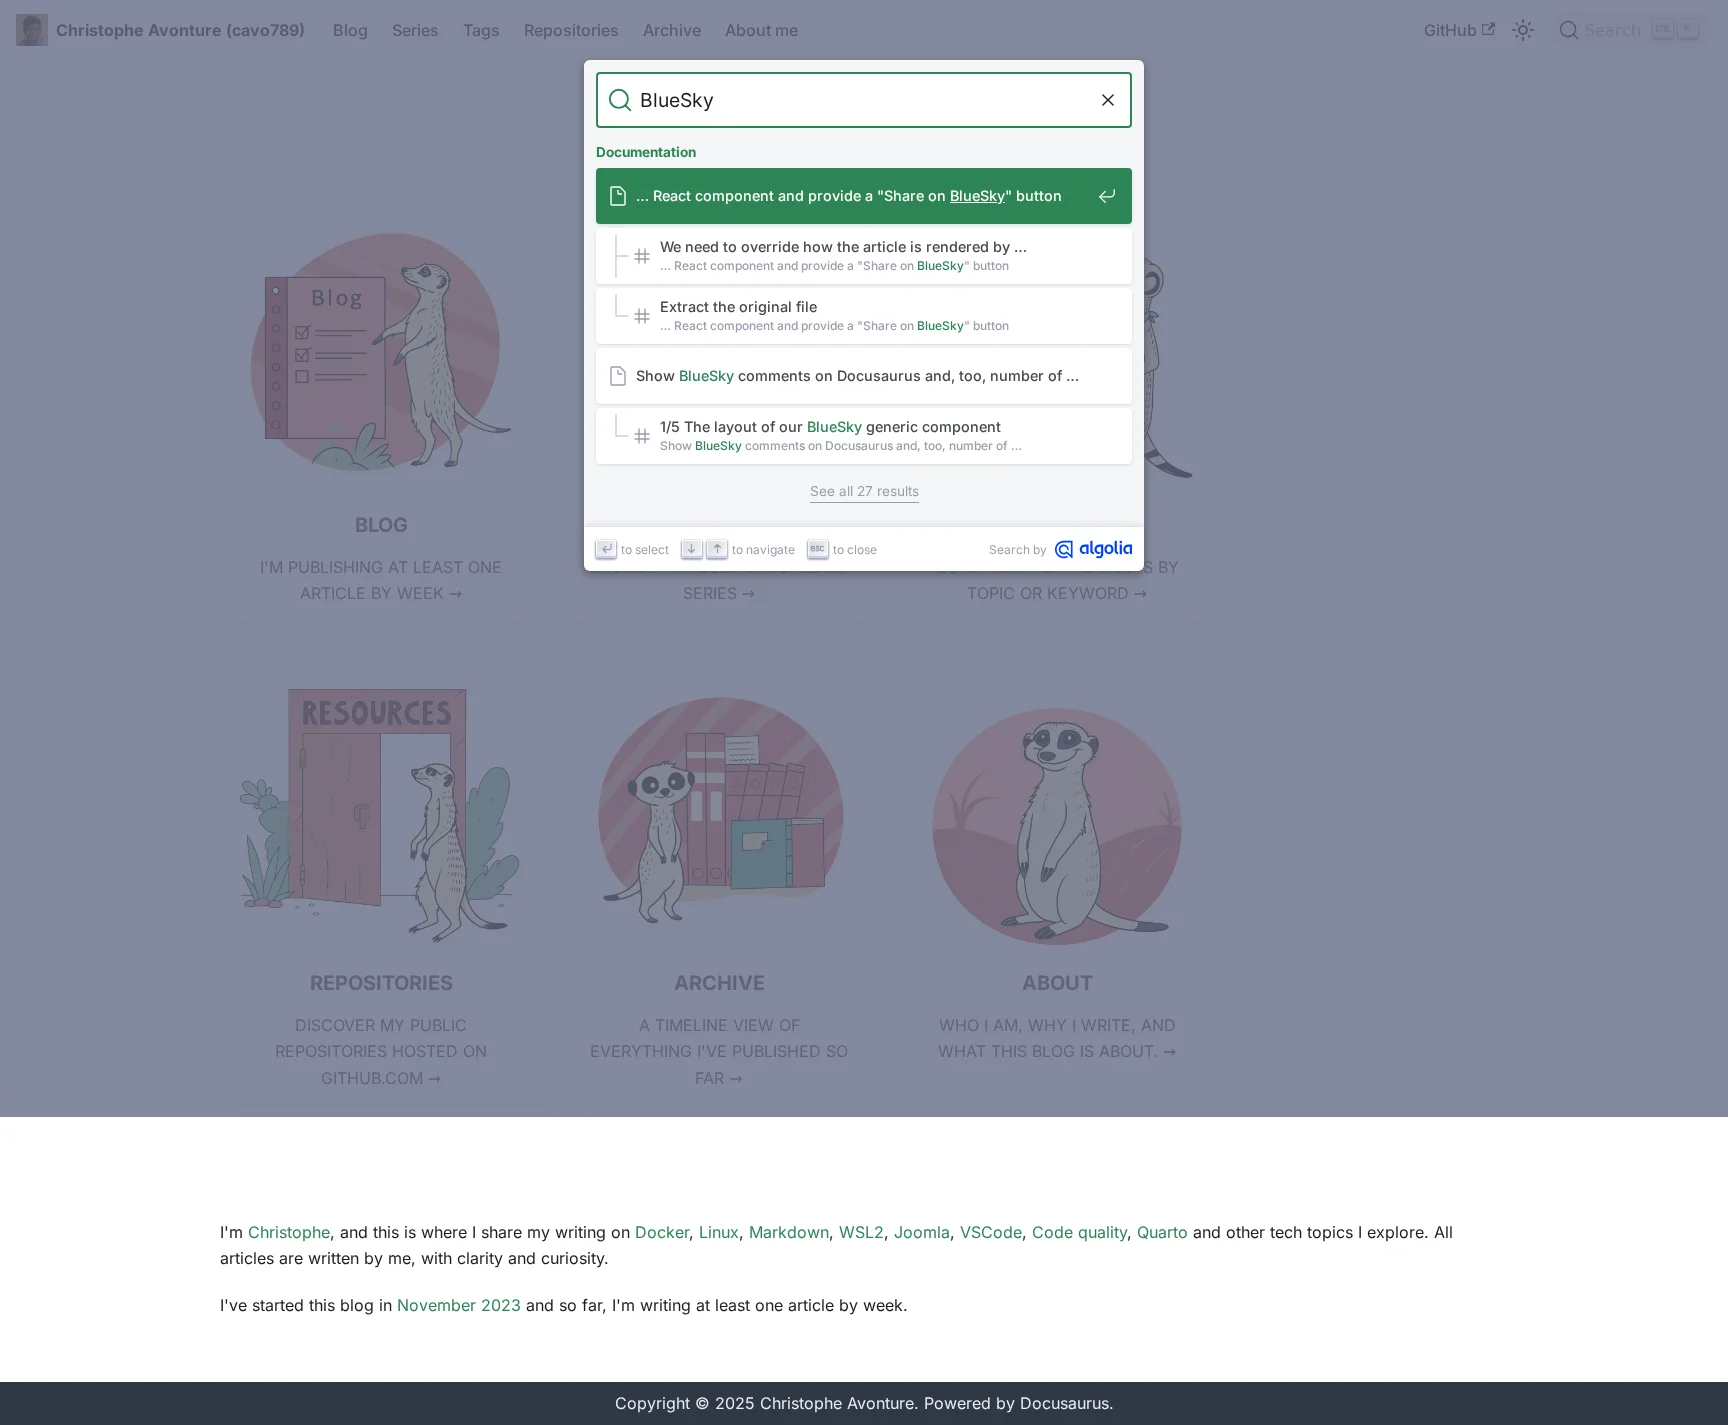
No manual screenshot, no separate debugging step: the failure and the evidence arrive together. Let's build this.
Let's create a temporary project
First, let's create a temporary folder and jump in it:
Right now, there is no ready-to-use Docker image for Pest v4 so let's create ours.
Please create a file called Dockerfile in your temporary folder with this content:
# cspell:disable
# syntax=docker/dockerfile:1.4
ARG PHP_CLI_VERSION=8.3-cliARG PHP_FPM_VERSION=8.3.24-fpmARG COMPOSER_VERSION=2.8.11
ARG OS_USERID=1000ARG OS_GROUPID=1000ARG OS_USERNAME="docker"
ARG TIMEZONE="Europe/Brussels"
FROM php:${PHP_CLI_VERSION} AS builder
ARG COMPOSER_VERSION
WORKDIR /var/www/html
# Set cache environment variables for all subsequent commandsENV NPM_CONFIG_CACHE=/var/www/html/.npm-cache \ PLAYWRIGHT_BROWSERS_PATH=/var/www/html/.cache/ms-playwright
# Install system dependencies, PHP extensions, and Node.js with browser dependenciesRUN --mount=type=cache,target=/var/cache/apt,id=apt-cache,sharing=private \ set -eux && \ apt-get update && apt-get install -y --no-install-recommends \ unzip zip git curl libzip-dev gnupg2 wget ca-certificates \ libgtk-3-0 libxshmfence-dev libxkbcommon-x11-dev \ libnspr4 libnss3 libgbm1 libasound2t64 \ && docker-php-ext-install zip sockets \ && curl -fsSL https://deb.nodesource.com/setup_20.x | bash - \ && apt-get install -y --no-install-recommends nodejs \ && apt-get clean && rm -rf /var/lib/apt/lists/*
# Install ComposerRUN curl -sS https://getcomposer.org/installer \ | php -- --version=${COMPOSER_VERSION} --install-dir=/usr/local/bin --filename=composer
# Create a temporary package.json to install node dependenciesRUN echo '{ "name": "pest-browser-tests", "version": "1.0.0", "devDependencies": { "playwright": "^1.55.0", "playwright-core": "^1.55.0" } }' > package.json
# Install Node dependencies with cacheRUN npm install
# Setup Composer dependencies with cacheRUN --mount=type=cache,target=/root/.composer \ composer init --name="function_test/pestphp" --require-dev="pestphp/pest:^4.0" --no-interaction && \ composer config --no-plugins allow-plugins.pestphp/pest-plugin true && \ composer require pestphp/pest-plugin-browser --dev && \ composer install --no-interaction --prefer-dist --no-progress
FROM php:${PHP_FPM_VERSION} AS php
ARG TIMEZONEENV TZ=${TIMEZONE}
WORKDIR /var/www/html
# Install PHP and Node.js dependenciesRUN --mount=type=cache,target=/var/cache/apt,id=apt-cache,sharing=private \ set -eux && \ apt-get update && apt-get install -y --no-install-recommends \ unzip zip libzip-dev curl gnupg2 wget ca-certificates \ libgtk-3-0 libxshmfence-dev libxkbcommon-x11-dev \ libnspr4 libnss3 libgbm1 libasound2t64 \ && docker-php-ext-install pcntl zip sockets \ && curl -fsSL https://deb.nodesource.com/setup_20.x | bash - \ && apt-get install -y --no-install-recommends nodejs \ && apt-get clean && rm -rf /var/lib/apt/lists/*
ARG OS_USERIDARG OS_GROUPIDARG OS_USERNAME
RUN set -e -x \ && groupadd --gid ${OS_GROUPID} "${OS_USERNAME}" \ && useradd --password '' -G www-data,root --uid ${OS_USERID} --gid ${OS_GROUPID} -l -d "/home/${OS_USERNAME}" "${OS_USERNAME}" \ && mkdir -p "/home/${OS_USERNAME}" \ && chown -R "${OS_USERNAME}":"${OS_USERNAME}" "/home/${OS_USERNAME}"
# Copy all files from the builder stage and set permissionsCOPY --from=builder --chown=${OS_USERNAME}:${OS_USERNAME} /var/www/html /var/www/html
# Set cache and path environment variables for all subsequent commandsENV NPM_CONFIG_CACHE=/var/www/html/.npm-cache \ PLAYWRIGHT_BROWSERS_PATH="/var/www/html/.cache/ms-playwright" \ PATH="/var/www/html/node_modules/.bin:$PATH"
# Switch to our userUSER ${OS_USERNAME}
# Install Playwright browsers in the new, accessible locationRUN npx playwright install chromium
# Dev entrypoint (keep container alive)ENTRYPOINT ["tail", "-f", "/dev/null"]This Dockerfile creates a PHP development environment for running browser-based tests with Pest. It builds in two stages: first, a builder stage installs PHP, Node.js, Composer, and Playwright dependencies; then, a second stage copies everything over, sets up a non-root user for security, and starts a container that stays alive for development work.
For our easiness, let's also create a makefile to be able to run very easy command like make build, make up, ...
Create a file called makefile in your project with this content:
# Default value. To override it, run something like "WEBSITE=my_website make start"WEBSITE ?= https://www.avonture.be
UID:=$(shell id -u)GID:=$(shell id -g)
.PHONY: buildbuild: clear docker build --build-arg OS_USERID=${UID} --build-arg OS_GROUPID=${GID} --tag pestphp .
.PHONY: removeremove: docker rm demo_pest --force
.PHONY: upup: docker run --detach -v ./tests:/var/www/html/tests --name demo_pest pestphp
.PHONY: bashbash: docker exec -it demo_pest /bin/bash
.PHONY: startstart: docker exec -it demo_pest sh -c "WEBSITE=$(WEBSITE) vendor/bin/pest"This Makefile orchestrates Docker operations for running Pest (a PHP testing framework). It defines tasks to build a Docker image with specific user permissions, start/stop containers, and run tests against a configurable website URL. The WEBSITE variable can be overridden when invoking make, defaulting to a Belgian URL.
And ... we're almost there. We just need to create a Pest test script. Please create a file called tests/Browser/HomepageTest.php with content:
<?php
it('loads the homepage', function () { visit(getenv('WEBSITE')) ->assertSee('Avonture');});
it('displays my name somewhere', function () { visit(getenv('WEBSITE')) ->assertSee('Christophe Avonture');});
it('shows blog posts on the blog page', function () { visit(getenv('WEBSITE') . '/blog') ->assertSee('All posts');});
it('navigates to the blog from the homepage', function () { visit(getenv('WEBSITE')) ->click('Blog') ->assertPathIs('/blog') ->assertSee('All Posts');});
it('loads a specific blog post', function () { visit(getenv('WEBSITE') . '/blog/docker-joomla') ->assertSee('Create your Joomla website using Docker');});
it('displays the about page', function () { visit(getenv('WEBSITE') . '/about') ->assertSee('My name is Christophe Avonture');});
it('can search for a post', function () { visit(getenv('WEBSITE')) ->click('.DocSearch-Button') ->type('.DocSearch-Input', 'Bluesky') ->assertSee('Create our own Docusaurus React component');});
it('navigates to the archive and click on aeSecure QuickScan article', function () { visit(getenv('WEBSITE') . '/blog/archive') ->click('August 1 - aeSecure - QuickScan - Free viruses scanner') ->assertPathIs('/blog/aesecure-quickscan') ->assertSee('Just start your browser and go to the URL where your site is accessible.');});
it('shows 404 for non-existent page', function () { visit(getenv('WEBSITE') . '/this-page-does-not-exist') ->assertSee('Page Not Found');});
it('can load the robots.txt file', function () { visit(getenv('WEBSITE') . '/robots.txt') ->assertSee('User-agent');});This is a test suite that automated checks that a website works correctly by visiting different pages and verifying they contain expected content. It tests things like whether the homepage loads, whether blog posts appear, whether navigation works, and whether error pages display properly.
Our current situation
- We'll create our own Docker image thanks to our
Dockerfile, - We'll use a makefile for easiness and
- We've a test scenario with 10 functional tests.
Create the image
To create the Docker image, please run make build:
Don't have make yet? (click for the details)
Please run sudo apt-get update && sudo apt-get -y install make.
The build phase can be slow because a lot of things should be downloaded. The final image will be around 2 GB.
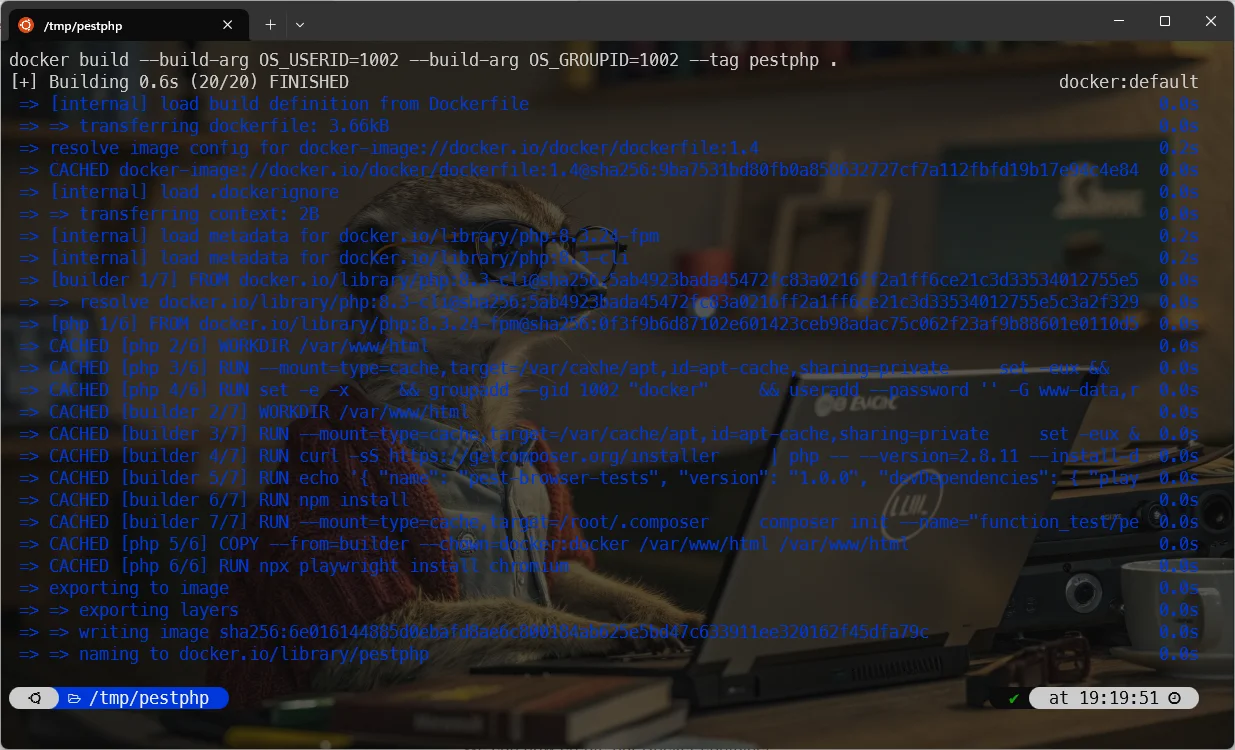
Create the container
Once the image has been created; we can now create our Docker container:
Run tests
And, last thing to do, once the container has been created, you can run all tests by just running make start.
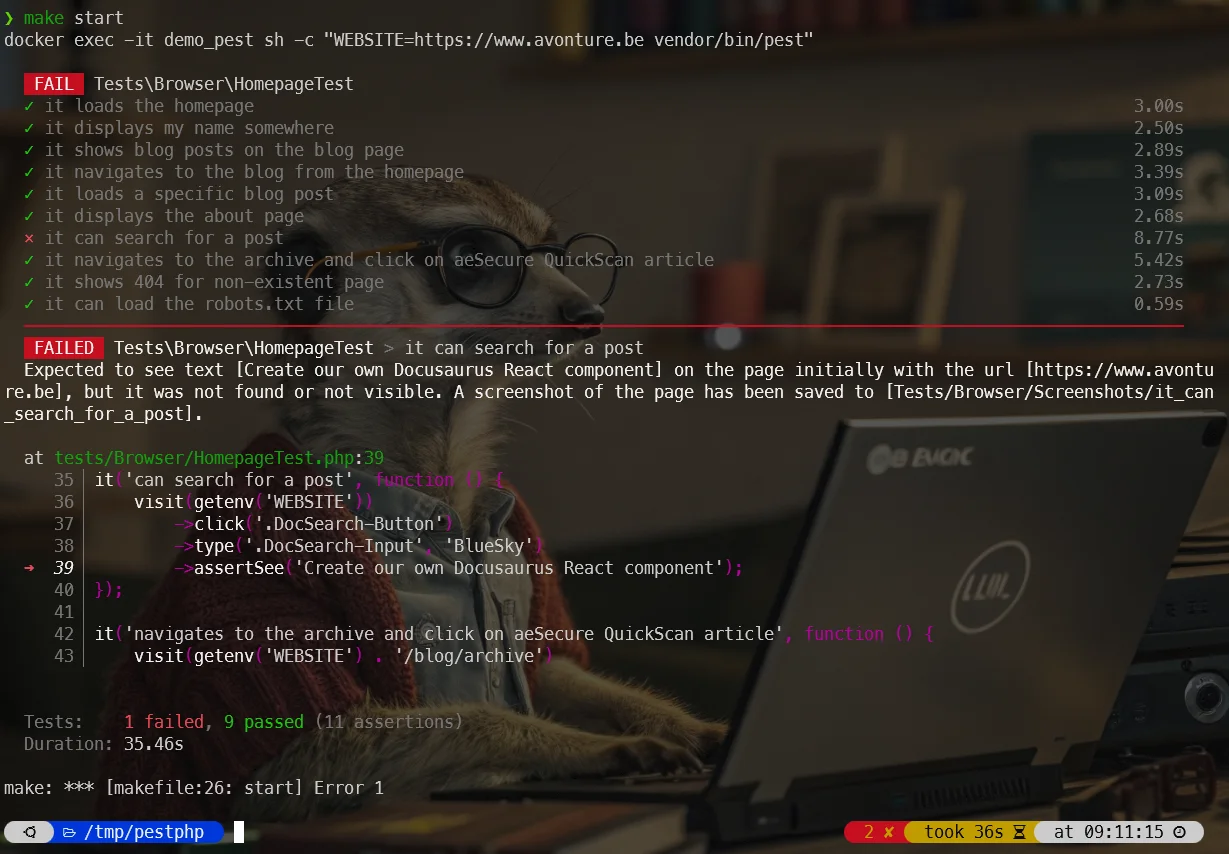
I've intentionally created an error to illustrate some nice feature:
As we can see, the test it can search for a post has failed while the previous ones have succeeded.
Note
Did you notice that other tests were also fired? Pest won't stop on failure.
The nice thing is: Pest has automatically taken a snapshot. See the error message, it says that a file Tests/Browser/Screenshots/it_can_search_for_a_post has been created automatically.
Pest has taken a screenshot — the same one already shown at the top of this article; we were searching for Create our own Docusaurus React component (as coded in our tests/Browser/HomepageTest.php scenario) and indeed, we don't see that title at all. But we see React component and provide a "Share on Bluesky" button so let's update the script:
<?php
it('loads the homepage', function () { visit(getenv('WEBSITE')) ->assertSee('Avonture');});
it('displays my name somewhere', function () { visit(getenv('WEBSITE')) ->assertSee('Christophe Avonture');});
it('shows blog posts on the blog page', function () { visit(getenv('WEBSITE') . '/blog') ->assertSee('All posts');});
it('navigates to the blog from the homepage', function () { visit(getenv('WEBSITE')) ->click('Blog') ->assertPathIs('/blog') ->assertSee('All Posts');});
it('loads a specific blog post', function () { visit(getenv('WEBSITE') . '/blog/docker-joomla') ->assertSee('Create your Joomla website using Docker');});
it('displays the about page', function () { visit(getenv('WEBSITE') . '/about') ->assertSee('My name is Christophe Avonture');});
it('can search for a post', function () { visit(getenv('WEBSITE')) ->click('.DocSearch-Button') ->type('.DocSearch-Input', 'Bluesky') // highlight-next-line ->assertSee('React component and provide a "Share on Bluesky" button');});
it('navigates to the archive and click on aeSecure QuickScan article', function () { visit(getenv('WEBSITE') . '/blog/archive') ->click('August 1 - aeSecure - QuickScan - Free viruses scanner') ->assertPathIs('/blog/aesecure-quickscan') ->assertSee('Just start your browser and go to the URL where your site is accessible.');});
it('shows 404 for non-existent page', function () { visit(getenv('WEBSITE') . '/this-page-does-not-exist') ->assertSee('Page Not Found');});
it('can load the robots.txt file', function () { visit(getenv('WEBSITE') . '/robots.txt') ->assertSee('User-agent');});This is a test suite that verifies a website works correctly by simulating user interactions. Each test visits a specific page or performs actions like clicking and searching, then checks that expected content appears on the page.
We don't need to build the image again neither to recreate the container; just run make start again.
Congratulations, we've just tested 10 features in less than 26 seconds — the same result already shown at the top of this article.
In-Depth (skip this if you just want to use it)
- Pest is using playwright; this is why our Dockerfile is more complex because we should also install NodeJS,
- Something really cooooool: we don't need to
wait_forsomething change on the page, Pest will do it for us. For instance, with Cypress and Behat, when we click on a button, we have to wait until, for instance, the Ajax script on that page has fired and theDOM elementhas been loaded. With Pest, we shouldn't care about this and that's an amazing feature! - We also have to create a specific user in the Docker image to match our local one. This is because when a test fails, Pest (running in Docker) will create an image and that one should be created on our host machine with our UID/GID,
- The
make upaction defined in themakefileis mounting our localtestsfolder in the container. It means that if we create new tests files or update existing ones, they will be immediately synchronized with the running container; nothing special to do here, - To reduce the need for configuration files, a
WEBSITEoperating system variable has been defined (see themakefile). That variable will be created in the container. A PHP script will then refer to the variable like thisgetenv('WEBSITE'). - There is a
--parallelflag for Pest. If you want to run your different tests files in parallel, edit themakefile, search fordocker exec -it demo_pest sh -c "WEBSITE=$(WEBSITE) vendor/bin/pest"and replace withdocker exec -it demo_pest sh -c "WEBSITE=$(WEBSITE) vendor/bin/pest --parallel"
- docker exec -it demo_pest sh -c "WEBSITE=$(WEBSITE) vendor/bin/pest"+ docker exec -it demo_pest sh -c "WEBSITE=$(WEBSITE) vendor/bin/pest --parallel"This change adds the --parallel flag to a Pest testing command running inside a Docker container. This tells Pest to run tests in parallel across multiple processes instead of sequentially, which speeds up test execution.
This article is part of the Functional testing series:
- Introduction to Behat
- Introduction to Cypress
- Writing functional tests with Pest
Loading comments…
Related posts

Bruno - A postman-like tool - GUI and CLI
August 7, 2025


Introduction to Cypress
March 30, 2025

Write PHP unit tests using Pest
September 27, 2024
Introduction to Behat
June 24, 2024