Make your Quarto project Devcontainer-Ready — No More Setup Headaches
Convert any Quarto project into a fully portable, VSCode-powered devcontainer in minutes.

This article is part of the Discovering Quarto series:
- Running Quarto Markdown in Docker
- Quarto conditional display
- Use Quarto and create a PowerPoint slideshow
- Using variables from external file in your Quarto project
- Some tips and tricks for Quarto when rendering as a reveal.js slideshow
- Quarto Callout Blocks
- Quarto includes short code
- Quarto Inline style
- My favorite Quarto extensions
- Using Mustache templating with Quarto
- Make your Quarto project Devcontainer-Ready — No More Setup Headaches
- Quarto - How I Built a Self-Documenting Ecosystem for 50+ Projects
Changelog
This article details how to convert any Quarto project into a portable, VSCode-powered devcontainer, eliminating setup headaches. By adding three specific configuration files (compose.yaml, Dockerfile, devcontainer.json), users can create a fully equipped development environment. This setup includes pre-installed Quarto, configured VSCode extensions, and features like automatic preview and optional pre-commit hooks, simplifying documentation workflow.
I love using Quarto and I've plenty of documentation projects on my disk. I'm writing user documentation, developer ones and, too, installation guide for almost every project I'm coding.
If you've never run Quarto through Docker before, Running Quarto Markdown in Docker is a good starting point; this article builds on that idea to give you a full VSCode devcontainer.
I quickly came up with the idea of creating a Docker image so that I could develop my documentation in peace, as well as a devcontainer configuration for VSCode. Now, when I want to write my documentation, in less than a minute, I can create an environment entirely dedicated to writing documentation.
Among other things, I install Quarto, install and configure a number of extensions for VSCode, and launch Quarto in preview mode: as soon as I save a change, Quarto regenerates the documentation on its own.
Let's see how to do this; you'll see, it's so simple.
The same devcontainer, specialized for slideshows, is used in Level Up Your Presentations with Quarto, reveal.js, Decktape, Docker and DevContainers; and taken to industrial scale in Quarto - How I Built a Self-Documenting Ecosystem for 50+ Projects.
Let's get a simple Quarto project first
For sure, if you've one, just jump in your project. Here, for this blog post, we'll just reuse an existing one.
By running the commands below in a console, you'll download just the brand folder from the quarto-examples project:
Run code . to open the project in VSCode and you'll get this:
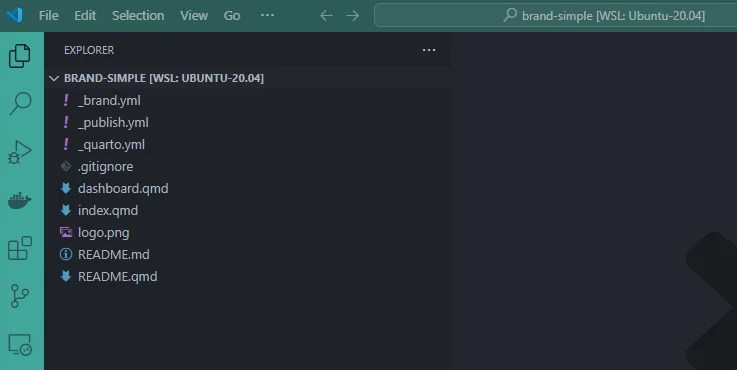
Here's where we're headed: open this same project as a devcontainer, run quarto preview ., and the site is already live — no Quarto install on your host required.
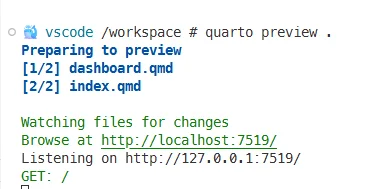
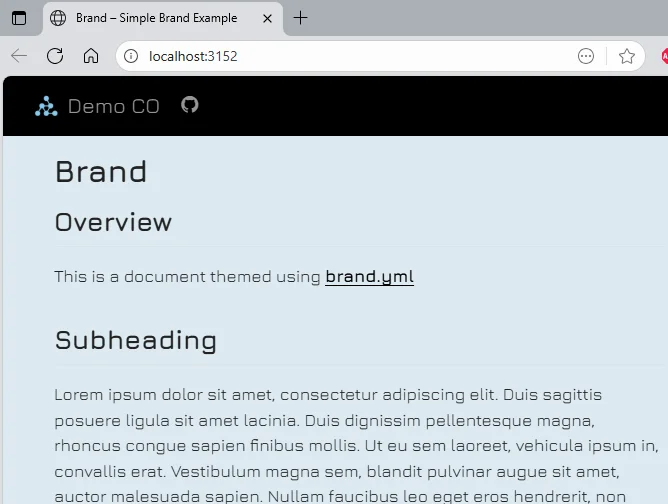
Crazy easy no? Let's build it, starting with three files.
We'll need to create three files
To get the best performance in terms of Docker image build speed and use of the Docker cache mechanism, we will need to create three files:
The .devcontainer/compose.yaml file is necessary to tell VSCode to create our Docker image if it does not already exist, or to reuse it if it does. This file is therefore essential in terms of performance.
The .devcontainer/Dockerfile file defines our Docker image: the binaries we need, user configuration, etc.
The .devcontainer/devcontainer.json file is used by VSCode to understand and build our working environment.
Need help here? Click the "Help" button above for setup instructions.
Information
Strictly speaking, we don't need the .devcontainer/compose.yaml file but this is the only way to build the Docker image once and reuse it across projects.
By opening a Devcontainer, even if the Dockerfile is strictly the same across your documentation projects, the context will be different (project1, project2, ...) and VSCode will rebuild the image for that context. To avoid this, we need to build the image and give it a name; this can only be done using a .devcontainer/compose.yaml file.
Extra Information (optional — skip if the defaults work for you)
Installation of sudo
During the creation of the Docker image, we also install the sudo command and allow our vscode user to run sudo su root in the devcontainer without having to fill in a password. The reason here is that, sometimes, Quarto will complain about a missing dependency (like when we are exporting to PDF and there is a missing library). To allow the developer to quickly add the dependency and do some tests without having to rebuild the container again and again, sudo is installed.
Build Arguments (optional — read only the ones you need)
Installation of Chromium
If you pay attention to .devcontainer/compose.yaml file, you'll see an argument called INSTALL_CHROMIUM. Depending on your project, you'll need it or not.
Indeed, under certain circumstances, when rendering your documentation to Word (i.e. by running f.i. quarto render . --profile docx --to docx), Quarto can ask you to install Chromium. To avoid doing this every time, simply open the .devcontainer/devcontainer.json file, search for INSTALL_CHROMIUM and initialize it to true.
Note: if you change the .devcontainer/Dockerfile code or the .devcontainer/devcontainer.json file, you'll need to rebuild the container as explained here below.
Make sure you need it
Before installing Chromium, make sure you need it i.e. first render your documentation without it and see if Quarto complains about Chromium. This is because Chromium requires a lot of dependencies and it will make your Docker image size much bigger.
Installation of Code Spell Checker
The same way, you have a variable called INSTALL_CSPELL. Initialize it to true if you want to install the Code-spell check tool (requires Node.js).
Installation of GraphViz
The same way, you have a variable called INSTALL_GRAPHVIZ. Initialize it to true if you want to install the GraphViz converter.
This is needed when, in your .qmd file, you have a graph like this one:
digraph flow {
  rankdir = LR;

  A [shape=box, label="Source"];
  B [shape=ellipse, label="Processor"];
  C [shape=box, label="Destination"];

  A -> B;
  B -> C;
}
GraphViz
If you have a Graphviz graph and didn't install GraphViz, you'll get an error like this: ERROR: AssertionError: Error occurred during cleanup: TypeError: Child process has already terminated.
Installation of pre-commit-hooks
The third variable is INSTALL_PRECOMMIT_HOOKS and, if your documentation has its own .git folder, it'll be a good idea to initialize the variable to true so, when committing your changes, a few data quality controls / formatting tools will be applied.
Opening our project as a Devcontainer
Right now, just press F1 (or CTRL+SHIFT+P) and select Dev Containers: Rebuild and Reopen in Container. If you don't have that command, please make sure to install the ms-vscode-remote.remote-containers extension from Microsoft.
The remote container of Microsoft
You can install the extension from the console by running code --install-extension ms-vscode-remote.remote-containers or by opening this page: Marketplace - Dev Containers.
So, once you've fired the Dev Containers: Rebuild and Reopen in Container command, VSCode will close your current session and open a new one. The very first time, VSCode will have to make some initializations (like building the Docker image and downloading extensions so it'll be slower).
After a few seconds, you'll get a screen like this:
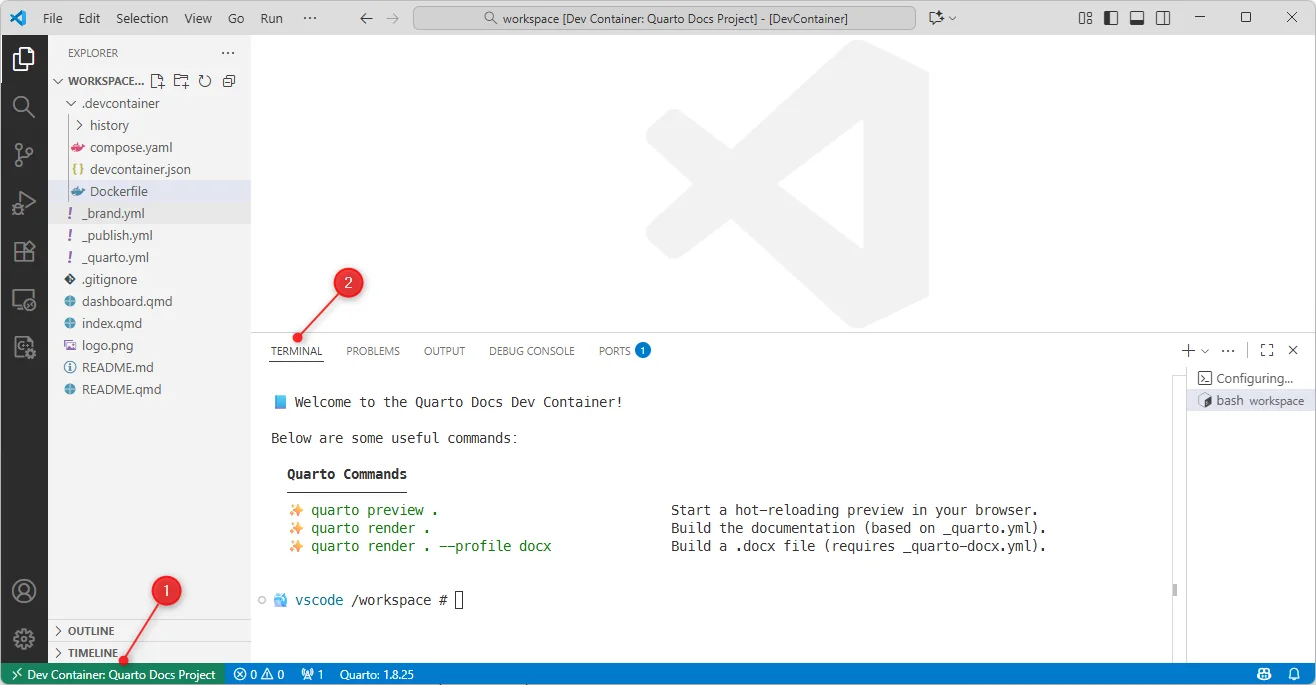
- See bottom left, you have, in the status bar, the text "Dev Container: xxx" (followed by the name of our container as configured in the
devcontainer.jsonfile). - In the Terminal window (if you don't see it press CTRL+ù), you'll see a cheatsheet with main commands like
quarto preview .to run the site with hot reload.
So, still in the Terminal, please type quarto preview . then press Enter — you'll get the same output already teased at the top of this article.
In theory, your browser will be automatically fired and the site opened, showing the same result already shown earlier. If not, just follow the link by pressing ALT and clicking on the link.
Crazy easy no?
What have we done?
At this stage, what have we done? We retrieved a Quarto website project and made sure to “dockerize” it.
Let's see the _quarto.yml file of the project we've just cloned (you'll find more information on the official Quarto site: Creating a website):
project: type: website
website: title: "Simple Brand Example" navbar: title: "Demo CO" tools: - icon: github href: https://github.com/quarto-dev/quarto-examples/tree/main/brand/brand-simpleThis YAML configuration file sets up a simple website project with branding details. It defines the project type as a website and then specifies the website's title, navigation bar appearance, and social/external links like GitHub.
We've added three files to the project in a special folder called .devcontainer. That folder will tell VSCode that we would like to use a Docker container when working on that project. The container will be based on a custom Docker image (as coded in .devcontainer/Dockerfile). The image will reuse the official Quarto image.
So, without having to install Quarto on our computer, we'll be able to use all features of Quarto.
Finally, we have to switch to the devcontainer i.e. just after we've opened VSCode, we have to run a special command to reopen the project as a devcontainer.
That command is, the first time, Dev Containers: Rebuild and Reopen in Container but as soon as the custom image has been created once, we can simply use Dev Containers: Reopen in Container.
Writing our documentation
So far, we've already fired quarto preview . in a terminal. The documentation was rendered and our website is already displayed (on http://localhost:7519 or any other port).
Let's check the hot reload feature: please edit the index.qmd file you'll retrieve in the root folder and change something. For instance, change the word Overview to Preface and save.
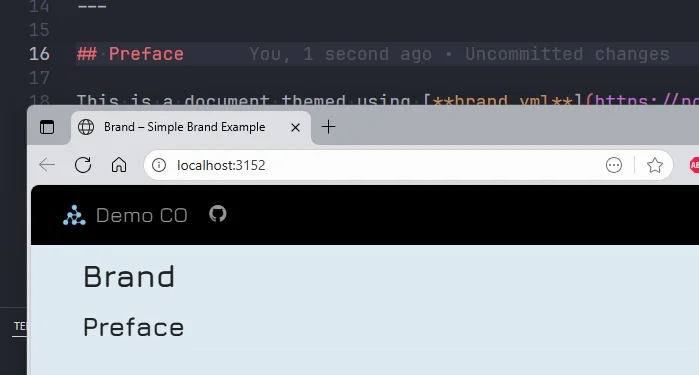
As you can see on the image here above, I just need to make a change, save my file and wait less than one second and the website is updated automatically. Nothing to do (I don't need to refresh the page). Easy no?
Using the terminal
Go to the Terminal window (if you don't see it press CTRL+ù).
Look now at the right part: there is a Configuring... terminal but too a bash workspace (the name of our project). If you don't see that one, look just above Configuring... and click on the + button.
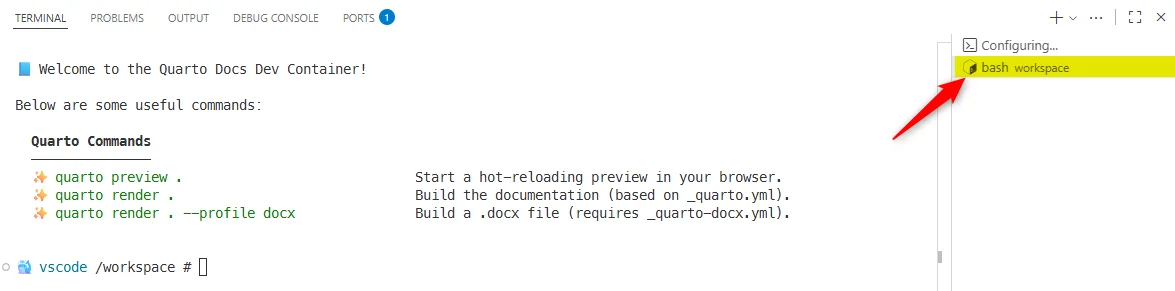
As you can see, you'll see a few instructions. These instructions were coded in the final part of the .devcontainer/Dockerfile file. They are there just to help the first time user.
So, if your objective is to render the final documentation, you can always see Oh yes, I simply need to run quarto render .
What is pre-commit?
In this project, I've planned the installation of pre-commit. This is an optional tool that will run some validation controls on your project before you push it to your versioning system (like GitHub or GitLab). I've dedicated a full article to it: Git - pre-commit-hooks.
By adding pre-commit in the devcontainer, you'll get the privilege to never again commit files with some fault like f.i. formatting issues in your Markdown content.
If you like this idea, please create the .pre-commit-config.yaml file in your project's root folder (so not in the .devcontainer folder but its parent folder).
Just copy/paste the content below:
# Pre-commit configuration for Quarto projectsexclude: "^.build/|^.git/|^.quarto/"
repos: # --- Universal hooks for clean files --- - repo: https://github.com/pre-commit/pre-commit-hooks rev: v6.0.0 hooks: - id: check-added-large-files - id: check-case-conflict - id: check-json - id: check-merge-conflict - id: check-yaml - id: detect-private-key - id: end-of-file-fixer - id: trailing-whitespace
# Markdown linter - repo: https://github.com/igorshubovych/markdownlint-cli rev: v0.45.0 hooks: - id: markdownlint args: - "--config=.config/.markdownlint.yaml"
# Checks all of the hyperlinks in a markdown text to determine if they are alive or dead - repo: https://github.com/tcort/markdown-link-check rev: v3.13.7 hooks: - id: markdown-link-check name: Check Markdown Links entry: markdown-link-check language: node types: [markdown]
# The hook below hook extracts the YAML front matter from each .qmd # file and validates its syntax using yq. # It helps catch formatting errors (e.g. missing colons, invalid keys) # before committing. # Only the YAML block between the first pair of --- lines is checked. - repo: local hooks: - id: validate-qmd-yaml name: Validate YAML front matter in .qmd entry: bash -c 'awk "/^---/{f=!f;next}f" "$1" | yq eval "." - > /dev/null' language: system pass_filenames: true args: ["{}"] files: \.qmd$
# --- Spelling --- # Requires to install cspell in the Docker file as a binary. This implies to install NPM tool # The .vscode/cspell.json file is shared with VSCode - repo: local hooks: - id: cspell name: Spell check with cspell entry: cspell language: system args: - "--config=.vscode/cspell.json" - "--no-progress" - "--no-summary" exclude: ^.*_extensions/.*This is a pre-commit configuration file that sets up automated checks to run before code is committed to a repository. It excludes certain directories from checking, then defines multiple tools that validate file quality — checking for large files, YAML syntax, markdown formatting, broken links, and spelling errors — to catch common issues before they're committed.
Once this file is in place, when you fire the git commit command from the terminal (CTRL+ù), git will first run pre-commit to run hooks. In the .pre-commit-config.yaml file above, we've defined two hooks: the first one to make generic checks on files, then a second one to ensure there are no linting errors with .md files (just check the official repo for more info).
These hooks are fired every time you commit files (and just on the committed files; not the entire project).
You can also force hooks to run without committing by running pre-commit run --all-files in the console.
This command will check all files.
pre-commit is a valuable tool for ensuring compliance with established industry quality standards.
Conclusion
With just three files (.devcontainer/compose.yaml, .devcontainer/Dockerfile and .devcontainer/devcontainer.json), we've converted a simple project to a Devcontainer where Quarto is preinstalled, extensions installed and configured and some features like the automatic preview is running.
Cool no?
This article is part of the Discovering Quarto series:
- Running Quarto Markdown in Docker
- Quarto conditional display
- Use Quarto and create a PowerPoint slideshow
- Using variables from external file in your Quarto project
- Some tips and tricks for Quarto when rendering as a reveal.js slideshow
- Quarto Callout Blocks
- Quarto includes short code
- Quarto Inline style
- My favorite Quarto extensions
- Using Mustache templating with Quarto
- Make your Quarto project Devcontainer-Ready — No More Setup Headaches
- Quarto - How I Built a Self-Documenting Ecosystem for 50+ Projects
Loading comments…
Related posts



Running Docusaurus using Docker
November 11, 2025