Master your ssh command and select the host from a list
Build an interactive, searchable SSH host selector using FZF. Learn to modularize your SSH configurations, add rich documentation, and trigger advanced custom actions via a fast Terminal User Interface.

This article is part of the Modern CLI tools for your terminal series:
- The jq utility for Linux
- The xmlstarlet utility for Linux
- Introduction to fzf - Fuzzy Finder
- Let's revisit the ls command thanks to eza
- Master your ssh command and select the host from a list
- FZF + ripgrep: Interactive Code Search with Live Preview
- delta: a Syntax-Highlighted Pager for git diff
- ripgrep — The Search Tool That Changed My WSL2 Workflow
- yq — The YAML Processor You Already Know How to Use
Changelog
~/.ssh/config file quickly becomes unmaintainable and relies too heavily on memorization. This post demonstrates a cleaner approach by breaking your configuration into project-specific files within a ~/.ssh/conf.d/ directory, allowing you to attach rich, styled documentation directly above your host definitions. To tie it all together, you will implement a custom shell function (sshf) powered by FZF. This creates a fast, searchable Terminal User Interface (TUI) that lets you instantly filter hosts by name, project, or metadata. It also goes a step further by introducing custom keybindings, enabling you to trigger advanced contextual actions—like pinging servers, modifying configurations, or generating system inventories—directly from the search menu.On my machine, I've accumulated more and more hosts in my ~/.ssh/config file. While I can type ssh server4 (see zsh-ssh-config-suggestions) to jump to that server, I still have to remember the list of available servers. This is manageable when dealing with just a few, but I currently have around 50 servers, and relying solely on memory is no longer practical.
It would be much more convenient to view the full list of hosts through a TUI (Terminal User Interface), select the desired host, and simply press Enter. Furthermore, it would be extremely helpful to access contextual information—such as the URL hosted on that server, whether a database is running, the PHP version, and more.
Additionally, creating one .conf file per project would eliminate the need to maintain a massive, monolithic configuration file containing all 50 servers. Let's explore how to achieve this setup in this post.
This builds on Introduction to fzf - Fuzzy Finder and on the aliases created in How to connect to your hosting server using SSH. It applies to ~/.ssh/config the same "one file per concern" philosophy as Beyond the Monolith - Organizing Your ZSH Workflow Like a Pro.
Before diving into the technical details, here is a preview of the final result:
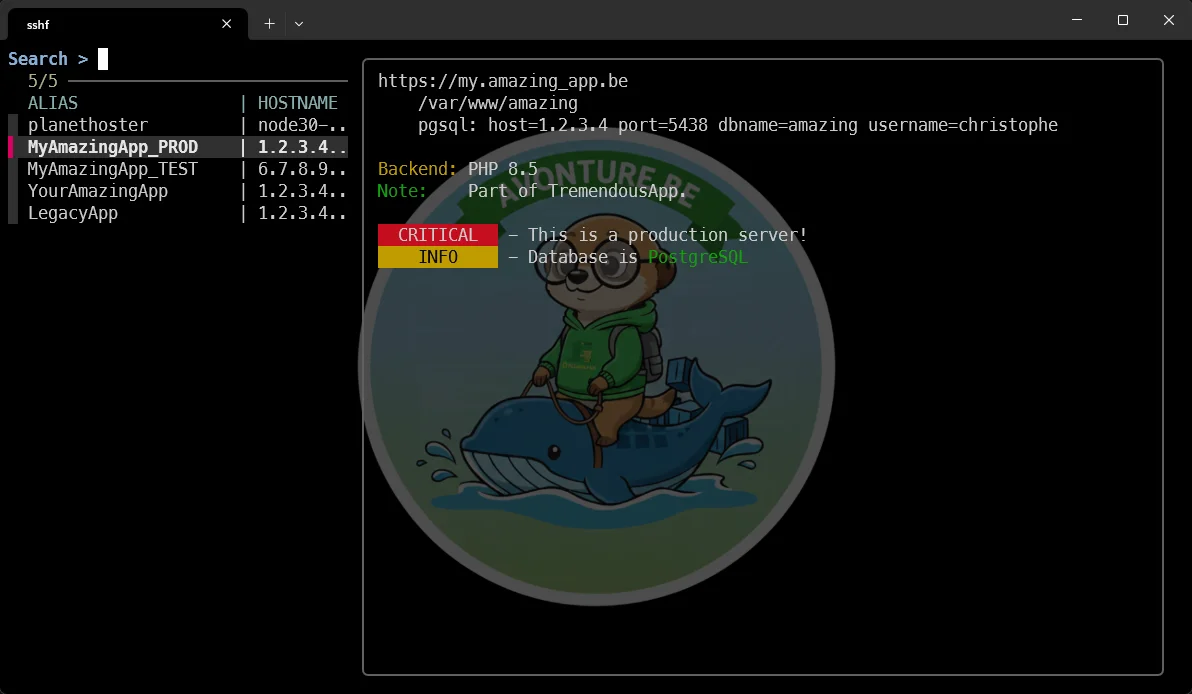
On the left side, there is a search box (allowing me to type amazing to filter on that pattern) above a list of hosts. On the right side, contextual information about the selected host is displayed.
Once a host is selected, I simply press Enter to open an SSH terminal session on that host—without having to enter my credentials manually.
Let's get started...
Seeing It in Action with Docker
Before touching your own ~/.ssh/config, try the whole TUI in a throwaway container — the exact
amazing.conf/legacy.conf files and the sshf function from further down are already in place.
Why Docker first?
The Dockerfile below installs fzf, perl and openssh-client, writes the exact SSH config
files shown further down, and appends the exact sshf function to ~/.bashrc. Nothing on your
own machine changes, and — since 1.2.3.4 and friends are the same placeholder IPs used
throughout this article — pressing Enter on a host won't actually connect anywhere.
Build and run it:
$ docker build -t sshf-demo . [+] Building 26.4s (8/8) FINISHED ✔ exporting to image
$ docker run --rm -it sshf-demo 🐳 root ~ # sshf
The same TUI from the screenshot at the top of this article opens, listing all four hosts across
both conf.d files with their doc-blocks. Type prod or php to filter, exactly like the
"Using filtering options" section below — no real server is ever contacted.
Install FZF
Check out my previous Fuzzy Finder blog post if you need more detailed information. Otherwise, simply run the command below and complete the installation by answering "Yes" to all prompts, following the instructions displayed in your terminal.
While this isn't strictly related to SSH, you can now press CTRL+R to enjoy much easier access to your console history. This is just one of the great features of FZF.
SSH configuration
The goal here is to organize your configuration more intelligently. Let's create an ~/.ssh/conf.d folder where your configuration files will reside.
For instance, create an ~/.ssh/conf.d/amazing.conf file with the following content:
Then, create a second file named ~/.ssh/conf.d/legacy.conf with this content:
Now, update your main ~/.ssh/config file to include these new files:
Include conf.d/amazing.conf
Include conf.d/legacy.conf
This approach simply allows you to group hosts by project, making them easier to manage.
Look at the amazing.conf file
We've defined three Host entries: MyAmazingApp_PROD, MyAmazingApp_TEST, and YourAmazingApp.
Notice that we've added some comments immediately before the first two Host lines (the placement is crucial).
This "doc-block" is plain text, so you can write whatever you like. For convenience, it supports markers like blue, green, red, yellow, bg-red, bg-yellow, and bold.
When the MyAmazingApp_PROD host is selected in the TUI, its associated doc-block will be displayed automatically.
Add the sshf function
sshf gets its own file, in a folder your shell loads at startup (the organisation explained in Beyond the Monolith): your rc file stays short, and removing the tool is deleting one file.
The code is the same for zsh and bash; only the folder and the loader differ.
- zsh
- bash
1. Create the file in ~/.zsh/fns/:
Need help here? Click the "Help" button above for setup instructions.
2. Load the folder from ~/.zshrc. Already done if you followed one of my "Ollama daily use" articles. Otherwise, add at the end of ~/.zshrc:
for fn_file in ~/.zsh/fns/*.zsh; do
  source "$fn_file"
done
3. Open a new terminal (or run exec zsh).
1. Create the file in ~/.bash/fns/:
Need help here? Click the "Help" button above for setup instructions.
2. Load the folder from ~/.bashrc. Add at the end of ~/.bashrc (the -r test keeps an empty folder from printing an error):
for fn_file in ~/.bash/fns/*.sh; do
  [[ -r "$fn_file" ]] && source "$fn_file"
done
3. Open a new terminal (or run exec bash).
Check that the shell knows the function: type sshf must answer sshf is a shell function.
Return to your terminal, type sshf, and press Enter. The magic will now unfold.
You will see the complete list of defined hosts. By typing a few letters, you will instantly apply filters. For example, simply type prod to filter the list and show only production servers.
Easy, isn't it?
Using filtering options
You can filter based on any pattern. For instance, if you type php:

FZF searches across all available data, not just the hostnames.
My real use case
At work, I've taken this well beyond simply displaying a list of hosts. FZF supports custom keybindings, which means you can assign actions to keys other than just Enter. You can define actions triggered by CTRL+A, CTRL+I, or even a single letter like E.
This is where it gets truly powerful!
- Ctrl+AI’ve set up a secondary screen that displays a list of actions to execute on the selected host.
- Ctrl+II run an inventory management script that scans all my hosts (or just the filtered ones) and generates a web page with an up-to-date inventory of installed software (such as PHP, Python, PostgreSQL versions).
- EYou could, for example, open an editor to directly modify the configuration file of the selected host.
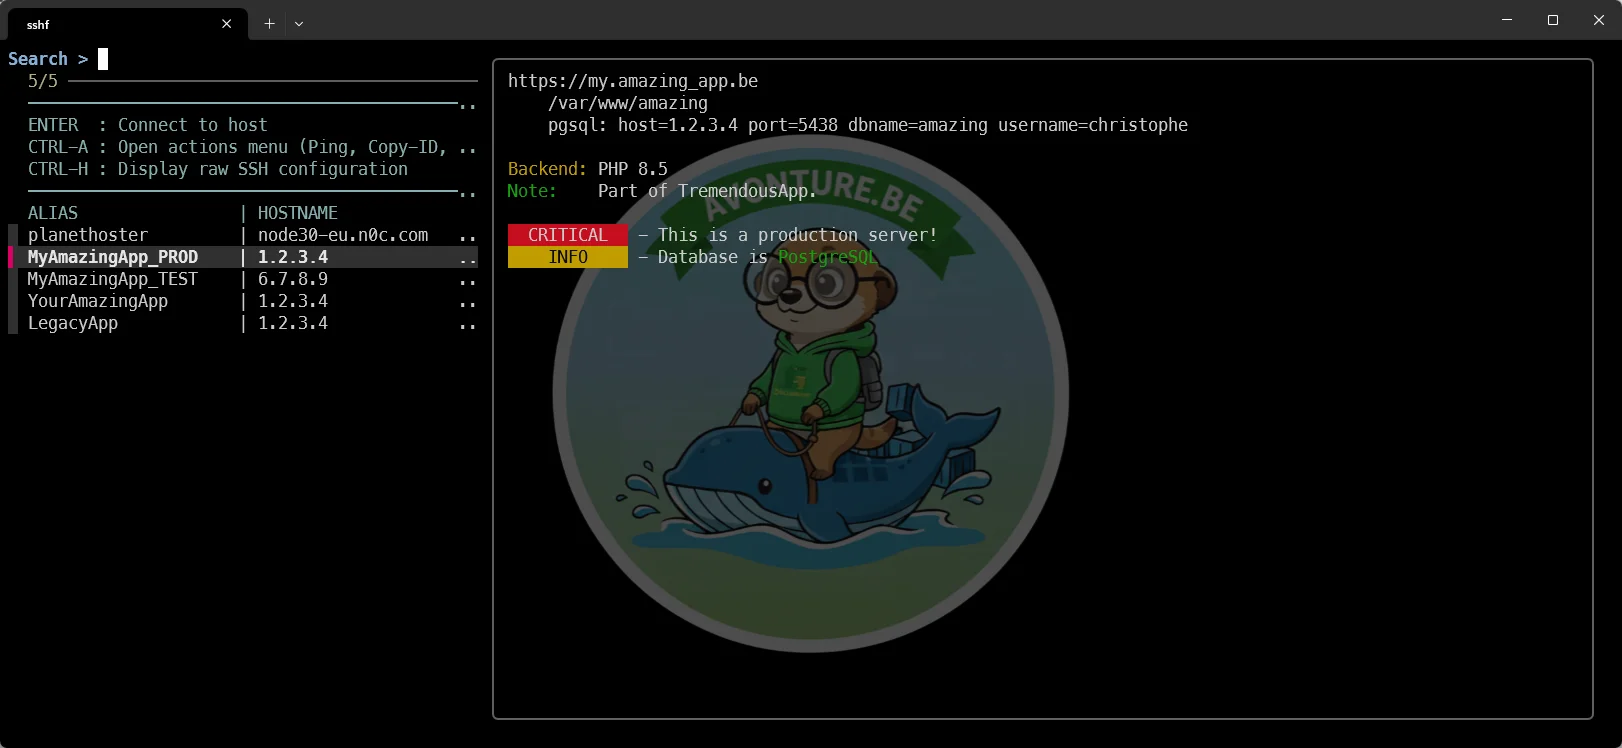
Your imagination is the only limit!
This article is part of the Modern CLI tools for your terminal series:
- The jq utility for Linux
- The xmlstarlet utility for Linux
- Introduction to fzf - Fuzzy Finder
- Let's revisit the ls command thanks to eza
- Master your ssh command and select the host from a list
- FZF + ripgrep: Interactive Code Search with Live Preview
- delta: a Syntax-Highlighted Pager for git diff
- ripgrep — The Search Tool That Changed My WSL2 Workflow
- yq — The YAML Processor You Already Know How to Use
Loading comments…
Related posts

ai-explain: ELI5 for Scripts and Errors, Right in Your Terminal
November 12, 2026

DuckDB - Query JSON and CSV Files With SQL, No Database Required
November 9, 2026
yq — The YAML Processor You Already Know How to Use
October 19, 2026

hyperfine — Stop Guessing Which Command Is Faster, Measure It
October 12, 2026


Docker Dive — X-Ray Your Images and Kill the Waste
September 24, 2026