Windows Terminal - Split Panes
Learn how to split panes in Windows Terminal for efficient multitasking; shortcuts, configuration tips, and workflow examples.

This article is part of the Windows Terminal series:
- Windows Terminal
- Use a background image in your Windows Terminal console
- Windows Terminal - Split Panes
- Windows Terminal - Adding a SSH profile

This article demonstrates how to configure Windows Terminal for efficient multitasking using split panes. It details two methods: hardcoding command lines within new profiles or reusing existing, potentially hidden, profiles to build complex workspace layouts. The guide also covers useful keyboard shortcuts, pane zooming, and broadcasting input to multiple panes simultaneously.
In this article, we'll show how to create a Windows Terminal profile with three (or more) split panes so you can monitor multiple consoles at the same time.
I often need this when working on a large project composed of several repositories: a backend application, a consumer application, a shared library, and a proof-of-concept that ties them all together. Instead of opening separate terminal windows, I prefer a single window with split panes.
This also lets me run the same command in all panes (for example, to run tests), monitor logs, or push changes to Git—all from one window.
And when I need to focus on one pane, I can zoom in on it and hide the others temporarily.
We'll use Windows Terminal. It ships with Windows 10 and later and is the default terminal for Windows. If you don't have it, you can download it here: Windows Terminal on Microsoft Store. If you're not yet familiar with profiles and settings.json, my Windows Terminal introduction is a good starting point.
Two other profile tricks worth combining with panes: Windows Terminal - Adding a SSH profile, so one of your panes opens straight on a remote server, and Use a background image in your Windows Terminal console to tell your panes apart at a glance.
There are two approaches:
- We can "hardcode" the command line.
- We can reuse existing profiles.
Let's see both.
Open Windows Terminal Settings
The first step is to open the Windows Terminal settings. You can use one of these methods:
- Click the
+button to open a new tab, then select Settings from the dropdown menu. - Press
Ctrl + ,in Windows Terminal. - Right-click the title bar and select Settings.
- Run
wt -pfrom PowerShell or CMD.

In the bottom-left corner, click Open JSON file. This will open the settings.json file in your default editor (for example, VS Code).

Create a new profile and hardcode the command line
Inside settings.json, add a new profile object to the profiles.list array.
Copy and paste the code below as a new entry in the list array, adjusting it to your needs (profile name, icon, command line, etc.).
{
    "name": "My complex project - Workspace",
    "icon": "🐍",
    "commandline": "wt.exe nt -p \"Ubuntu 24.04\" wsl.exe -d Ubuntu-24.04 --cd ~/repositories/project_1 ; sp -H -p \"Ubuntu 24.04\" wsl.exe -d Ubuntu-24.04 --cd ~/repositories/project_2 ; sp -V -p \"Ubuntu 24.04\" wsl.exe -d Ubuntu-24.04 --cd ~/repositories/project_3",
    "hidden": false
},
-p 'Ubuntu 24.04'
In the suggested command line above, I've used -p "Ubuntu 24.04" because that is the name of an existing profile in my Windows Terminal. You will likely use something else.
This will create a new profile named My complex project - Workspace with three split panes, each running a different WSL Ubuntu instance in a specific directory (project_1, project_2, project_3).
Go back to Windows Terminal, display the list of profiles, and you will see the new one. Click it to start.
Due to the use of the `wt.exe nt` command, Windows Terminal will open a new window with the specified layout.
The first pane will be the main one, and the other two will be split horizontally and vertically, as illustrated below.

If you need four panes, you can add another sp command in the commandline property.
{
  "name": "My complex project - Workspace",
  "icon": "🐍",
  "commandline": "wt.exe nt -p \"Ubuntu 24.04\" wsl.exe -d Ubuntu-24.04 --cd ~/repositories/project_1 ; sp -H -p \"Ubuntu 24.04\" wsl.exe -d Ubuntu-24.04 --cd ~/repositories/project_2 ; sp -V -p \"Ubuntu 24.04\" wsl.exe -d Ubuntu-24.04 --cd ~/repositories/project_3 ; sp -V -p \"Ubuntu 24.04\" wsl.exe -d Ubuntu-24.04 --cd ~/repositories/project_4",
  "hidden": false
}

Or, if you want a layout with the screen divided into four quadrants (two on top and two at the bottom), you can use this command line:
{
  "name": "My complex project - Workspace",
  "icon": "🐍",
  "commandline": "wt.exe nt -p \"Ubuntu 24.04\" wsl.exe -d Ubuntu-24.04 --cd ~/repositories/project_1 ; sp -H -p \"Ubuntu 24.04\" wsl.exe -d Ubuntu-24.04 --cd ~/repositories/project_3 ; sp -V -p \"Ubuntu 24.04\" wsl.exe -d Ubuntu-24.04 --cd ~/repositories/project_4 ; mf up ; sp -V -p \"Ubuntu 24.04\" wsl.exe -d Ubuntu-24.04 --cd ~/repositories/project_2",
  "hidden": false
}

If you prefer a vertical layout:
 {
    "name": "My complex project - Workspace",
    "icon": "🐍",
    "commandline": "wt.exe nt -p \"Ubuntu 24.04\" wsl.exe -d Ubuntu-24.04 --cd ~/repositories/project_1 ; sp -V -p \"Ubuntu 24.04\" wsl.exe -d Ubuntu-24.04 --cd ~/repositories/project_2 ; mf left ; sp -H -p \"Ubuntu 24.04\" wsl.exe -d Ubuntu-24.04 --cd ~/repositories/project_3 ; mf right ; sp -H -p \"Ubuntu 24.04\" wsl.exe -d Ubuntu-24.04 --cd ~/repositories/project_4",
    "hidden": false
},

There are many ways to create layouts—see the full wt command reference here: Windows Terminal Command Line Arguments.
Create a workspace profile and reuse existing profiles
As you can see, using a hard-coded command line quickly becomes complex to maintain.
We can do better by reusing existing profiles.
In the example below, I'm creating six profiles, one for each subproject. In each profile, I'm setting the working directory (see the commandline attribute) and a specific background (image, opacity, and stretch mode — see Use a background image in your Windows Terminal console if you want more details on these properties). Then, I will set the hidden attribute to true so the profile will not be displayed in the list of profiles.
{
    "name": "Core API",
    "commandline": "wsl.exe -d Ubuntu-24.04 --cd ~/repositories/core-api",
    "tabTitle": "Core API",
    "hidden": true,
    "backgroundImage": "c:/Users/Christophe/backgrounds/core_api.jpg",
    "backgroundImageOpacity": 1,
    "backgroundImageStretchMode": "fill",
    "guid": "{ab98421f-2e2e-4ae0-9065-5385ee28c930}"
},
{
    "name": "Facade",
    "commandline": "wsl.exe -d Ubuntu-24.04 --cd ~/repositories/facade",
    "hidden": true,
    "tabTitle": "Facade",
    "backgroundImage": "c:/Users/Christophe/backgrounds/facade.jpg",
    "backgroundImageOpacity": 1,
    "backgroundImageStretchMode": "fill",
    "guid": "{c2f1edf0-a7c6-427e-bc29-f74549363ec7}"
},
{
    "name": "POC Facade",
    "commandline": "wsl.exe -d Ubuntu-24.04 --cd ~/repositories/poc-facade",
    "tabTitle": "POC Facade",
    "hidden": true,
    "backgroundImage": "c:/Users/Christophe/backgrounds/poc_facade.jpg",
    "backgroundImageOpacity": 1,
    "backgroundImageStretchMode": "fill",
    "guid": "{1b82632f-68a2-4611-b03e-ff0d0ff2ff08}"
},
{
    "name": "Shared Lib",
    "commandline": "wsl.exe -d Ubuntu-24.04 --cd ~/repositories/shared",
    "tabTitle": "Shared Lib",
    "hidden": true,
    "backgroundImage": "c:/Users/Christophe/backgrounds/shared_lib.jpg",
    "backgroundImageOpacity": 1,
    "backgroundImageStretchMode": "fill",
    "guid": "{71b426b6-6404-4e12-a549-4546f59683e7}"
},
{
    "name": "API Runtime",
    "commandline": "wsl.exe -d Ubuntu-24.04 --cd ~/repositories/api-runtime",
    "tabTitle": "API Runtime",
    "hidden": true,
    "backgroundImage": "c:/Users/Christophe/backgrounds/api_runtime.jpg",
    "backgroundImageOpacity": 1,
    "backgroundImageStretchMode": "fill",
    "guid": "{c2a595be-9ae2-4038-9f59-a3d4e60eeb4c}"
},
{
    "name": "POC Databases",
    "commandline": "wsl.exe -d Ubuntu-24.04 --cd ~/repositories/poc-databases",
    "tabTitle": "POC Databases",
    "hidden": true,
    "backgroundImage": "c:/Users/Christophe/backgrounds/poc_databases.jpg",
    "backgroundImageOpacity": 1,
    "backgroundImageStretchMode": "fill",
    "guid": "{3b64affc-5130-441c-9653-1e25d78f3209}"
},
GUID is no longer needed in newer versions of Windows Terminal
In the code above, I've used a legacy one for illustration. I've kept the guid attribute because older versions of Windows Terminal require it.
If you have a recent version, you can drop the guid line; it is no longer required.
If you need to specify that attribute and are wondering How can I generate a GUID string?, there is a Linux command for that. Simply type uuidgen in your console. Each time you run it, you will get a new, valid GUID.
Okay, that was to define profiles I will reuse in my workspace.
Now, add this final profile:
{
    "name": "My complex project - Workspace",
    "icon": "🐍",
    "commandline": "wt.exe nt -p \"Core API\" ; sp -H -p \"Shared Lib\" ; sp -V -p \"API Runtime\" ; sp -V -p \"POC Databases\" ; mf up ; sp -V -p \"Facade\" ; sp -V -p \"POC Facade\"",
    "guid": "{521ac4e0-056d-460c-b2b4-69dd727c8836}"
},
If you save this file and go back to Windows Terminal, clicking the + button will display the list of profiles:

By clicking on it, you will now have a new terminal with 6 different panes, each clearly identified by its background image:

Bonus
Toggle zoom for a pane
This one is my favorite. You can zoom in and out of a pane by pressing Ctrl + Shift + P and then selecting Toggle pane zoom. Repeat the action to restore the view.
This is very useful when you want to focus on a specific pane without closing the others.
Keyboard shortcuts to manage panes
Here is a list of useful keyboard shortcuts to manage panes in Windows Terminal:
`+` and `-` refer to the keys on the main keyboard, not the numeric keypad.
Pane shortcuts
- Alt + Shift + + — Split the current pane vertically.
- Alt + Shift + - — Split the current pane horizontally.
- Alt + Shift + arrow keys — Increase or decrease the size of the current pane in the direction of the arrow key.
- Ctrl + Shift + W — Close the current pane.
Control panel actions
You can broadcast input to all panes by toggling the Toggle broadcast input to all panes option from the Command Palette menu (which you can open by pressing Ctrl + Shift + P).
So, toggle this option, and you will see the cursor change to indicate that broadcasting is active. Now, whatever you type in one pane will be sent to all panes.
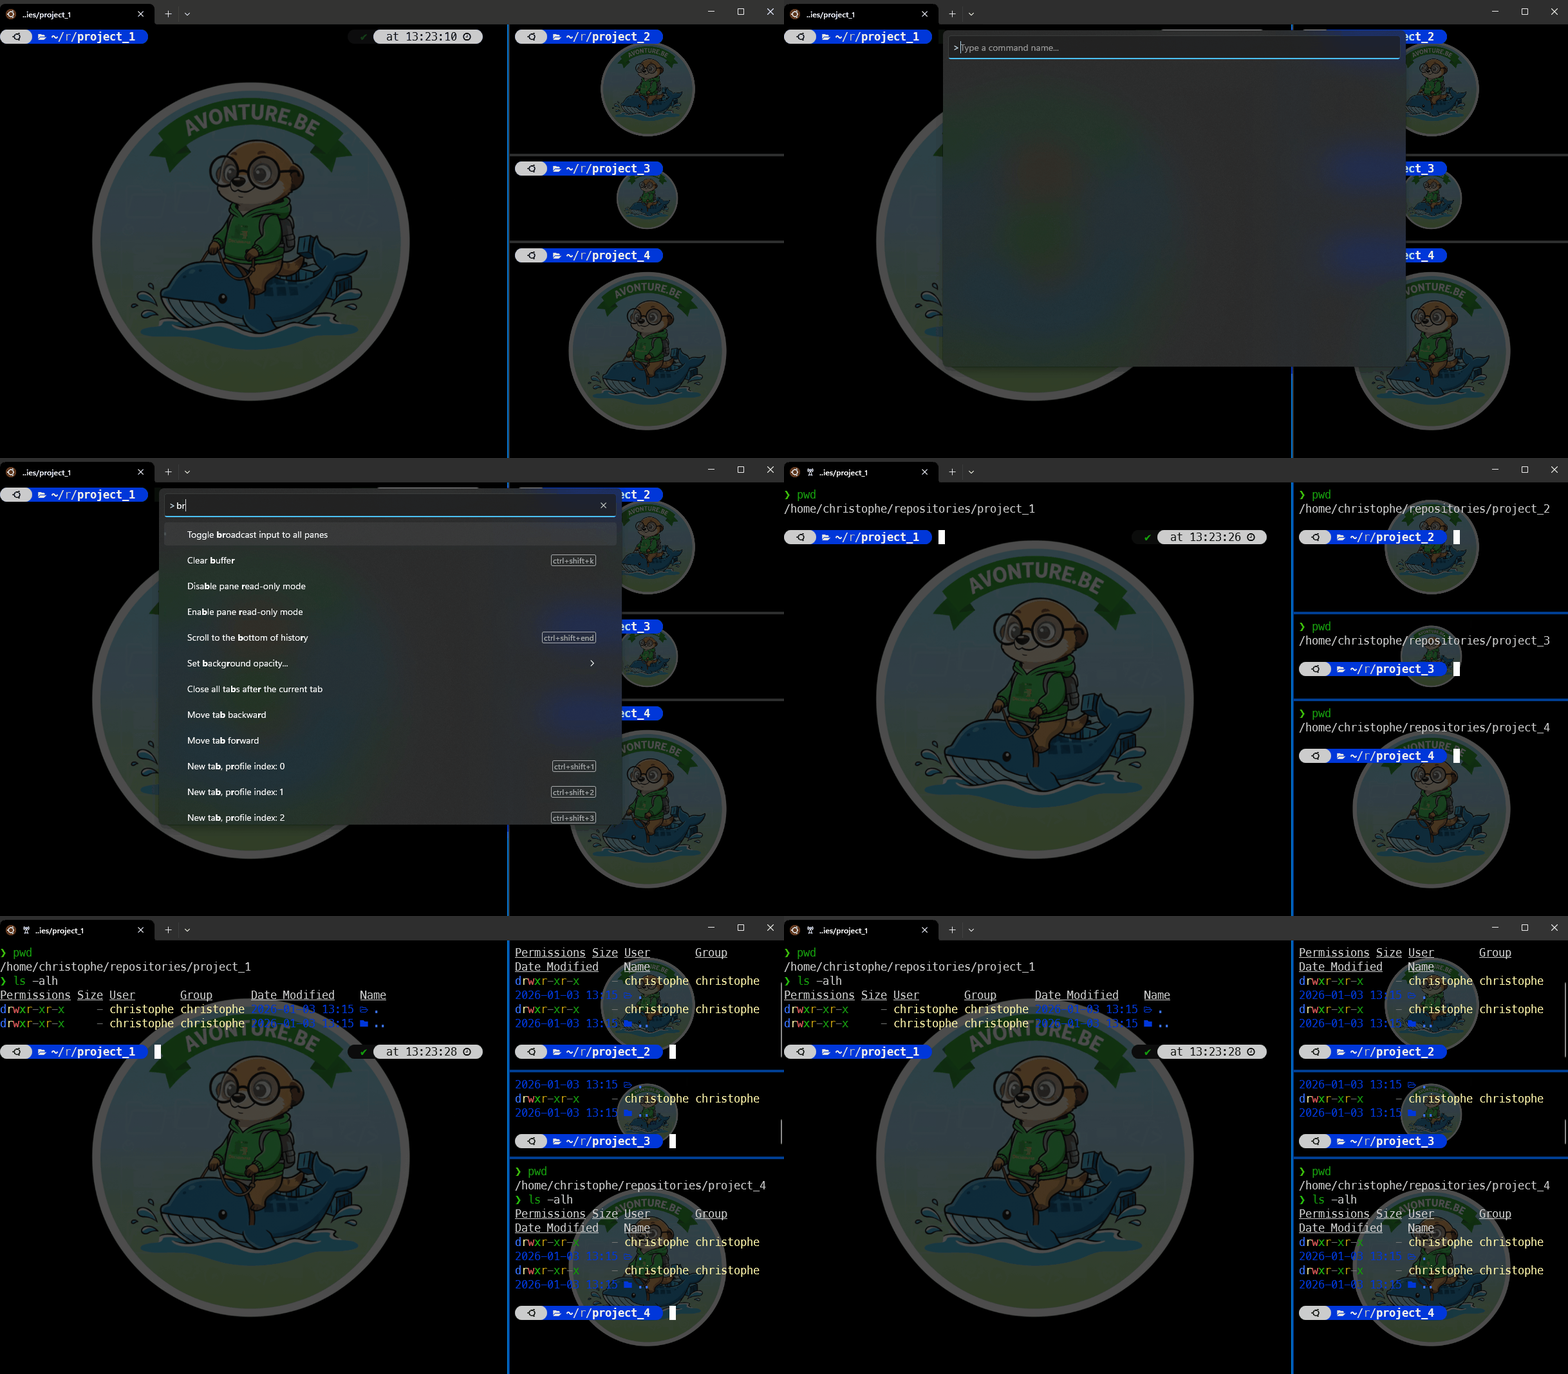
Toggle the option again to disable broadcasting.
For example, you can clear the screen in all panes at once by typing clear, or you could push your changes to Git in all repositories by typing git add . && git commit -m 'wip' && git push just once.
This article is part of the Windows Terminal series:
- Windows Terminal
- Use a background image in your Windows Terminal console
- Windows Terminal - Split Panes
- Windows Terminal - Adding a SSH profile
Loading comments…
Related posts

Windows Terminal - Adding a SSH profile
January 19, 2026

Use a background image in your Windows Terminal console
April 24, 2025

Windows Terminal
April 1, 2024