Exterminate them all, fight spam directly at your host company
Stop email spam at the source! Discover how to use cPanel's SpamAssassin to blacklist and whitelist domains, including an advanced method for directly editing the user_prefs file via FTP.

This article is over a year old but was reviewed on July 30, 2026 — the content is still accurate.

This article shows how to fight spam at the source using cPanel's SpamAssassin: defining blacklist and whitelist domain patterns through the web interface, or editing the .spamassassin/user_prefs file directly over FTP to manage blacklist_from/whitelist_from rules in bulk, sorted and deduplicated.
If your web host company offers you cPanel access, you will find a tool called SpamAssassin there.
There, you have two main options: the Spam filter and a White list.
Using the first one, you can define email patterns like *@hair.com which means: immediately kill those emails on the server. The second one is just the opposite, f.i. *@my-own-company.com saying that you trust that domain.
PlanetHoster - N0C
If you're hosted by PlanetHoster on the N0C infrastructure, please read Exterminate them all, fight spam directly at PlanetHoster - N0C instead.
My personal use case: even if I don't like shortcuts on my desktop, I do have one for https://(my_host_company)/xxxxx/mail/spam/index.html#/blacklist i.e. direct access to the page where I can add my spam filters. And it works quite well.
Clicking through a web interface doesn't scale, though. Exterminate them all, kill spam using GitHub Actions generates the rules from a JSON list and deploys them automatically.
But, did you know there is another way to do this?
Using your FTP client, go to your user's home directory. If your host has SpamAssassin enabled, you'll see a folder called .spamassassin and, in that folder, a file called user_prefs. Open that file.
That file can look like this:
blacklist_from *.hrblacklist_from *.restblacklist_from *.rublacklist_from *.su
blacklist_from *@hair.com
whitelist_from *@avonture.bewhitelist_from *@my-own-company.comThis configuration file sets up email filtering rules by blocking entire country-code domains and a specific company domain, then explicitly allows emails from two trusted company domains. It's a allowlist/blocklist setup where the blocklist rules are applied first to reject spam, and whitelist rules create exceptions for trusted senders.
As you can expect, you'll find two rules: blacklist_from and whitelist_from with the pattern you've filled in the SpamAssassin web interface of your hosting company:
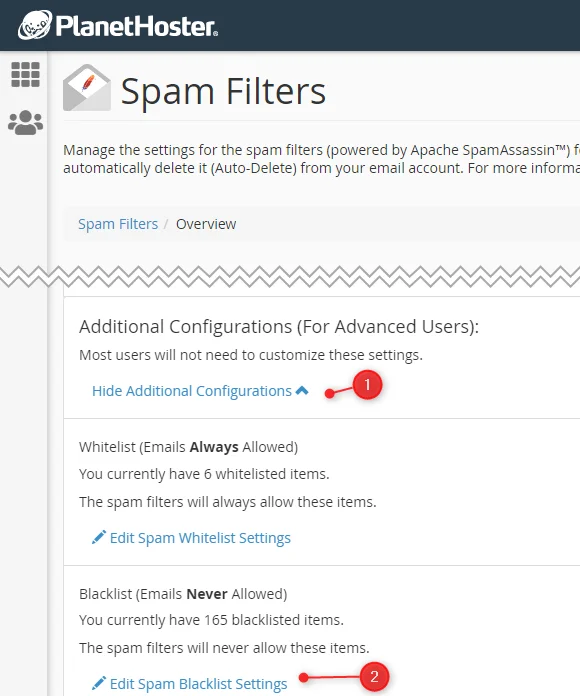
Spam Filters location
You can manipulate entries one by one using the web interface too. Go to your cPanel, search for Spam Filters and click on Additional Configurations (For Advanced Users).
You can now manipulate the list with f.i. VSCode and sort it alphabetically, simplify rules, remove duplicated entries (after refactoring), ...
I really like fighting against spam directly at my host company because, otherwise, I get spam on all my machines (my different computers and my smartphone) and, on my smartphone, when I click on This is spam, I only ever teach my smartphone to delete this email, not my other machines... And I only identify that sender (like <buy-it@hair.com>); I'll continue to get spam from any other email account like really-but-it@hair.com.
The fight doesn't stop there — next up, fighting spam directly at PlanetHoster - N0C.
Related posts

Open WebUI — Beyond the Chat: Models, RAG, Tools and API Keys
October 26, 2026

AnythingLLM: Chat With All Your Scattered Documentation
August 17, 2026

SSH Remote development with VSCode
January 5, 2026

How to connect to your hosting server using SSH
December 29, 2025

Self-hosted note-taking application
July 29, 2025
karakeep - The Bookmark Everything App
July 18, 2025